
If you are looking for a dessert that perfectly captures the fun, festive spirit of St. Patrick’s Day, look no further than this delightful St. Patrick’s Day Brownie Trifle (Quick, Green & Chocolatey!) Recipe. Combining rich, fudgy brownies with vibrant green pudding and cool, fluffy whipped topping, this layered treat is as impressive to look at as it is irresistible to eat. Whether you’re hosting a party or just want to add some magic to your holiday dessert table, this recipe is a surefire way to bring smiles and satisfy chocolate cravings all at once.
Ingredients You’ll Need
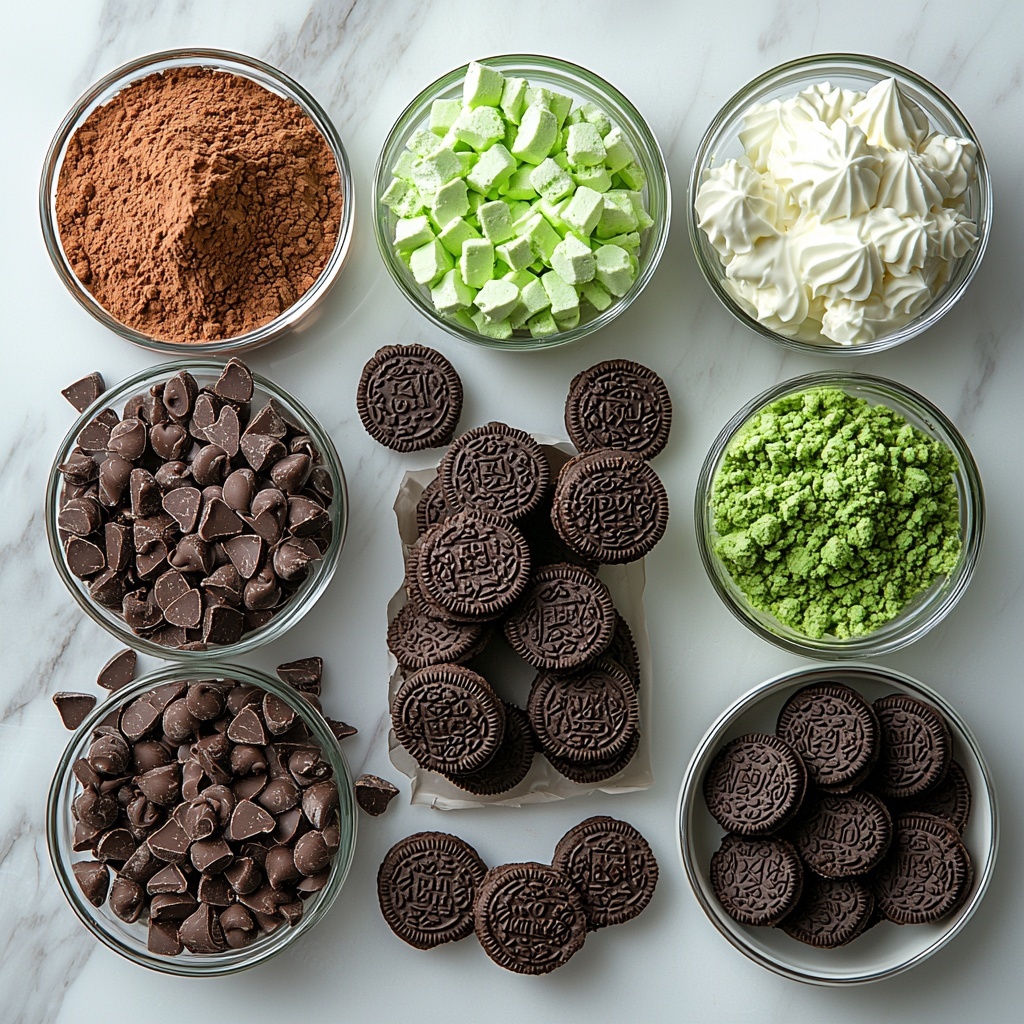
Gathering these simple but essential ingredients will set you up for a trifle that bursts with flavor, color, and texture. Each component plays a special role in making this dessert both visually stunning and deliciously indulgent.
- 1 box Brownie Mix: The foundation of this dessert, providing rich and fudgy cake-like layers that make every bite heavenly.
- 3.5 oz Instant Vanilla Pudding Mix: Adds creamy, smooth texture and a mild sweetness that pairs perfectly with chocolate.
- 8 oz Cool Whip: Light and airy, this topping balances the deeper flavors and adds softness to every spoonful.
- Green Food Coloring: Brings a festive St. Patrick’s Day vibe with vibrant green pudding that catches the eye.
- Mint Oreos, crushed: Provides a refreshing minty crunch and festive decoration to top off your trifle beautifully.
How to Make St. Patrick’s Day Brownie Trifle (Quick, Green & Chocolatey!) Recipe
Step 1: Bake the Brownies
Start by preparing the brownies according to the package directions for an 8×8 pan. Once baked, allow them to cool completely—this is an important step so that your pudding and whipped layers stay intact and your trifle has the perfect texture.
Step 2: Prepare the Green Vanilla Pudding
Mix the instant vanilla pudding as instructed on the box, then stir in green food coloring a little at a time until you reach a bright, festive shade of green. This pudding layer brings a creamy contrast and the iconic green hue to your trifle.
Step 3: Crush the Mint Oreos
Place a handful of Mint Oreos into a Ziploc bag, seal tightly, and crush them with a rolling pin or the palm of your hand. These will add that refreshing mint flavor and a delightful crunchy texture on top.
Step 4: Assemble the Trifle Layers
Begin by layering the cut-up brownies into your trifle bowl or individual glasses. Next, spoon on a layer of the green pudding, followed by a generous dollop of Cool Whip. The interplay between each layer creates a symphony of flavor in every bite.
Step 5: Repeat Layers
Go ahead and repeat the brownie, pudding, and Cool Whip layers once more to build a beautifully tall and decadent dessert that will impress your guests.
Step 6: Add the Mint Oreo Topping
Finish by sprinkling the crushed Mint Oreos on top. This final touch not only lends color and texture but also gives that burst of minty freshness that celebrates the holiday perfectly.
Step 7: Chill Before Serving
Refrigerate your assembled trifle for at least a couple of hours, or ideally overnight, to allow the layers to set and the flavors to meld together wonderfully before serving.
How to Serve St. Patrick’s Day Brownie Trifle (Quick, Green & Chocolatey!) Recipe
Garnishes
Beyond the crushed Mint Oreos, you can add chocolate shavings, fresh mint leaves, or even a drizzle of chocolate syrup on top to elevate the look and taste. These garnishes add extra layers of flavor and a festive flair.
Side Dishes
This trifle is a showstopper dessert and pairs beautifully with a simple cup of black coffee, a mint-infused latte, or even a light fruit salad to balance the richness of the chocolate and pudding layers.
Creative Ways to Present
Try individual clear mini trifle cups for a charming, portion-controlled presentation that guests will love. Or layer the ingredients in a large glass bowl so everyone gets a peek at those gorgeous green and chocolate layers before digging in.
Make Ahead and Storage
Storing Leftovers
Store any leftover St. Patrick’s Day Brownie Trifle (Quick, Green & Chocolatey!) Recipe in an airtight container in the refrigerator. It will stay fresh for up to 3 days, making it a perfect make-ahead option for celebrations.
Freezing
While this trifle is best enjoyed fresh, you can freeze the brownie component separately before assembling the trifle. Freeze brownies wrapped tightly for up to one month, then thaw fully before layering with pudding and whipped topping.
Reheating
This dessert is designed to be served chilled, so reheating is not recommended. However, if you’d like a warm brownie treat later on, just heat leftover brownies by themselves and enjoy with a scoop of ice cream.
FAQs
Can I use homemade brownies instead of a boxed mix?
Absolutely! Homemade brownies bring a special touch and lots of love to this recipe. Just be sure they are fully cooled before assembling your trifle layers.
Is it possible to make this recipe dairy-free?
Yes, you can substitute dairy-free pudding mixes and whipped toppings available at most grocery stores for a dairy-free version without compromising flavor.
How long should the trifle chill before serving?
For the best texture and flavor, chill the trifle for at least 2 hours but overnight is ideal to let all the layers meld beautifully.
Can I prepare this trifle in advance for a party?
Definitely! This St. Patrick’s Day Brownie Trifle (Quick, Green & Chocolatey!) Recipe is perfect for making ahead of time. Assemble it the night before and keep refrigerated until serving.
What if I don’t have green food coloring?
You can leave out the green coloring for a classic vanilla pudding layer or try natural alternatives like matcha powder for a subtle green tint and unique flavor.
Final Thoughts
This St. Patrick’s Day Brownie Trifle (Quick, Green & Chocolatey!) Recipe is a joyous celebration in every spoonful. It’s quick to whip up, beautifully festive, and incredibly satisfying for anyone who loves chocolate and mint. I wholeheartedly encourage you to try it out for your next St. Patrick’s Day gathering – it’s sure to become a new holiday favorite!
Print
St. Patrick’s Day Brownie Trifle (Quick, Green & Chocolatey!) Recipe
- Prep Time: 15 minutes
- Cook Time: 15 minutes
- Total Time: 30 minutes
- Yield: 12 servings
- Category: Dessert
- Method: No-Cook
- Cuisine: American
Description
Celebrate St. Patrick’s Day with this festive and delicious Brownie Trifle featuring rich chocolate brownies, vibrant green vanilla pudding, and creamy Cool Whip, topped with crunchy crushed Mint Oreos. This quick and easy no-bake trifle is perfect for gatherings and brings a fun, colorful twist to your holiday dessert table.
Ingredients
Brownie Base
- 1 box Brownie Mix (plus ingredients listed on the box for an 8×8 pan)
Pudding Layer
- 3.5 oz Instant Vanilla Pudding Mix (use large box for full-size trifle)
- Green Food Coloring (enough to achieve desired shade)
Other Ingredients
- 8 oz Cool Whip
- Mint Oreos, crushed
Instructions
- Cook the brownies: Prepare the brownies according to the package directions for an 8×8 pan. Once baked, allow them to cool completely to prevent melting the pudding or Cool Whip when assembling the trifle.
- Make the pudding: Prepare the instant vanilla pudding according to the package instructions. After it’s mixed, add green food coloring gradually until you reach your desired vibrant green shade, perfect for the St. Patrick’s Day theme.
- Crush the Oreos: Place a few Mint Oreos into a sealed Ziploc bag. Use a rolling pin or your hands to crush the cookies into small chunks for a crunchy topping and textured layer in the trifle.
- Assemble the trifle – first layer: Start by layering cut-up brownie pieces at the bottom of your trifle dish. Follow with a layer of the green vanilla pudding, then spread a layer of Cool Whip evenly over the pudding.
- Assemble the trifle – second layer: Repeat the layering process by adding another layer of brownie pieces, then pudding, and finally Cool Whip, creating a beautiful and tasty stacked dessert.
- Add the topping: Sprinkle the crushed Mint Oreos generously on top of the final Cool Whip layer to add a refreshing minty crunch and decorative flair.
- Chill to serve: Place the assembled trifle in the refrigerator and chill until ready to serve, allowing the flavors to meld and the dessert to set perfectly.
Notes
- Ensure brownies are completely cooled before assembling to avoid melting the pudding or Cool Whip.
- Use green food coloring sparingly to get the perfect festive green color without overpowering the taste.
- For a gluten-free version, use gluten-free brownie mix and gluten-free Mint Oreos if available.
- Assemble the trifle a few hours ahead for best flavor, but can be made up to a day in advance.
- Can be served in individual cups for portion control and easy serving.


