
“`html
There’s something incredibly festive and fun about whippping up a batch of these delightful treats, which is exactly why the Grinch Oreo Balls Recipe has stolen my heart. Imagine the crisp crunch of Oreo cookies crushed to perfection, blended with rich, creamy cream cheese, then dipped into vibrant green candy melts that capture the holiday spirit in every bite. Topped with adorable little red heart sprinkles, these bite-sized gems are the perfect blend of sweet, smooth, and a little bit of whimsy that will enchant kids and adults alike. If you’re looking to bring a playful twist to your dessert table, this Grinch Oreo Balls Recipe is your ultimate go-to.
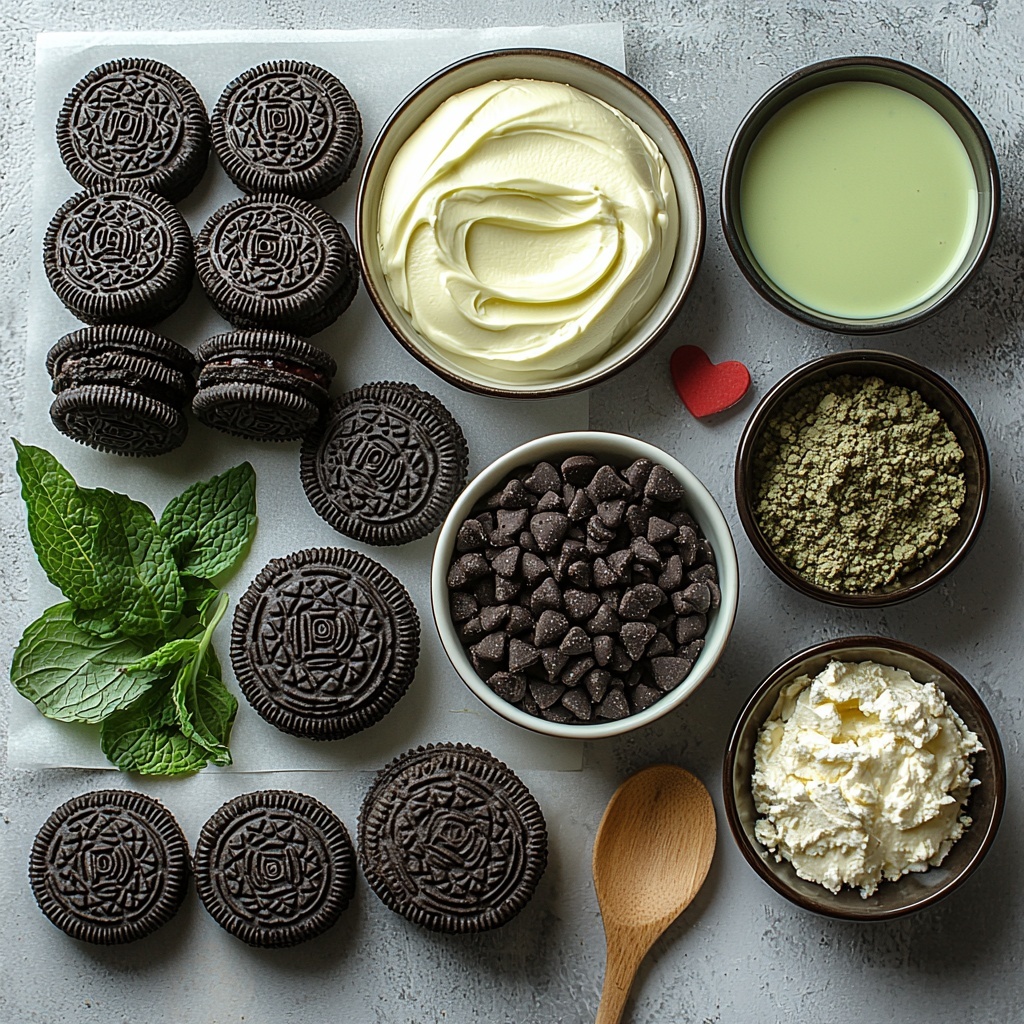
Ingredients You’ll Need
Keeping it simple is the secret here. Each ingredient plays an essential role, whether it’s lending that signature Oreo flavor, creamy texture, festive green color, or just a pop of adorable detail that makes these treats unforgettable.
- 36 Oreo cookies (14 ounce package): The base of our recipe, giving that classic chocolatey crunch and sweetness.
- 8 ounces cream cheese (room temperature): Smooth and creamy, it perfectly binds the Oreo crumbs together for a luscious filling.
- 12 ounces light green candy melts: This gives the balls their iconic Grinchy color and a silky, glossy coating.
- Red heart sprinkles: Tiny pops of color and extra festive charm to finish off each bite.
How to Make Grinch Oreo Balls Recipe
Step 1: Crush the Oreos to Fine Crumbs
Start by placing your Oreo cookies into the bowl of a food processor and pulse them until they become fine, sandy crumbs. This step is crucial because you want a smooth texture that blends beautifully with the cream cheese, rather than chunky pieces.
Step 2: Blend Cream Cheese and Oreo Crumbs
In a large bowl, beat the cream cheese with a hand or stand mixer until it’s rich and creamy, without lumps. Gradually add the Oreo crumbs in batches, mixing well after each addition until you have a homogeneous mixture that’s easy to shape but holds together nicely.
Step 3: Prepare Your Baking Sheet
Line a baking sheet with parchment or wax paper. This will provide a non-stick surface that’s perfect for laying out the formed balls and allows easy transfer to the fridge or freezer for chilling.
Step 4: Shape the Mixture into Balls
Using your hands or a small cookie scoop, roll the Oreo mixture into approximately 1-inch round balls. Place each one carefully on the prepared baking sheet, keeping them spaced just enough so they won’t stick together after coating.
Step 5: Chill Before Coating
Pop the baking sheet into the refrigerator for 30 minutes to firm up the balls, or freeze for 15 minutes if you’re short on time. This helps the balls hold their shape when dipped in the candy coating.
Step 6: Melt the Candy Coating
Place the green candy melts in a microwave-safe bowl and heat in 30-second increments, stirring gently after each interval. Continue until the coating is smooth and completely melted, perfect for dipping.
Step 7: Dip the Oreo Balls into the Candy Coating
Remove a few Oreo balls from the fridge at a time and dip each ball individually into the melted candy. For the easiest handling, use a toothpick to pierce a ball and gently roll it around in the candy until fully coated. Make sure to tap off any excess coating to keep things neat before placing it back onto the lined sheet.
Step 8: Add Festive Red Heart Sprinkles
While the candy coating is still wet, quickly decorate each dipped ball with a red heart sprinkle. This detail not only adds a splash of contrasting color but also ties in the holiday magic of the Grinch theme.
Step 9: Chill to Set
Once all the balls are coated and decorated, return them to the refrigerator for about 30 minutes. This way, the candy shell will harden to a nice, firm finish, making them easy to handle and irresistible to bite into.
Step 10: Store Properly
After the chocolate sets, place your Grinch Oreo Balls in an airtight container and store them in the refrigerator. They keep beautifully fresh for up to two weeks, perfect for making ahead of your holiday celebrations.
How to Serve Grinch Oreo Balls Recipe
Garnishes
Besides the red heart sprinkles, consider adding a sprinkle of edible gold dust or tiny green sugar crystals right before the coating sets for an extra sparkle. Fresh mint leaves or a dusting of powdered sugar on the serving tray can also enhance the festive vibe beautifully.
Side Dishes
Although these Oreo balls can shine all on their own, pairing them with a cup of hot cocoa, peppermint tea, or a rich eggnog really elevates the experience. They also complement holiday cookie platters wonderfully, adding variety and a pop of color.
Creative Ways to Present
Serve these adorable Grinch Oreo Balls on a tiered dessert stand for a striking centerpiece. You can also individually wrap them in clear cellophane with festive ribbons for gift-giving or party favors. Little green mini cupcake liners make for a cute, easy-to-grab option at any holiday gathering.
Make Ahead and Storage
Storing Leftovers
Keep leftover Grinch Oreo Balls in an airtight container in the refrigerator to maintain freshness and prevent the candy coating from sweating. This simple storage will keep them deliciously fresh for up to two weeks, making them perfect for preparing in advance.
Freezing
If you want to make a big batch ahead of time, freezing is a smart move. Place them in a single layer on a baking sheet to freeze individually before transferring to a sealed freezer bag. They can last up to three months when frozen and thaw quickly in the fridge before serving.
Reheating
As these are delicious cold treats, reheating isn’t necessary. If you want to soften the candy coating slightly, just let them sit at room temperature for 10 to 15 minutes. Avoid microwaving to preserve texture and prevent melting the coating.
FAQs
Can I use other cookies besides Oreos for this recipe?
Absolutely! While Oreos are classic and provide great chocolate flavor, you can experiment with other sandwich cookies or even crushed chocolate chip cookies for a different twist. Just be sure they’re finely crushed for the best texture.
What if I don’t have a food processor to crush the Oreos?
No worries at all—you can place the cookies in a zip-top bag and crush them with a rolling pin or the bottom of a heavy pan until they become fine crumbs. It might take a little elbow grease but works perfectly fine!
Why do I need to chill the balls before dipping them?
Chilling is essential because it firms up the creamy mixture, making the balls sturdier and less likely to break apart or melt when dipped into the warm candy coating.
Can I use regular chocolate instead of candy melts?
You can, but candy melts are formulated to melt smoothly and harden with a beautiful glossy finish. Using regular chocolate requires tempering and may produce a different texture or shine. If you want green coloring, candy melts are definitely easier.
Are these suitable for parties with children?
Yes! They’re bite-sized, sweet but not overwhelming, and decorated with playful red heart sprinkles that kids love. Just be mindful of any allergies to dairy or gluten in your group.
Final Thoughts
I can’t recommend this Grinch Oreo Balls Recipe enough if you’re looking for a festive, fun, and utterly delicious holiday treat to share. It’s simple, shows off your creative flair, and brings smiles every single time. So gather your ingredients, roll up your sleeves, and dive into the joyful process—you’ll soon see why these are a beloved favorite year after year!
“`
Print
Grinch Oreo Balls Recipe
- Prep Time: 30 minutes
- Cook Time: 0 minutes
- Total Time: 30 minutes
- Yield: 38 Oreo balls
- Category: Dessert
- Method: No-Cook
- Cuisine: American
- Diet: Vegetarian
Description
Delightfully festive Grinch Oreo Balls perfect for holiday celebrations. These no-bake treats combine crushed Oreo cookies and creamy cream cheese, coated in vibrant green candy melts and decorated with red heart sprinkles for a fun, eye-catching dessert that’s easy to make and sure to impress.
Ingredients
Oreo Ball Base
- 36 Oreo cookies (14 ounce package)
- 8 ounces cream cheese, room temperature
Coating and Decoration
- 12 ounces light green candy melts
- Red heart sprinkles
Instructions
- Prepare Oreo Crumbs: Place Oreo cookies in the bowl of a food processor and pulse until you have fine crumbs. Set aside.
- Mix Cream Cheese and Oreo Crumbs: In a large bowl, beat cream cheese with a hand mixer or stand mixer until creamy and smooth. Gradually add Oreo crumbs in halves, mixing until fully incorporated into a uniform mixture.
- Prepare Baking Sheet: Line a baking sheet with parchment or wax paper, selecting one that fits your refrigerator or freezer.
- Form Oreo Balls: Using your hands or a small cookie scoop, roll the Oreo mixture into approximately 1-inch balls and place them on the prepared baking sheet.
- Chill Oreo Balls: Refrigerate the Oreo balls for 30 minutes or freeze for 15 minutes to firm them up for coating.
- Melt Candy Coating: In a microwave-safe bowl, melt the light green candy melts by microwaving in 30-second increments, stirring in between until fully melted and smooth.
- Dip Oreo Balls: Remove a portion of the chilled Oreo balls from the refrigerator. Pierce each ball with a toothpick and gently dip and roll it in the melted candy coating. Tap gently to remove excess coating before placing back onto the lined baking sheet.
- Add Sprinkles: Remove the toothpick carefully and immediately decorate each ball with a red heart sprinkle while the candy coating is still wet.
- Set the Coating: Return the coated Oreo balls to the refrigerator and chill for 30 minutes until the candy coating is fully set.
- Storage: Store the finished Oreo balls in a tightly sealed container in the refrigerator for up to 2 weeks to maintain freshness.
Notes
- Use room temperature cream cheese for smooth mixing and better texture.
- For consistent sizing, use a small cookie scoop when forming balls.
- If candy melts are too thick, add a small amount of vegetable oil to thin them.
- Store in an airtight container in the refrigerator to keep them fresh longer.
- Be gentle when removing toothpicks to keep balls intact and maintain coating integrity.


