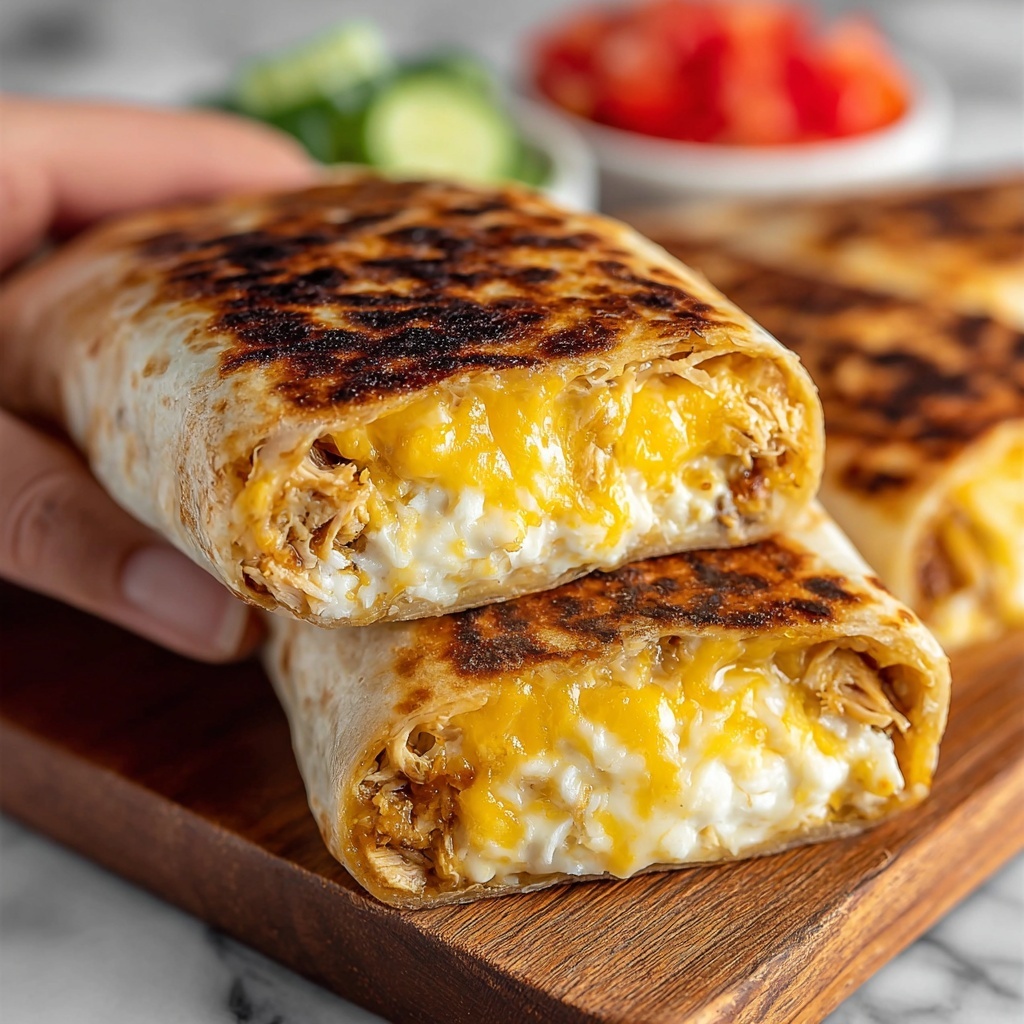
If you’ve been searching for a dish that feels like a cozy hug on a plate, let me introduce you to the sensational Cheesy Garlic Chicken Wraps Recipe. This delightful wrap masterfully combines tender, flavorful chicken with the irresistible richness of melted cheese and the zesty punch of garlic, all wrapped snugly in a warm tortilla. Whether you need a quick lunch or a satisfying dinner, these wraps are the perfect easy-to-make comfort food that will have you coming back for more without missing a beat.
Ingredients You’ll Need
These simple yet essential ingredients come together to create a harmonious balance of creaminess, spice, and texture. Each element plays its part in lifting the dish — from the juicy chicken and sharp cheese to the bite of garlic and that subtle kick of hot sauce.
- 2 large tortillas (regular or low-carb/high-protein): The perfect sturdy base to hold all the goodness without falling apart.
- 7 oz cooked chicken (about 200 grams, chopped): Rotisserie chicken works wonders here, providing tender, flavorful meat with minimal effort.
- 2 garlic cloves (minced or grated): Adds a fragrant, zesty depth that wakes up the palate.
- 2 tablespoons light mayonnaise: Creates a creamy texture that’s not too heavy, binding the ingredients together.
- 1 tablespoon light Greek yogurt (or plain yogurt): Offers subtle tanginess and lightens up the filling beautifully.
- 2 teaspoons hot sauce (like Frank’s): Brings a gentle heat to complement the creaminess perfectly.
- ¼ teaspoon salt: Balances and enhances all the flavors in the wrap.
- 3 oz grated cheese (about 90 grams, cheddar blend recommended): Melts into gooey pockets that make every bite comforting and delicious.
- 1 green onion (chopped): Adds a fresh, mild crunch and color contrast.
- Olive oil spray: Ensures the wrap crisps up beautifully on the pan without sticking.
How to Make Cheesy Garlic Chicken Wraps Recipe
Step 1: Prepare the Chicken Mixture
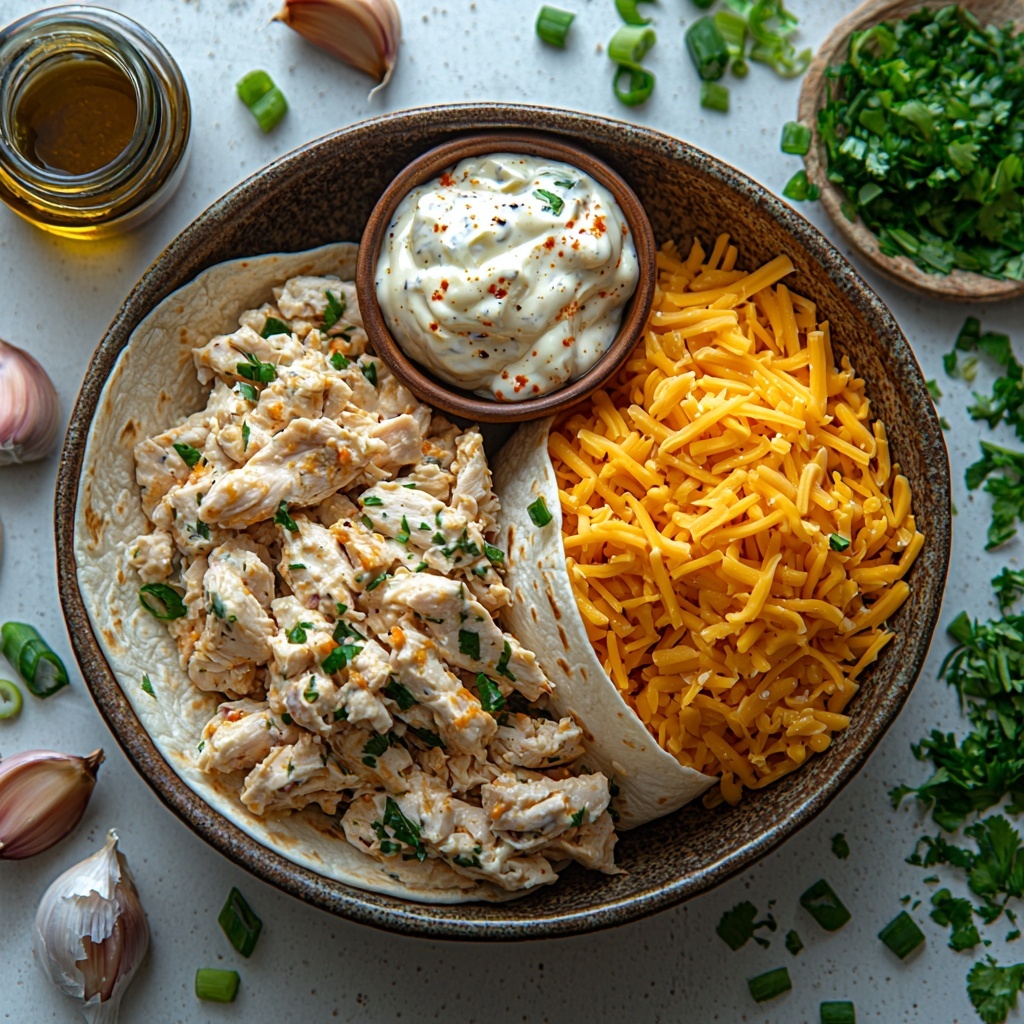
Start by combining your chopped cooked chicken, minced garlic, light mayonnaise, Greek yogurt, hot sauce, and salt in a bowl. Mix everything thoroughly until the chicken is well coated with this flavorful, creamy blend. This step is the base of your wrap’s incredible taste.
Step 2: Assemble the Wrap
Lay out one tortilla flat on your work surface. On the lower third of the tortilla, sprinkle about 2 tablespoons of grated cheese. Then, spoon on approximately two-thirds of a cup of the chicken mixture, spreading it evenly. Add another tablespoon of cheese on top, followed by a sprinkle of fresh chopped green onion for that appealing crunch and brightness.
Step 3: Roll Up the Wrap
Fold in the sides of the tortilla to keep the filling secure. Then, starting from the bottom, roll the tortilla tightly until it forms a neat cylinder. A well-rolled wrap is the key to a tidy, mess-free eating experience.
Step 4: Prepare to Cook
Heat a non-stick pan over medium-high heat. Lightly spray the pan with olive oil to prevent sticking and help achieve a golden, crispy exterior on your wraps.
Step 5: Cook the Wraps
Place each wrap seam-side down in the hot pan. Cook them for about 3 to 4 minutes on each side, or until they are beautifully crisp and golden brown. Covering the pan with a lid during cooking helps melt the cheese inside and ensures the filling heats through perfectly.
Step 6: Slice and Serve
Once cooked, remove the wraps from the pan and slice them in half on a diagonal. This not only looks inviting but also makes them easier to handle. Serve immediately while they’re warm and the cheese is wonderfully gooey.
How to Serve Cheesy Garlic Chicken Wraps Recipe
Garnishes
To elevate your wraps, consider topping with a small handful of fresh cilantro or parsley, adding a squeeze of lime juice for zest, or even a dollop of sour cream for extra creaminess. These garnishes add freshness and an additional layer of flavor, making your meal vibrant and unforgettable.
Side Dishes
These wraps pair beautifully with crunchy vegetable sticks like carrots and celery or a light side salad featuring mixed greens and a tangy vinaigrette. For a heartier meal, sweet potato fries or roasted potatoes create a lovely balance of textures and flavors.
Creative Ways to Present
If you’re hosting or want to impress, slice the wraps into bite-sized pinwheels and secure them with toothpicks—perfect for sharing! Alternatively, serve them wrapped in parchment paper with a sprinkle of extra cheese and herbs on top for a rustic, café-inspired touch.
Make Ahead and Storage
Storing Leftovers
If you have leftovers, wrap them tightly in plastic wrap or store in an airtight container in the refrigerator. They will stay fresh for up to 2 days, making for a convenient grab-and-go meal the next day.
Freezing
While freezing is possible, it’s best to freeze the chicken mixture separately rather than the fully assembled wrap to maintain texture. Store the mixture in a freezer-safe bag or container for up to 2 months. When ready, thaw overnight in the fridge before assembling and cooking.
Reheating
To reheat, place the wrap in a preheated skillet or oven to regain that golden crispness rather than using a microwave, which can make it soggy. Reheat for 3-4 minutes per side until warmed through and deliciously crispy again.
FAQs
Can I use raw chicken for this Cheesy Garlic Chicken Wraps Recipe?
This recipe calls for cooked chicken to keep things quick and easy. If you’re starting with raw chicken, cook it thoroughly first—grilled, roasted, or shredded rotisserie chicken works best.
What kind of cheese is best for these wraps?
A cheddar blend works wonderfully for its meltability and flavor, but you can also experiment with mozzarella, Monterey Jack, or even a spicy pepper jack for an extra kick.
How spicy is the wrap with just 2 teaspoons of hot sauce?
The amount of hot sauce gives it a mild to moderate heat level. You can adjust the quantity to your personal taste, or choose a milder or hotter sauce depending on your preference.
Can I make this recipe vegetarian?
Absolutely! Substitute the chicken with sautéed mushrooms, chickpeas, or your favorite plant-based protein for a tasty vegetarian twist on the Cheesy Garlic Chicken Wraps Recipe.
Is it possible to make these wraps gluten-free?
Yes. Simply use gluten-free tortillas instead of regular ones, and confirm that your hot sauce and other ingredients are certified gluten-free to enjoy this dish without worry.
Final Thoughts
Trust me when I say that this Cheesy Garlic Chicken Wraps Recipe is one you’ll keep coming back to whenever you want a fulfilling, flavorful meal that’s quick to prepare and utterly satisfying. The blend of creamy, spicy, and crispy textures feels like a celebration in each bite. I can’t wait for you to try it and make it your own little kitchen favorite!
Print
Cheesy Garlic Chicken Wraps Recipe
- Prep Time: 15 minutes
- Cook Time: 7 minutes
- Total Time: 22 minutes
- Yield: 2 servings
- Category: Lunch
- Method: Frying
- Cuisine: American
- Diet: Low Fat
Description
These Cheesy Garlic Chicken Wraps are a quick and flavorful meal perfect for lunch or a light dinner. Featuring tender cooked chicken blended with garlic, spicy hot sauce, and creamy mayonnaise and yogurt, all wrapped in a warm tortilla with melted cheddar cheese and fresh green onion. Pan-toasted until golden and crispy, they are comforting and delicious in every bite.
Ingredients
Wrap Filling
- 7 oz cooked chicken, chopped (about 200 grams, rotisserie recommended)
- 2 garlic cloves, minced or grated (adjust to taste)
- 2 tablespoons light mayonnaise
- 1 tablespoon light Greek yogurt or plain yogurt
- 2 teaspoons hot sauce (such as Frank’s)
- ¼ teaspoon salt
Wrap Assembly
- 2 large tortillas (regular or low-carb/high-protein)
- 3 oz grated cheese (about 90 grams, cheddar blend used)
- 1 green onion, chopped
Cooking
- Olive oil spray
Instructions
- Prepare the Chicken Mixture: In a bowl, combine the chopped cooked chicken with minced garlic, light mayonnaise, Greek yogurt, hot sauce, and salt. Mix thoroughly to create a creamy, flavorful filling.
- Assemble the Wrap: Lay out each tortilla flat. On the lower third, sprinkle about 2 tablespoons of grated cheese. Add approximately ⅔ cup of the chicken mixture on top of the cheese, then sprinkle another tablespoon of cheese and a handful of chopped green onion over the filling.
- Fold and Roll: Fold in the sides of the tortilla towards the center, then tightly roll it up starting from the bottom edge to enclose the filling securely.
- Heat the Pan: Preheat a non-stick skillet over medium-high heat and lightly spray the surface with olive oil to prevent sticking and add crispness.
- Cook the Wraps: Place the wraps seam-side down onto the heated pan. Cook each side for about 3 to 4 minutes until the tortillas turn golden brown and crispy. Covering the pan with a lid while cooking helps to evenly heat the inside and melt the cheese.
- Serve: Remove the wraps from the pan, slice each in half diagonally, and serve immediately while warm and melty.
Notes
- Using rotisserie chicken saves time and adds extra flavor.
- Adjust garlic and hot sauce quantities according to your taste preference.
- Light mayonnaise and yogurt make the filling creamy without excess fat.
- Covering the pan while cooking helps ensure the cheese melts thoroughly inside the wrap.
- For a lower-carb option, use high-protein or low-carb tortillas.
- Serve with a side salad or fresh veggies for a complete meal.


