
The Old-Style Chocolate Pie Recipe with Silky Custard and Optional Topping Recipe is a true celebration of classic comfort in dessert form. Imagine a luscious, velvety chocolate custard nestled in a perfectly crisp pie crust, delivering a nostalgic taste that warms the heart and delights the palate. Whether you’re a longtime pie enthusiast or discovering this treasure for the first time, this recipe invites you to create a dessert that’s simple to make but rich in flavor, with the added joy of choosing between a cloud of whipped cream or a golden meringue topping. It’s the kind of pie that turns any day into a special occasion and keeps everyone coming back for just one more slice.
Ingredients You’ll Need
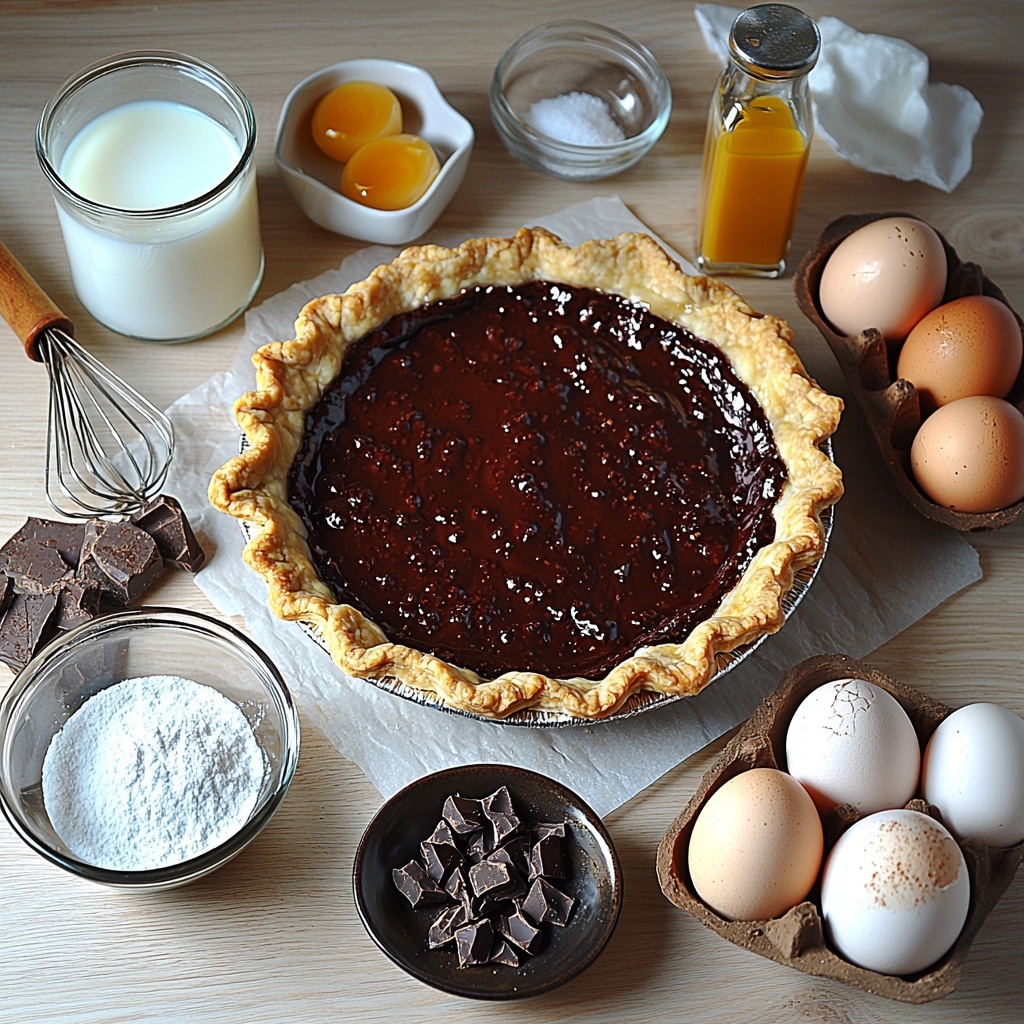
Gathering a handful of straightforward, kitchen-staple ingredients will bring this pie to life. Each component has its own role, from creating the silky texture to enhancing the chocolate depth and ensuring the pie crust’s perfect crunch.
- Pie crust: One fully baked 9-inch crust, homemade or store-bought, provides the essential buttery foundation.
- Milk: 2 1/2 cups whole milk add rich creaminess; you can substitute 2% for a lighter touch but whole milk delivers the best body.
- Eggs: 3 large egg yolks add silkiness and help thicken the custard.
- Sugar: 3/4 cup granulated sugar sweetens without overwhelming the chocolate.
- Cocoa powder: 1/3 cup unsweetened cocoa offers deep, authentic chocolate flavor.
- Cornstarch: 1/4 cup acts as the thickening agent, critical for that perfect custard texture.
- Salt: A pinch—1/4 teaspoon—balances flavors and enhances chocolate richness.
- Butter: 3 tablespoons unsalted butter lend a glossy finish and velvety mouthfeel.
- Vanilla extract: 1 1/2 teaspoons provide a warm, fragrant underpinning.
- Optional chocolate: 2–3 ounces semisweet chocolate, chopped, boosts the depth for an extra indulgent custard.
- Whipped cream topping: 1 cup heavy cream + 2 tablespoons powdered sugar + 1/2 teaspoon vanilla create a light, fluffy counterpoint.
- Meringue topping (optional): Use the reserved 3 egg whites, 1/2 cup sugar, 1/4 teaspoon cream of tartar, and 1/2 teaspoon vanilla for a classic toasted finish.
How to Make Old-Style Chocolate Pie Recipe with Silky Custard and Optional Topping Recipe
Step 1: Bake the Pie Crust
Start with a 9-inch pie shell, baked according to your recipe or the package instructions if store-bought. Make sure it’s fully cooled before adding the filling so it stays crisp under the luscious custard without becoming soggy.
Step 2: Combine and Whisk Dry Ingredients
Off the heat in a medium saucepan, whisk together the sugar, cocoa powder, cornstarch, and salt. This step is super important to avoid any clumps and to give your custard that flawless, silky texture everyone raves about.
Step 3: Slowly Add the Milk
Whisk in a splash of milk first to create a smooth paste with your dry ingredients, then gradually add the remaining milk, whisking constantly. This avoids lumps and gets you one step closer to that perfectly smooth custard.
Step 4: Cook the Custard Over Medium Heat
Place the saucepan on medium heat and stir consistently with a whisk or heatproof spatula, scraping the bottom and corners so nothing burns. Within 6 to 10 minutes, you’ll notice small bubbles and the custard thickening beautifully—this is magic happening right before your eyes.
Step 5: Temper the Egg Yolks
In a separate bowl, beat the egg yolks. To avoid scrambling, slowly add a ladle of the hot custard mixture into the yolks while whisking. Then, gradually pour the tempered yolks back into the saucepan. Cook for another 1 to 2 minutes until the filling looks thick and glossy, proof of that velvety finish.
Step 6: Add Butter, Vanilla, and Optional Chocolate
Take the pan off the heat and stir in the butter and vanilla extract until everything melds into one smooth custard. If you’re craving that extra richness, now’s the time to melt the chopped semisweet chocolate into the warm custard—it creates a gorgeous sheen and deeper flavor.
Step 7: Strain the Custard for Silky Perfection
Pour the custard through a fine-mesh sieve into a bowl. This little step catches any bits of cooked egg or lumps, giving you the smoothest filling possible. It’s totally worth the extra care!
Step 8: Fill the Cooled Pie Crust
Scrape your warm custard into the cooled pie crust and smooth the surface. To keep a skin from forming, press a piece of plastic wrap directly onto the filling if you don’t plan to use meringue topping.
Step 9: Chill Until Fully Set
Pop the pie into the refrigerator and let it chill for at least four hours — this resting time allows the custard to become firm and slice perfectly. For the best results and clean cuts, chilling overnight truly can’t be beat.
Step 10: Add Your Favorite Topping
For whipped cream topping, beat heavy cream with powdered sugar and vanilla until soft peaks form, then spread gently over the cold pie. If you prefer meringue, whisk reserved egg whites with cream of tartar until soft peaks, gradually add sugar until glossy and stiff, spread over warm filling sealing edges to crust, then bake at 350°F (175°C) for 12–15 minutes until the top is golden and irresistible. Cool completely before slicing.
Step 11: Serve Like a Pro
Use a sharp knife dipped in warm water to make neat slices and wipe the blade between each cut for picture-perfect slices sure to wow your guests.
How to Serve Old-Style Chocolate Pie Recipe with Silky Custard and Optional Topping Recipe
Garnishes
Enhance the presentation and flavor by adding fresh berries, chocolate shavings, or a dusting of cocoa powder on top of your whipped cream or meringue. A sprig of mint also adds a pop of color that makes every slice look like a masterpiece.
Side Dishes
This pie pairs beautifully with freshly brewed coffee or a smooth glass of milk. For a more decadent experience, serve alongside a scoop of vanilla ice cream or a small bowl of fresh fruit salad to balance the richness.
Creative Ways to Present
For an elegant touch at your next dinner party, serve slices with a drizzle of caramel or raspberry sauce on the plate. You can also experiment with layered parfaits by breaking pie slices into small chunks and layering them with whipped cream and berries in a glass for a delightful twist on presentation.
Make Ahead and Storage
Storing Leftovers
Cover any leftover pie tightly with plastic wrap or store in an airtight container and keep in the refrigerator. It’s best enjoyed within 3 days to maintain the silky custard texture and freshness.
Freezing
While the pie custard doesn’t freeze well due to texture changes, the baked crust can be frozen separately for up to 2 months. Freeze flat and wrapped well, then thaw before filling and chilling as usual.
Reheating
This pie is typically enjoyed chilled, but if you prefer a slightly warmer slice, allow it to sit at room temperature for 10–15 minutes before serving. Avoid microwaves to keep the custard from breaking down.
FAQs
Can I use a homemade crust instead of store-bought?
Absolutely! Homemade crust adds a wonderful personal touch and buttery flavor. Just make sure to prebake it fully and let it cool before filling for the best texture.
Is it necessary to strain the custard?
Straining helps eliminate any small lumps or curdled bits from the cooked eggs, ensuring your filling is perfectly smooth and silky. It’s a small step that makes a big difference.
What if I don’t want to use the optional chocolate?
No problem at all. The cocoa powder alone creates a rich chocolate flavor. Adding chopped semisweet chocolate just ups the indulgence with a deeper, glossy finish.
How do I know when the custard is thick enough?
You’ll notice the custard thickens and holds its shape when stirred—it should coat the back of a spoon, and when you run your finger through it, the line stays sharp without running.
Can I make this pie vegan or dairy-free?
This classic recipe relies on eggs, milk, and butter for its signature texture and flavor, making substitutions tricky. However, experimenting with plant-based milks and egg replacers can work, though you might lose some of that silky custard essence.
Final Thoughts
If you’re searching for a dessert that warms your soul and delights anyone lucky enough to taste it, the Old-Style Chocolate Pie Recipe with Silky Custard and Optional Topping Recipe is the answer. Its smooth custard, deep chocolate flavor, and the joyful choice between whipped cream or meringue make it a timeless favorite worth making again and again. I can’t wait for you to experience the magic of this pie and add your own special twists to keep it forever a beloved classic.
Print
Old-Style Chocolate Pie Recipe with Silky Custard and Optional Topping Recipe
- Prep Time: 30 minutes
- Cook Time: 10 minutes
- Total Time: 4 hours 40 minutes
- Yield: 8 servings
- Category: Dessert
- Method: Stovetop
- Cuisine: American
- Diet: Vegetarian
Description
This Old-Style Chocolate Pie is a simple, silky, and comforting dessert featuring a rich chocolate custard filling nestled in a crisp prebaked pie crust. The custard is made on the stovetop with a smooth blend of cocoa, sugar, eggs, and milk, then chilled until perfectly set. You can finish it with either a classic whipped cream topping or a fluffy baked meringue for a nostalgic treat that’s both elegant and satisfying.
Ingredients
Pie Crust
- 1 fully baked 9-inch pie crust (homemade or store-bought)
Chocolate Custard Filling
- 2 1/2 cups whole milk (2% can be used, but whole milk gives better body)
- 3 large egg yolks (reserve whites if making meringue)
- 3/4 cup granulated sugar
- 1/3 cup unsweetened cocoa powder
- 1/4 cup cornstarch (for thickening)
- 1/4 teaspoon salt
- 3 tablespoons unsalted butter
- 1 1/2 teaspoons vanilla extract
- Optional: 2–3 ounces semisweet chocolate, chopped (for extra richness)
Whipped Cream Topping (optional)
- 1 cup heavy cream
- 2 tablespoons powdered sugar
- 1/2 teaspoon vanilla extract
Meringue Topping (optional)
- Reserved 3 egg whites
- 1/2 cup granulated sugar
- 1/4 teaspoon cream of tartar
- 1/2 teaspoon vanilla extract
Instructions
- Bake the crust: Prebake a 9-inch pie shell according to package or recipe instructions. Let it cool completely so it stays crisp under the filling.
- Whisk the dry ingredients: In a medium saucepan (off heat), whisk together sugar, cocoa powder, cornstarch, and salt until no lumps remain. This ensures a smooth custard later.
- Add milk gradually: Whisk in a small amount of milk first to create a smooth paste, then slowly add the remaining milk while whisking continuously to keep the mixture silky and lump-free.
- Cook the custard: Place the saucepan over medium heat. Stir steadily with a whisk or heatproof spatula, scraping the bottom and corners to prevent scorching. After 6–10 minutes, steam and small bubbles will appear, and the custard will begin to thicken.
- Temper the yolks: In a small bowl, whisk the egg yolks. Gradually ladle in some hot custard while whisking to warm the yolks gently. Then pour this mixture back into the saucepan. Cook for an additional 1–2 minutes until the custard is thick and glossy.
- Finish with butter and vanilla: Remove the saucepan from heat, then stir in the butter and vanilla extract until the mixture is smooth. If desired, add the chopped semisweet chocolate now for extra richness and a shiny finish.
- Strain for perfection: Pour the custard through a fine-mesh sieve into a clean bowl to catch any cooked egg bits or lumps, ensuring the filling is silky smooth.
- Fill the crust: Transfer the warm custard into the cooled prebaked pie crust and smooth the top. To prevent a skin from forming on the custard surface, press a piece of plastic wrap directly onto it if you aren’t topping with meringue.
- Chill: Refrigerate the pie for at least 4 hours or until fully set and sliceable. For best results, chill overnight to get clean slices.
- Top it off: For whipped cream topping: Beat heavy cream with powdered sugar and vanilla to soft peaks, then spread evenly over the cold pie. For meringue topping: Beat reserved egg whites with cream of tartar to soft peaks, gradually add sugar until stiff and glossy peaks form. Spread over warm filling, sealing the edges to the crust. Bake in a preheated 350°F (175°C) oven for 12–15 minutes until golden brown. Cool completely before slicing.
- Serve: Use a sharp knife dipped in warm water for neat cuts, wiping the knife between slices to keep edges clean and presentable.
Notes
- Using whole milk rather than 2% milk improves the custard’s texture and richness.
- Tempering the egg yolks prevents them from curdling when added to the hot custard mixture.
- Pressing plastic wrap onto the custard avoids a skin forming if not using meringue topping.
- Refrigerating overnight yields cleaner slices and enhances flavor development.
- Meringue topping adds a classic vintage touch but requires baking after spreading, unlike whipped cream topping.
- If desired, garnish slices with fresh berries or a dusting of cocoa powder for extra presentation appeal.


