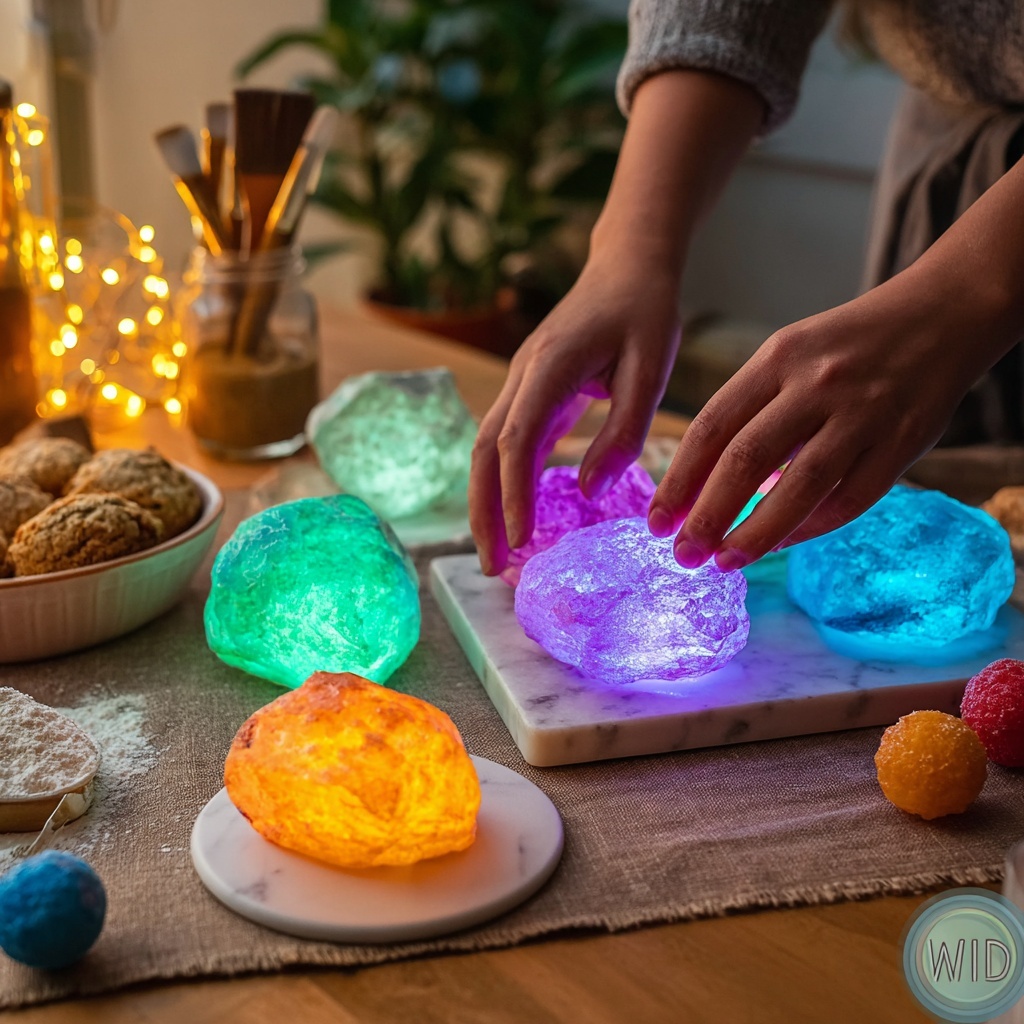
If you’ve ever dreamed of bringing a bit of the cosmos right into your home or playroom, then you are absolutely going to love this fun and creative project. Glowing Bouncy Moon Rocks: Create Your Own Fun Space Decor Recipe is a delightful way to craft colorful, squishy, and glow-in-the-dark decorations that feel like little pieces of the moon you can hold in your hand. Not only do these playful rocks brighten up any space, but they also bounce and stretch, making them both mesmerizing and endlessly entertaining. Whether you’re a parent looking for a unique activity or just a space enthusiast wanting some glowing decor, this recipe has got you covered with its charm and simplicity.
Ingredients You’ll Need
Getting the ingredients together for this recipe is refreshingly simple, and each component has a special role that helps create the perfect glowing, bouncy texture and vibrant color. These essentials combine to give you a sensory experience that’s as fun to make as it is to use.
- White glue: Acts as the base that gives your moon rocks their sticky, pliable texture which is perfect for bouncing.
- Liquid starch: The magic activator that transforms the glue into a smooth, stretchy dough-like consistency.
- Food coloring: Adds eye-catching hues that can be customized to make your moon rocks uniquely yours.
- Glow-in-the-dark paint: This is the star ingredient that makes your moon rocks glow beautifully when the lights go out.
- Water: Used to thin the paint, ensuring even and easy application on your bouncy creations.
- Wax paper or silicone mat: Essential for drying your moon rocks without sticking, keeping their shape intact.
How to Make Glowing Bouncy Moon Rocks: Create Your Own Fun Space Decor Recipe
Step 1: Mix the Base Ingredients
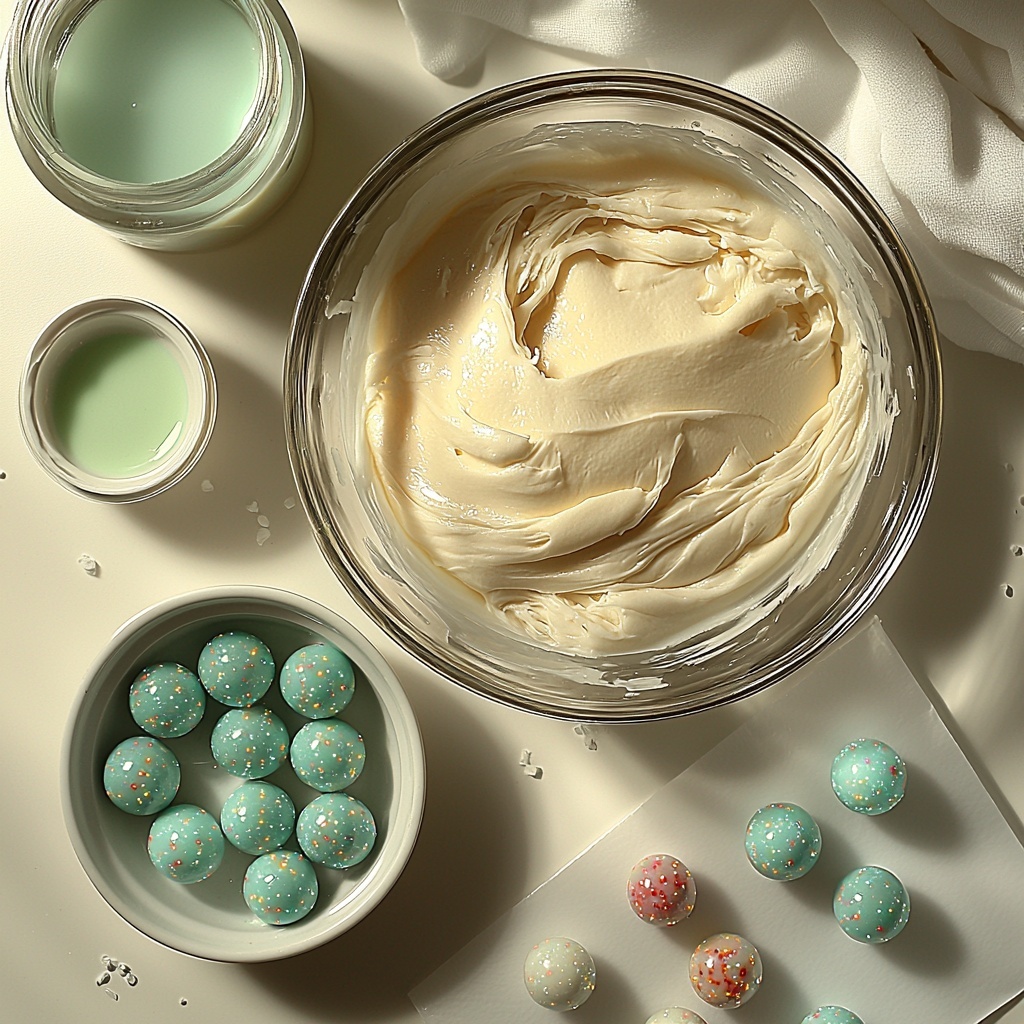
Start by combining one cup of white glue with one cup of liquid starch in a mixing bowl. Stir them together thoroughly until the mixture looks uniform. This blend is where the bouncy, squishy magic begins, so take your time ensuring everything is well mixed.
Step 2: Add Your Color
Next, if you want your moon rocks to shine with a splash of color, add a few drops of food coloring to the mixture. Keep stirring until you achieve the exact shade that makes you smile. The color really brings these moon rocks to life and gets your creativity flowing.
Step 3: Knead to Perfection
Once everything is combined, dive in with your hands and knead the mixture. This step is crucial because it smoothes out the texture and makes your moon rocks stretchy and soft. If it feels too sticky, knead a little longer; you’re aiming for a dough that bounces just right.
Step 4: Prepare the Glow Paint
In a separate bowl, mix your glow-in-the-dark paint with a small splash of water. This thins out the paint, making it easier to coat your moon rocks evenly. It’s this glow that will truly make your creations stand out when the lights go dark.
Step 5: Shape and Paint Your Moon Rocks
Roll your kneaded mixture into small balls—think of little planets or tiny meteors. Then, dip each ball into the thinned glow paint, coating it completely. This step is where your moon rocks start to feel ultra-special and ready to light up any room.
Step 6: Dry and Enjoy
Place the painted balls carefully on wax paper or a silicone mat to dry. Let them rest for a few hours so the paint sets perfectly, locking in that magical glow. Once dry, your glowing bouncy moon rocks are made for bouncing, decorating, or simply enjoying their otherworldly charm.
How to Serve Glowing Bouncy Moon Rocks: Create Your Own Fun Space Decor Recipe
Garnishes
While these moon rocks shine best on their own, sprinkling a little glitter or tiny star-shaped confetti around them can enhance their celestial vibe. You might even want to add small stickers of planets or comets on their surface before the paint dries for extra personality.
Side Dishes
Treat your glowing bouncy moon rocks like a centerpiece by pairing them with other space-themed crafts like DIY constellation jars or glow-in-the-dark stars stuck to your walls. They work beautifully alongside these extras to complete a stellar space decor atmosphere.
Creative Ways to Present
Set your moon rocks in clear glass bowls that catch and reflect their glow, or scatter them across a black tablecloth dotted with tiny silver stars for a moonlit night effect. For kids, placing them in a shallow box filled with glittery sand creates a playful moon surface to explore.
Make Ahead and Storage
Storing Leftovers
You can keep your glowing bouncy moon rocks fresh and pliable by storing them in an airtight container. This prevents drying out and allows you to enjoy their squishy texture over many days without losing the bounce or glow.
Freezing
Freezing isn’t recommended for these moon rocks because the glue mixture can be impacted by extreme cold and lose its stretchy quality. It’s best to keep them at room temperature in a cool, dry place for longevity.
Reheating
If your moon rocks start feeling a bit stiff, gently warming them by placing the airtight container in warm water for a few minutes can restore softness. Hands-on kneading afterward always helps bring back their bouncy charm.
FAQs
Can I use other types of glue?
White school glue works best due to its balance of stickiness and texture, but you can experiment with similar PVA glues. Avoid super glues or craft glues that dry hard, as they won’t create the soft, bouncy feel you want.
How long do the glow effects last?
The glow typically lasts for several hours after being exposed to light, but it will fade over time. Charging your moon rocks under a bright lamp or sunlight for a few minutes before dark will give you the brightest glow.
Are these moon rocks safe for kids to play with?
Absolutely! The ingredients are generally non-toxic, but always supervise younger children to prevent ingestion and make sure hands are washed after play. The sensory experience makes them an excellent activity for children and adults alike.
Can I make different shapes besides balls?
Yes! Feel free to get creative by molding your moon rocks into little moons, stars, or even alien shapes. Just make sure shapes aren’t too thin so they can bounce without breaking.
What if my mixture is too sticky or too hard?
If it’s too sticky, try adding a bit more liquid starch, a little at a time, and knead well. If it feels too hard, warming it slightly or adding a drop of water can soften the mixture before kneading again.
Final Thoughts
There’s something truly magical about creating little glowing treasures that bounce and dance with the light, and Glowing Bouncy Moon Rocks: Create Your Own Fun Space Decor Recipe offers a wonderful chance to bring that magic to life. Whether you’re crafting solo or turning it into a shared family adventure, these moon rocks are sure to spark joy and ignite imaginations. So gather your ingredients, roll up your sleeves, and get ready to make your own tiny pieces of the universe—fun and glow guaranteed!
Print
Glowing Bouncy Moon Rocks: Create Your Own Fun Space Decor Recipe
- Prep Time: 10 minutes
- Cook Time: 3 hours (drying time)
- Total Time: 3 hours 10 minutes
- Yield: Approximately 12-15 small moon rocks depending on size
- Category: Craft / Play Food Decoration
- Method: No-Cook
- Cuisine: American
Description
Create fun and glowing bouncy moon rocks perfect for space-themed decorations or as playful toys for kids. These colorful, stretchy balls light up in the dark, providing hours of entertainment and imaginative play.
Ingredients
Base Ingredients
- 1 cup white glue
- 1 cup liquid starch
Coloring
- Food coloring (a few drops, optional)
Glow Effect
- Glow-in-the-dark paint (enough to coat the balls)
- Small amount of water (to thin the glow paint)
Instructions
- Mix glue and starch: In a mixing bowl, combine 1 cup of white glue with 1 cup of liquid starch. Stir thoroughly until the mixture is well blended.
- Add color: If desired, add a few drops of food coloring to the glue and starch mixture. Stir until the color is evenly distributed to achieve your preferred hue.
- Knead the mixture: Using your hands, knead the combined mixture until it becomes smooth and stretchy in texture, similar to slime.
- Prepare glow paint: In a separate container, mix the glow-in-the-dark paint with a small amount of water to thin it out and make it easier to coat the moon rocks.
- Shape and coat: Roll the kneaded mixture into small balls. Then dip each ball into the thinned glow paint, ensuring an even coating on all sides.
- Dry: Lay the coated balls on wax paper or a silicone mat. Allow them to dry for several hours, so the glow paint sets and the outer layer becomes tack-free.
- Enjoy: Once dry, your glowing bouncy moon rocks are ready for play or as unique space-themed decorations.
Notes
- You can customize the size of the moon rocks depending on the desired use—larger ones for decoration, smaller ones for toys.
- Use non-toxic glue and paint to ensure the moon rocks are safe for children.
- To recharge the glow effect, expose the moon rocks to bright light before playing in the dark.
- Store the moon rocks in an airtight container to maintain softness and prevent drying out.

