
There’s something truly nostalgic and delightful about the Old-Fashioned Pink Jelly Cake Recipe that immediately brings back memories of simpler times and sweet celebrations. This charming Australian classic combines light, fluffy cakes with a strikingly pink, wobbly jelly coating and a luscious whipped cream filling, all wrapped in a coconut embrace. It’s a showstopper both in looks and flavor, offering a perfect balance of textures and a burst of fruity sweetness that’s sure to brighten any occasion.
Ingredients You’ll Need
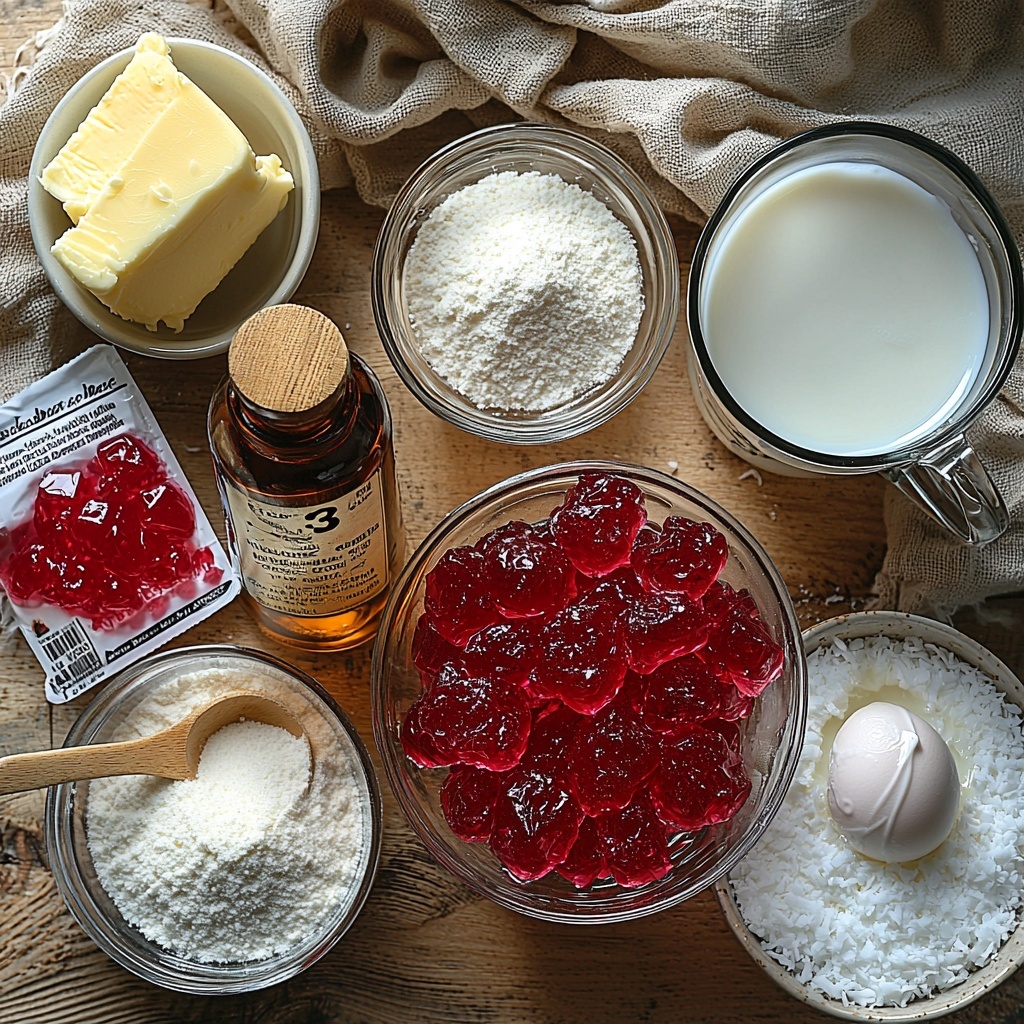
Creating this Old-Fashioned Pink Jelly Cake Recipe is easier than you might think because it relies on simple, pantry-friendly ingredients that play vital roles in the final result. Each one is chosen to provide tender cakes, vibrant jelly, and that irresistible coconut finish.
- Butter (80g, softened): This adds richness and keeps the cake moist and tender.
- Caster sugar (1/2 cup, 110g): Essential for sweetness and helps create a soft crumb.
- Vanilla extract (1 tsp): Adds warm, fragrant notes enhancing the overall flavor.
- Egg (1): Binds the ingredients and provides structure.
- Milk (2/3 cup, 160g): Keeps the batter smooth and contributes to a soft texture.
- Self-raising flour (1 cup, 130g, sifted): Gives the cake its rise and fluffy body.
- Strawberry jelly crystals (85g): The star ingredient for that iconic pink, fruity jelly topping.
- Boiling water (1 cup, 240g): Used to dissolve the jelly crystals perfectly.
- Cold water (1 cup, 240g): Helps cool the jelly mixture for easy coating.
- Desiccated coconut (3 1/2 cups, 280g): Infuses a lovely, chewy texture and balances the sweetness.
- Whipped cream (1 cup, 240g): The creamy center that makes these cakes irresistibly good.
How to Make Old-Fashioned Pink Jelly Cake Recipe
Step 1: Prepare the Cake Batter
Begin by preheating your oven to 175°C with fan-forcing on for even baking. Lightly grease two 12-hole patty-pan tins so the cakes won’t stick. In a large bowl, cream together the softened butter, caster sugar, and vanilla extract until the mixture turns pale and fluffy. This step is crucial for incorporating air, which leads to light, tender cakes.
Step 2: Mix in the Wet and Dry Ingredients
Add the egg to your creamed mixture and beat until fully combined. Then, gently fold in the milk and sifted self-raising flour in two batches, alternating between the two. This careful folding ensures the batter remains light without overmixing, which could make the cakes tough.
Step 3: Bake the Cakes
Spoon the batter evenly into the prepared patty-pan holes, filling each just below the top to allow for rising. Bake these delightful little cakes for 15 to 18 minutes or until they turn golden and a skewer inserted into the center comes out clean. Let them cool in the tins for 5 minutes before transferring to a wire rack to cool completely.
Step 4: Prepare the Pink Jelly
While the cakes are cooling, dissolve the strawberry jelly crystals in boiling water, stirring until completely dissolved. Add the cold water to cool the mixture down. Refrigerate the jelly until it is partially set but still coated—this usually takes 1 to 2 hours. This texture allows the jelly to cling beautifully to the cakes.
Step 5: Coat the Cakes with Jelly and Coconut
Using a slotted spoon, dip each cooled cake into the jelly mixture, letting any excess drip off. Then roll each jelly-coated cake generously in desiccated coconut. This step not only adds wonderful texture but also gives the cakes their signature snowy pink appearance that makes this Old-Fashioned Pink Jelly Cake Recipe so visually delightful.
Step 6: Assemble with Whipped Cream
To finish, spoon a generous dollop of whipped cream onto half of the jelly-coated cakes and sandwich them with the remaining halves. Press gently so the cakes stick together but the cream remains fluffy. For best results, refrigerate the assembled cakes for 30 minutes to allow everything to set perfectly before serving.
How to Serve Old-Fashioned Pink Jelly Cake Recipe
Garnishes
Add a fresh twist by garnishing your Old-Fashioned Pink Jelly Cake Recipe with fresh strawberries or a light dusting of icing sugar. This not only enhances the flavor but also adds a bit of fresh color contrast that makes each little cake even more tempting.
Side Dishes
Serve these nostalgic treats alongside a hot cup of tea or coffee for a perfect afternoon indulgence. They also pair wonderfully with fresh fruit salads or a chilled glass of rosé, making for a balanced plate of sweet and refreshing flavors.
Creative Ways to Present
If you want to impress your guests, consider arranging the cakes on a tiered cake stand or individual decorative plates. You can also pipe extra whipped cream around the edges or drizzle a berry coulis on the side for an elegant, modern twist on this classic pink jelly cake.
Make Ahead and Storage
Storing Leftovers
Leftover Old-Fashioned Pink Jelly Cake Recipe treats keep best in an airtight container in the refrigerator. They will stay fresh and delicious for up to 3 days, making them a perfect make-ahead option for busy days or unexpected guests.
Freezing
If you want to save some for later, you can freeze the separated cake halves before adding the jelly and cream. Wrap them tightly in plastic wrap and foil, then freeze for up to a month. When ready, thaw in the fridge and proceed with jelly coating and assembly for the freshest texture.
Reheating
This cake is best served chilled, so reheating is not recommended. Instead, simply take it out of the fridge 10-15 minutes before serving to let the whipped cream soften slightly, enhancing its melt-in-your-mouth appeal.
FAQs
Can I use other flavors of jelly crystals besides strawberry?
Absolutely! While strawberry is traditional and provides that signature pink color, you can experiment with raspberry or cherry jelly crystals if you want a slightly different fruity twist and color in your Old-Fashioned Pink Jelly Cake Recipe.
Is desiccated coconut essential for the recipe?
Desiccated coconut is key to achieving that classic texture and look, but if you’re not a fan, finely chopped nuts or rainbow sprinkles can be fun alternatives, though the authentic feel might differ slightly.
Can I make these cakes gluten-free?
Yes! Substitute the self-raising flour with a gluten-free blend that includes raising agents. The texture may vary a bit, but the jelly and cream elements remain just as delicious.
How do I ensure the jelly coats the cake without melting it?
Make sure the jelly is partially set—thick but still pourable—before dipping the cakes. If it’s too runny, the jelly won’t stick well; too firm, and it won’t coat evenly.
What’s the secret to getting the cakes light and fluffy?
Creaming the butter and sugar until pale and fluffy, and gently folding in the flour and milk alternately without overmixing, create the perfect airy texture for this Old-Fashioned Pink Jelly Cake Recipe.
Final Thoughts
If you’re looking to make a dessert that will charm friends and family with its nostalgic flair and delightful flavors, this Old-Fashioned Pink Jelly Cake Recipe is your answer. Its perfect balance of soft cake, sweet jelly, whisper-light cream, and coconut makes every bite feel like a warm hug from the past. Trust me, once you try it, this recipe will become a favorite to bake and share again and again.
Print
Old-Fashioned Pink Jelly Cake Recipe
- Prep Time: 20 minutes
- Cook Time: 18 minutes
- Total Time: 1 hour 30 minutes
- Yield: 12 servings
- Category: Dessert
- Method: Baking
- Cuisine: Australian
Description
Old-Fashioned Pink Jelly Cake is a nostalgic Australian treat featuring soft vanilla sponge cakes dipped in homemade strawberry jelly, rolled in desiccated coconut, and filled with luscious whipped cream. This recipe delivers a delightful combination of fluffy cake, fruity jelly, and creamy filling, perfect for parties or afternoon tea.
Ingredients
Cake Batter
- 80g butter, softened
- 1/2 cup (110g) caster sugar
- 1 tsp vanilla extract
- 1 egg
- 2/3 cup (160g) milk
- 1 cup (130g) self-raising flour, sifted
Jelly Mixture
- 85g packet strawberry jelly crystals
- 1 cup (240g) boiling water
- 1 cup (240g) cold water
Assembly
- 3 1/2 cups (280g) desiccated coconut
- 1 cup (240g) whipped cream
Instructions
- Preheat oven: Set your oven to 175°C (fan-forced) to ensure it reaches the correct temperature for baking the cakes evenly.
- Prepare tins: Lightly grease two 12-hole patty-pan tins to prevent the cakes from sticking and enable easy removal after baking.
- Cream butter and sugar: In a large bowl, beat the softened butter, caster sugar, and vanilla extract together until the mixture becomes pale and fluffy, creating a light base for your cakes.
- Add egg: Beat in the egg thoroughly, ensuring it is fully incorporated and the mixture is smooth.
- Fold in milk and flour: Alternately fold in the milk and sifted self-raising flour in two batches, gently combining the ingredients without overmixing to maintain a tender cake texture.
- Fill tins: Spoon the batter into the prepared patty-pan holes, filling each just below the top to allow room for rising.
- Bake cakes: Bake for 15–18 minutes or until the tops are golden and a skewer inserted into the centre comes out clean, indicating doneness.
- Cool cakes: Let the cakes cool in the tins for 5 minutes before transferring them to a wire rack to cool completely.
- Make jelly: Dissolve the strawberry jelly crystals in boiling water, stir in cold water, then refrigerate until partially set, about 1–2 hours, to achieve the right consistency for coating.
- Dip cakes in jelly: Using a slotted spoon, dip each cooled cake into the jelly mixture, allowing excess jelly to drip off for an even coating.
- Coat with coconut: Roll each jelly-coated cake in desiccated coconut thoroughly to cover the jelly layer and add texture.
- Assemble cakes: Spoon whipped cream onto the base of one coconut-coated cake and sandwich with another, creating a delightful cream filling layer inside.
- Chill before serving: Refrigerate the assembled cakes for 30 minutes to allow the jelly and cream to set, enhancing the flavors and texture.
Notes
- Ensure the cakes are completely cooled before dipping in jelly to prevent them from breaking apart.
- Partially setting the jelly is crucial to achieve a sticky but not runny coating.
- You can substitute whipped cream with stabilized whipped cream or mascarpone for a richer filling.
- Store assembled cakes in the refrigerator and consume within 2 days for best freshness.


