“`html
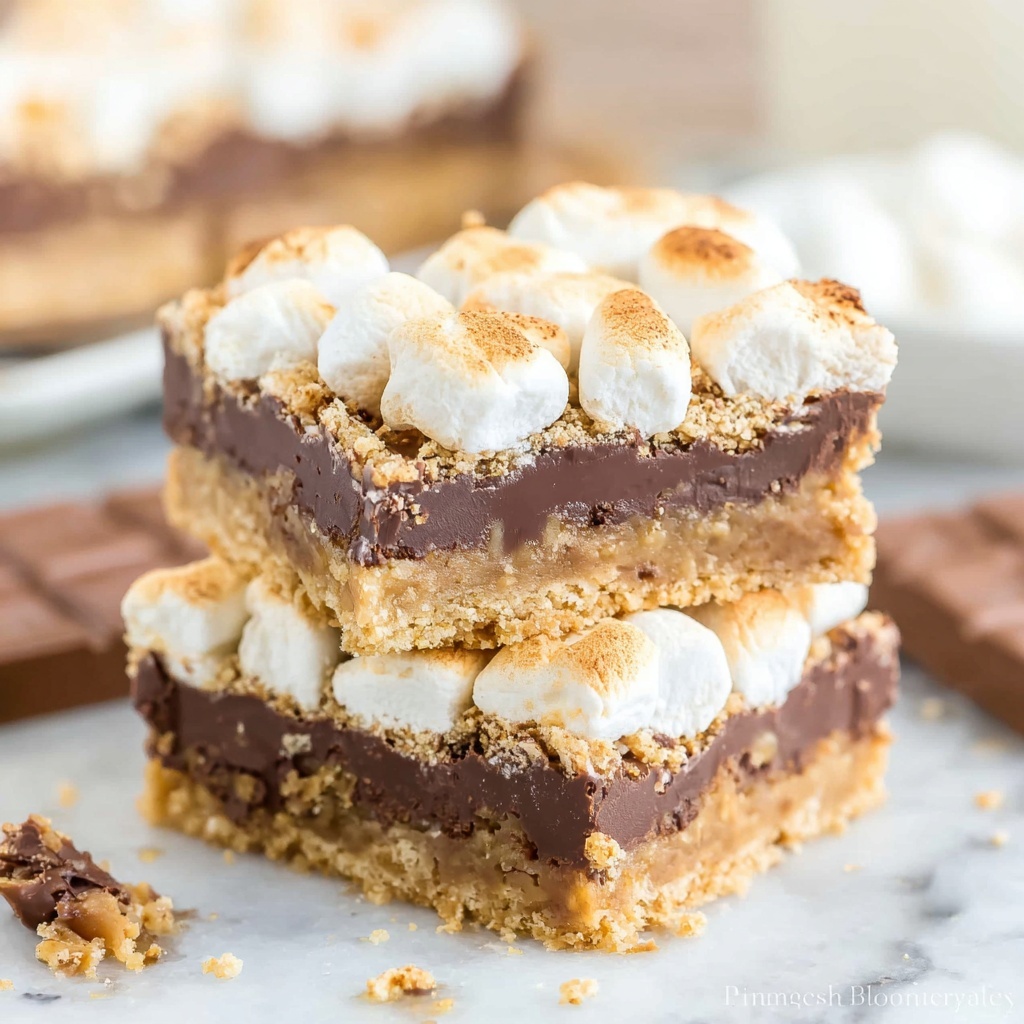
If you love that classic campfire treat but want something easier to make indoors or at a party, then you absolutely need to try this delightful S’mores Bar Recipe. It takes just 25 minutes to prepare, delivers 16 generous servings, and perfectly balances the crunch of graham cracker, the richness of melty chocolate, and the gooey sweetness of toasted marshmallows. It’s the ultimate way to enjoy s’mores anytime, with zero fuss and all the fun.
Ingredients You’ll Need
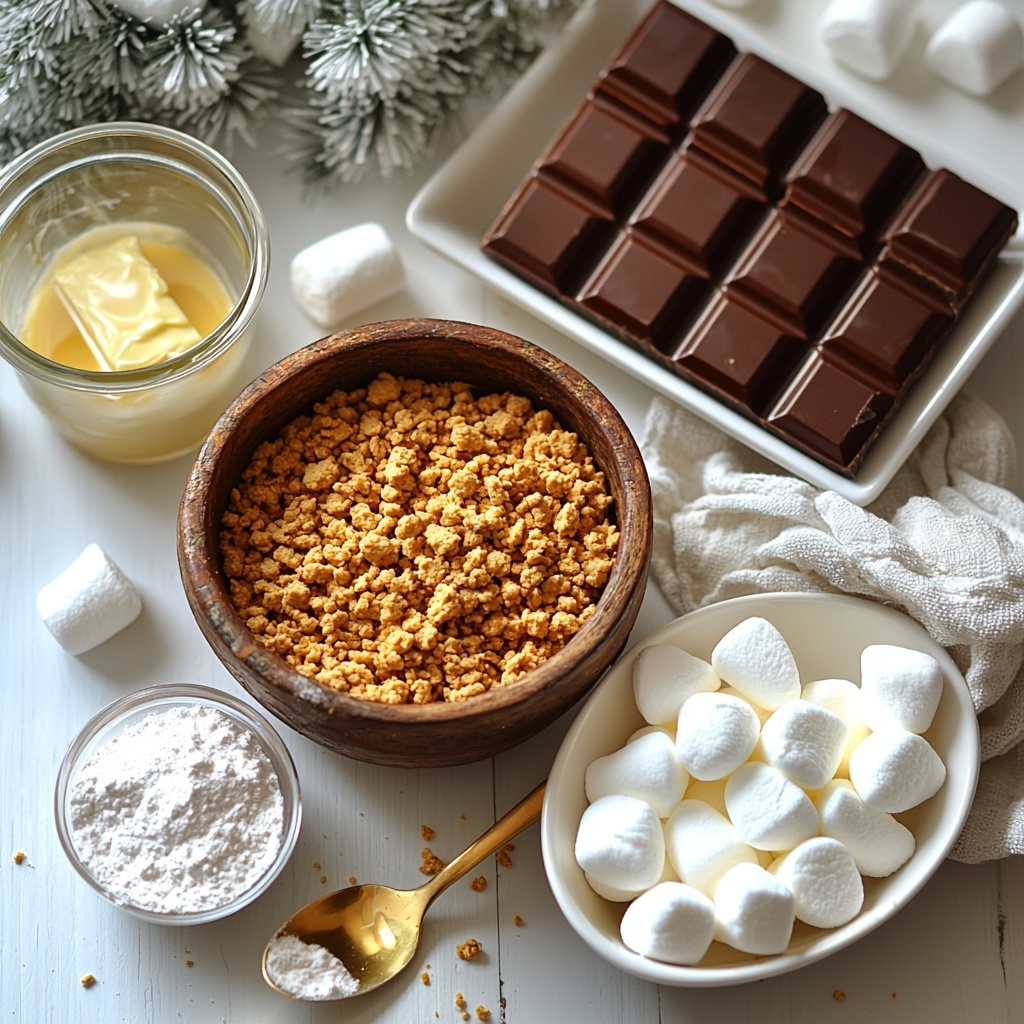
These simple ingredients come together beautifully to create the perfect blend of textures and flavors in this S’mores Bar Recipe. Each component plays an essential role, from the buttery crust to the shiny melted chocolate to the fluffy toasted marshmallows on top.
- 2 Cups graham cracker crumbs: This is the crunchy and slightly sweet base that grounds the entire bar.
- 8-12 Tablespoons butter (melted): Melted butter brings richness and helps bind the graham cracker crust firmly together.
- 1/2 Cup powdered sugar: Adds a subtle sweetness and improves the texture of the crust.
- 4 Hershey Chocolate Bars (4.4 ounce each): Classic milk chocolate bars that melt to create the gooey middle layer.
- 1 package mini marshmallows: These provide that signature soft and toasted topping you can’t resist.
How to Make S’mores Bar Recipe
Step 1: Prepare Your Oven and Pan
Start by preheating your oven to 350 degrees. While it heats up, generously grease a 9×13-inch baking pan with non-stick butter spray—this ensures your bars come out easily without sticking.
Step 2: Make the Graham Cracker Crust
In a medium-sized bowl, mix together the graham cracker crumbs, powdered sugar, and melted butter with a spoon. The butter will help everything hold together once baked, creating a crust that’s both firm and flavorful.
Step 3: Press and Bake the Crust
Pour the mixture into the prepared pan. Use your fingers to firmly press and pack the crumbs evenly along the bottom and sides of the pan. Pop it in the oven for about 5 to 8 minutes, just until the edges turn a light golden brown—this slight bake will firm up the crust as it cools.
Step 4: Cool the Crust
Once out of the oven, allow the crust to cool completely. This step is crucial so the next layers don’t slide around or melt the crust prematurely.
Step 5: Add the Chocolate Layer
Lay the Hershey chocolate bars over the crust, covering it as fully as you can. Return the pan to the oven for 3 minutes; this will soften the chocolate just enough to get shiny and slightly melty but not completely liquefied. Keep an eye on it to prevent over melting.
Step 6: Cool Slightly Then Add Marshmallows
After the chocolate begins to melt, remove the pan and let it cool for 1 to 2 minutes so the chocolate slightly firms. Next, pack mini marshmallows closely together on top of the chocolate layer—almost like a blanket of softness ready to be toasted.
Step 7: Broil to Toast the Marshmallows
Switch your oven to “broil” and carefully watch the pan as you broil the marshmallows for about 2 minutes. This is the moment to channel your inner hawk: as soon as they start to brown, take them out! Marshmallows go from perfectly toasted to burnt in seconds, and no one wants a fire alarm going off in the kitchen.
Step 8: Cool Completely and Set
Allow the bars to cool fully after broiling. For cleaner slicing, pop the pan in the refrigerator to let everything set; this makes cutting much easier and neater.
Step 9: Slice and Serve
To cut the bars, warm a sharp knife under hot water, dry it quickly, and slice right through. Repeat warming the knife if it gets sticky. Now you’re ready to enjoy gooey, crunchy, chocolatey perfection!
How to Serve S’mores Bar Recipe
Garnishes
For an extra-special touch, sprinkle a few crushed graham crackers or some chocolate shavings on top after broiling. A light dusting of cinnamon or a drizzle of caramel sauce can also elevate these bars to dessert superstar status.
Side Dishes
This S’mores Bar Recipe pairs wonderfully with a scoop of vanilla bean ice cream or a dollop of whipped cream to balance the rich sweetness. For a more grown-up twist, a small cup of strong coffee or a glass of cold milk complements every bite beautifully.
Creative Ways to Present
Serve these bars on a rustic wooden board for a cozy vibe at your next gathering, or cut them into bite-sized squares for easy party finger food. Layering them in clear dessert cups with alternating layers of chocolate chips and marshmallows can make a fun s’mores parfait that looks stunning and tastes just as good.
Make Ahead and Storage
Storing Leftovers
If you have leftovers (which might be rare!), store them in an airtight container in the refrigerator for 3 to 4 days. Keeping them chilled helps maintain their structure and flavor, preventing the marshmallows from becoming too sticky.
Freezing
You can freeze the bars tightly wrapped in plastic wrap and aluminum foil for up to 1 month. To thaw, place them in the refrigerator overnight. This is perfect for prepping ahead of big events or saving some treats for later.
Reheating
To enjoy your s’mores bars warm, reheat them gently in a low oven (around 300 degrees) for about 5 to 7 minutes, or until the chocolate softens again. Avoid microwaving, as it can make the marshmallows rubbery and the crust soggy.
FAQs
Can I use a different type of chocolate?
Absolutely! While Hershey bars are classic, feel free to use dark, semi-sweet, or even white chocolate bars according to your preference. Just make sure the chocolate melts well for that gooey layer.
What if I don’t have graham cracker crumbs?
You can crush whole graham crackers in a zip-top bag with a rolling pin or substitute with digestive biscuits or honey graham crackers for a slight twist in flavor.
Can I make the crust gluten-free?
Yes! Use gluten-free graham cracker crumbs or any gluten-free cookie crumbs you like. The butter and sugar mixture will work just the same to bind them.
How do I prevent marshmallows from catching fire under the broiler?
Keep a close eye because broilers vary; remove the pan as soon as the marshmallows start to brown. You can also broil with the oven door slightly open to reduce heat intensity if your broiler runs hot.
Can I double the recipe for a larger batch?
Definitely! Just use two 9×13 pans or a larger pan and adjust baking times slightly as needed to ensure everything cooks evenly.
Final Thoughts
This S’mores Bar Recipe is an unbeatable crowd-pleaser that brings all the joy of classic campfire s’mores right to your kitchen with ease and flair. Whether for a family dessert, a party treat, or just because, these bars will become a favorite go-to for anyone who loves that perfect combination of crunchy, creamy, and toasty. Give it a try—I promise you’ll be hooked after the first bite!
“`
Print
S’mores Bar Recipe
- Prep Time: 10 minutes
- Cook Time: 15 minutes
- Total Time: 25 minutes
- Yield: 16 servings
- Category: Dessert
- Method: Baking
- Cuisine: American
Description
This delicious S’mores Bar recipe combines a crunchy graham cracker crust, melted Hershey chocolate, and toasted mini marshmallows to create a gooey, sticky, and irresistible treat perfect for any occasion. Easy to make in just 25 minutes, these bars bring the classic campfire s’mores flavor to your kitchen with a simple baking and broiling method.
Ingredients
Crust
- 2 cups graham cracker crumbs
- 1/2 cup powdered sugar
- 8–12 tablespoons melted butter
Filling & Topping
- 4 Hershey Chocolate Bars (4.4 ounce each)
- 1 package mini marshmallows
Instructions
- Preheat Oven: Preheat your oven to 350 degrees Fahrenheit to prepare for baking the crust and initial chocolate melt.
- Prepare Pan: Grease a 9×13 inch baking pan with non-stick butter spray to prevent sticking of the bars.
- Mix Crust Ingredients: In a medium bowl, combine the graham cracker crumbs, powdered sugar, and melted butter. Stir thoroughly to create a moist crumb mixture suitable for forming the crust.
- Press Crust: Evenly distribute the crumb mixture into the bottom and sides of the prepared baking pan. Press firmly with your fingers to pack it tightly, creating a solid base for the bars.
- Bake Crust: Bake in the preheated oven for 5-8 minutes until the edges turn slightly golden brown. This sets the crust, which will harden further as it cools.
- Cool Crust: Remove from oven and allow the crust to cool before adding the chocolate layer.
- Layer Chocolate: Arrange the Hershey bars evenly on top of the cooled crust, covering the surface completely.
- Bake Chocolate: Return the pan to the oven and bake for about 3 minutes, just until the chocolate begins to melt and looks shiny.
- Cool Chocolate: Let the pan cool for 1-2 minutes to slightly set the melted chocolate layer.
- Add Marshmallows: Place mini marshmallows densely over the melted chocolate, ensuring they are packed tightly together.
- Broil Marshmallows: Switch the oven setting to broil and place the pan back inside. Watch carefully and broil for approximately 2 minutes until marshmallows turn golden brown. Remove immediately to prevent burning as oven broiler temperatures vary.
- Cool Completely: Allow the bars to cool completely before cutting. For easier slicing, refrigerate briefly to set the layers firmly.
- Serve: Cut into squares using a sharp knife warmed under hot water and dried to prevent sticking. Repeat warming the knife if it gets sticky between cuts.
Notes
- The crust will harden as it cools—avoid overbaking to keep it tender enough.
- Broil marshmallows cautiously; watch closely to prevent burning or fire.
- Chilling the bars after baking helps with easier slicing and cleaner cuts.
- Warming the knife between cuts prevents sticking and messy edges.


