“`html
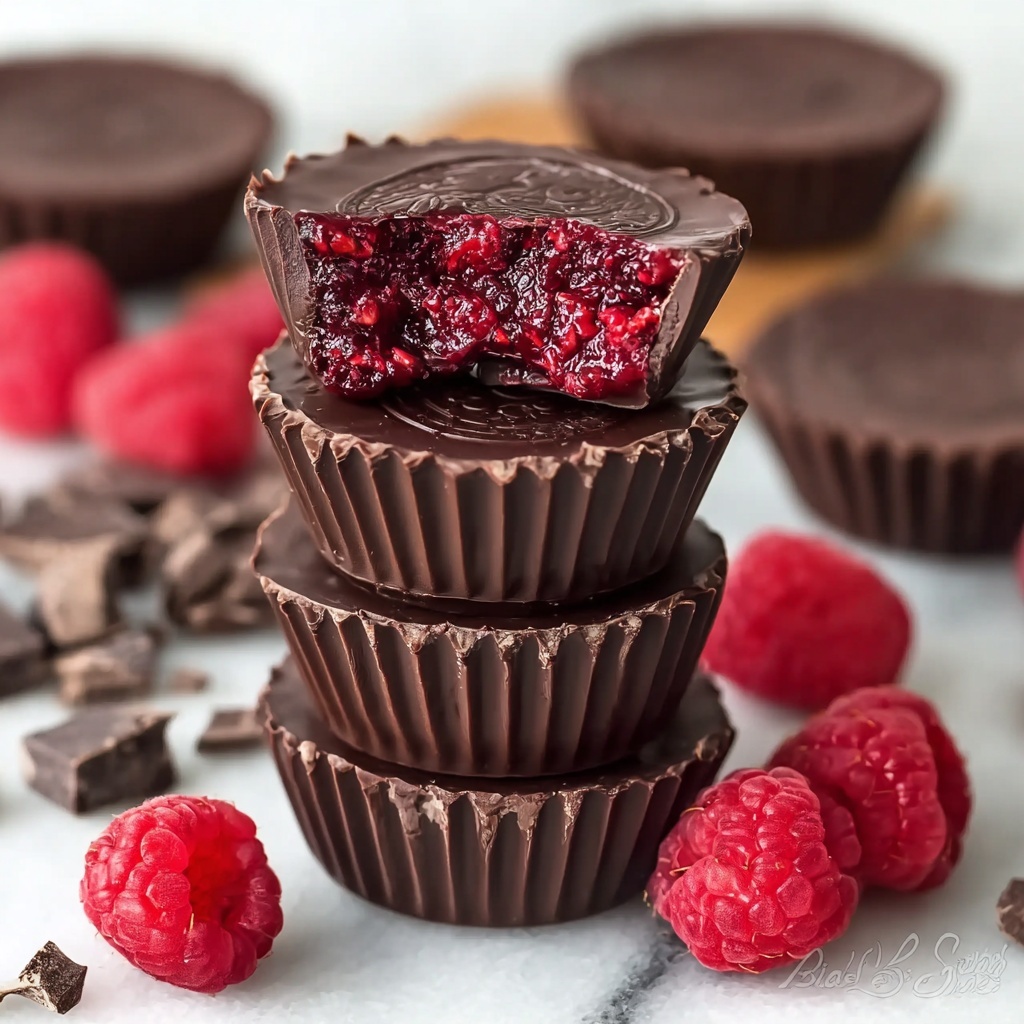
There is something utterly enchanting about the melding of rich chocolate with bright, tangy raspberries, and this Chocolate Raspberry Cups Recipe captures that magic perfectly. These delightful little treats combine silky smooth chocolate shells with a luscious, slightly sweetened raspberry filling that bursts with freshness. Whether you’re looking for an impressive yet simple dessert to share or a charming snack that feels like a moment of pure indulgence, these cups deliver flavor, texture, and a touch of elegance in every bite.
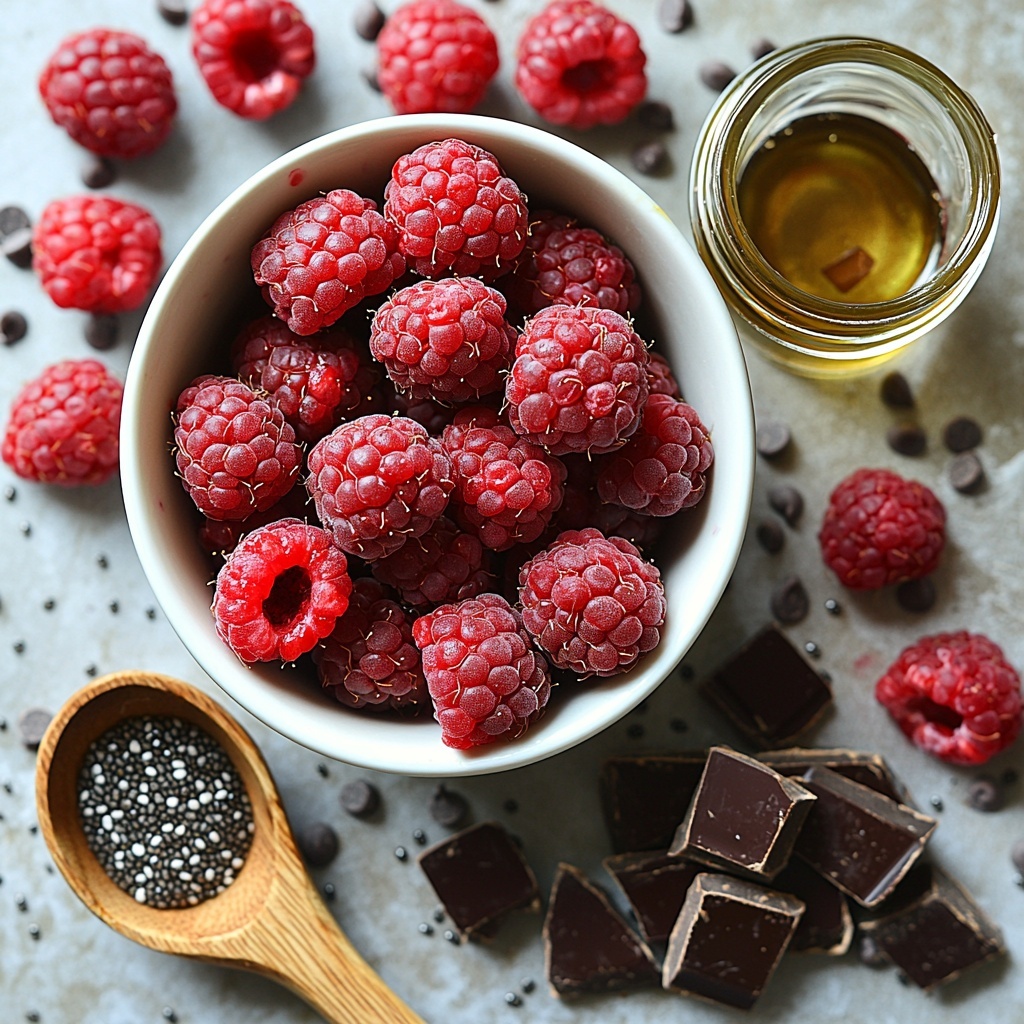
Ingredients You’ll Need
Gathering these few simple ingredients is your first step toward creating a beautiful balance of flavors and textures. Each ingredient plays its own role, from the vibrant tartness of the raspberries to the creamy melt of chocolate, resulting in a dessert that feels both satisfying and sophisticated.
- 6 oz raspberries (fresh or frozen): The star fruit that brings natural brightness and color to the filling.
- 1 tbsp chia seeds: Adds a slight gel-like texture to thicken the raspberry mixture naturally.
- 2 tsp sweetener of choice: Just enough sweetness to enhance the raspberries without overpowering them.
- 6 oz chocolate chips or chopped chocolate bars (about 1 cup): Creamy and rich, this forms the luscious outer shell of the cups.
- Optional: 1 tsp vegetable oil or melted coconut oil: Helps smooth out the chocolate for easier spreading and a shiny finish.
How to Make Chocolate Raspberry Cups Recipe
Step 1: Prepare the Raspberry Filling
This filling is where fresh fruity flavor meets natural sweetness and a hint of texture from chia seeds. Begin by mashing the raspberries thoroughly to release all their juice, then gently warm them with the chia seeds and your chosen sweetener over low heat. Stir gently until you see the mixture bubbling, which activates the chia to thicken it nicely. Let it cool slightly so it’s ready to nestle inside the chocolate shells.
Step 2: Melt the Chocolate
For that luxuriously smooth texture, melting your chocolate slowly is key. Use either a microwave-safe bowl or a double boiler method to ensure the chocolate melts evenly without burning. If you like a shinier, silkier shell, stir in a teaspoon of vegetable or coconut oil now — it also makes it easier to spread the chocolate later.
Step 3: Form the Chocolate Cups
Line a mini muffin tin with paper liners or grab your favorite candy molds for shaping. Spoon about a teaspoon of the melted chocolate into each liner, then carefully spread the chocolate up the sides to form a delicate shell. Pop the tray into the fridge or freezer just long enough for the chocolate to harden so it holds its shape for the filling.
Step 4: Add the Raspberry Filling
With your chocolate cups beautifully set, spoon about two teaspoons of the luscious raspberry filling into each one. The tartness and slight texture of the filling create a delightful contrast to the crisp chocolate shell, making every bite an experience.
Step 5: Seal the Cups
Almost there! Cover each raspberry-filled cup with the remaining melted chocolate, smoothing the tops so the filling is fully enclosed. Chill them again until the chocolate is completely set, giving you perfectly forged little cups of indulgence.
How to Serve Chocolate Raspberry Cups Recipe
Garnishes
To elevate presentation and add a sensory wow factor, consider topping the cups with a single fresh raspberry or a tiny mint leaf. A light dusting of powdered sugar or finely grated dark chocolate over the top can also enhance their visual appeal while complementing the flavors.
Side Dishes
These cups shine on their own but pair beautifully with light accompaniments like a dollop of whipped cream or a spoonful of vanilla Greek yogurt. For an elegant dessert platter, add some nuts or a fresh fruit salad alongside for a balanced treat.
Creative Ways to Present
Present your Chocolate Raspberry Cups Recipe variety by arranging them on colorful doilies or in small paper cups for parties. For a gift, place them in a decorative box layered with parchment paper, and finish with a ribbon for a charming edible surprise. Playing with shapes by using different sized molds can also make for a fun, playful presentation.
Make Ahead and Storage
Storing Leftovers
After indulging in some of these treats, store any leftovers in an airtight container in the refrigerator. They will keep beautifully for 3-4 days, retaining the crisp chocolate shell and the fresh raspberry filling’s flavor without becoming soggy or losing texture.
Freezing
You can freeze these cups if you want to enjoy them later. Simply place them in a single layer on a baking sheet to freeze, then transfer to a freezer-safe container or bag. When properly stored, they’ll stay delicious for up to one month. Thaw them in the refrigerator before serving to keep their shape and texture.
Reheating
Since these are best enjoyed chilled, reheating isn’t recommended. Allow them to come to room temperature briefly before serving if they’ve been in the fridge or freezer, but avoid heat as this will melt the chocolate and spoil their firm cup structure.
FAQs
Can I use frozen raspberries for this recipe?
Absolutely! Frozen raspberries work just as well as fresh ones. Just thaw them slightly and drain any excess juice before mashing to avoid a too-watery filling.
What if I don’t have chia seeds?
You can substitute with ground flax seeds or even a teaspoon of cornstarch mixed with a bit of water to thicken the filling, though chia seeds add a unique texture and nutrition boost.
Which chocolate works best for these cups?
Use high-quality chocolate chips or chopped bars depending on your taste preference. Dark chocolate offers a rich, slightly bitter contrast to the sweet raspberry, while milk chocolate makes it creamier and sweeter.
Can I make these chocolate raspberry cups vegan?
Yes! Choose dairy-free chocolate and a plant-based sweetener, and you’ll have a vegan-friendly dessert everyone will adore.
How do I avoid the chocolate shells cracking when setting?
Make sure to spread the chocolate evenly and chill them quickly so they set firmly. Adding a small amount of coconut or vegetable oil helps keep the chocolate flexible and less prone to cracking.
Final Thoughts
There is something genuinely rewarding about making your own Chocolate Raspberry Cups Recipe — it’s a perfect mix of fresh fruitiness, indulgent chocolate, and a charming homemade touch. Whether for a special occasion or a treat to brighten your day, these cups offer pure joy in every bite. Trust me, once you try them, they’ll quickly become a favorite go-to dessert to share with friends and family.
“`
Print
Chocolate Raspberry Cups Recipe
- Prep Time: 15 minutes
- Cook Time: 10 minutes
- Total Time: 45 minutes
- Yield: 12 servings
- Category: Dessert
- Method: Stovetop
- Cuisine: American
- Diet: Gluten Free
Description
Delight in these elegant and flavorful Chocolate Raspberry Cups, combining rich melted chocolate with a fresh, tangy raspberry chia seed filling. Perfect as a guilt-free treat or a sophisticated dessert, this no-bake recipe requires minimal preparation and yields bite-sized treats bursting with fruity and chocolaty goodness.
Ingredients
Raspberry Filling
- 6 oz raspberries (fresh or frozen)
- 1 tbsp chia seeds
- 2 tsp sweetener of choice
Chocolate Shell
- 6 oz chocolate chips or chopped chocolate bars (about 1 cup)
- Optional: 1 tsp vegetable oil or melted coconut oil
Instructions
- Prepare the raspberry filling: Mash the raspberries thoroughly. In a small saucepan over low heat, combine the mashed raspberries, chia seeds, and sweetener. Stir occasionally until the mixture is hot and begins to bubble. Remove from heat and let it cool slightly.
- Melt the chocolate: In a microwave-safe bowl or using a double boiler, melt the chocolate chips or chopped chocolate. If using, stir in the vegetable or coconut oil until smooth and glossy.
- Form the chocolate cups: Line a mini muffin tin with paper liners or use candy molds. Spoon about a teaspoon of the melted chocolate into each liner, spreading it up the sides to form a thin shell. Refrigerate or freeze for a few minutes until firmly set.
- Add the raspberry filling: Once the chocolate shells have hardened, spoon about two teaspoons of the raspberry chia filling into each cup carefully.
- Seal the cups: Cover the raspberry filling with the remaining melted chocolate, smoothing the tops evenly. Place back in the refrigerator to chill until fully set and firm.
Notes
- You can use fresh or frozen raspberries; if using frozen, thaw and drain excess water before mashing.
- Adjust the amount of sweetener according to your taste preference or dietary needs.
- The optional oil helps to achieve a glossier, smoother chocolate texture but can be omitted.
- For best results, use high-quality dark or semi-sweet chocolate.
- Store finished cups in the refrigerator and consume within 5 days.
- If you like, dust with cocoa powder or garnish with a fresh raspberry before serving.

