
If you’ve ever dreamed of filling your kitchen with the irresistible aroma of fresh-baked bread, this Easy Homemade Rye Bread Recipe is your golden ticket. It combines the hearty, slightly tangy flavor of dark rye with the perfect chewy crumb and crisp crust that make rye bread so special. With just a handful of simple ingredients and a little patient waiting, you’ll create a loaf that feels like it came from a cozy artisan bakery. Whether you’re new to bread baking or a seasoned pro looking to expand your repertoire, this recipe will fill your home with warmth and your table with deliciousness.
Ingredients You’ll Need
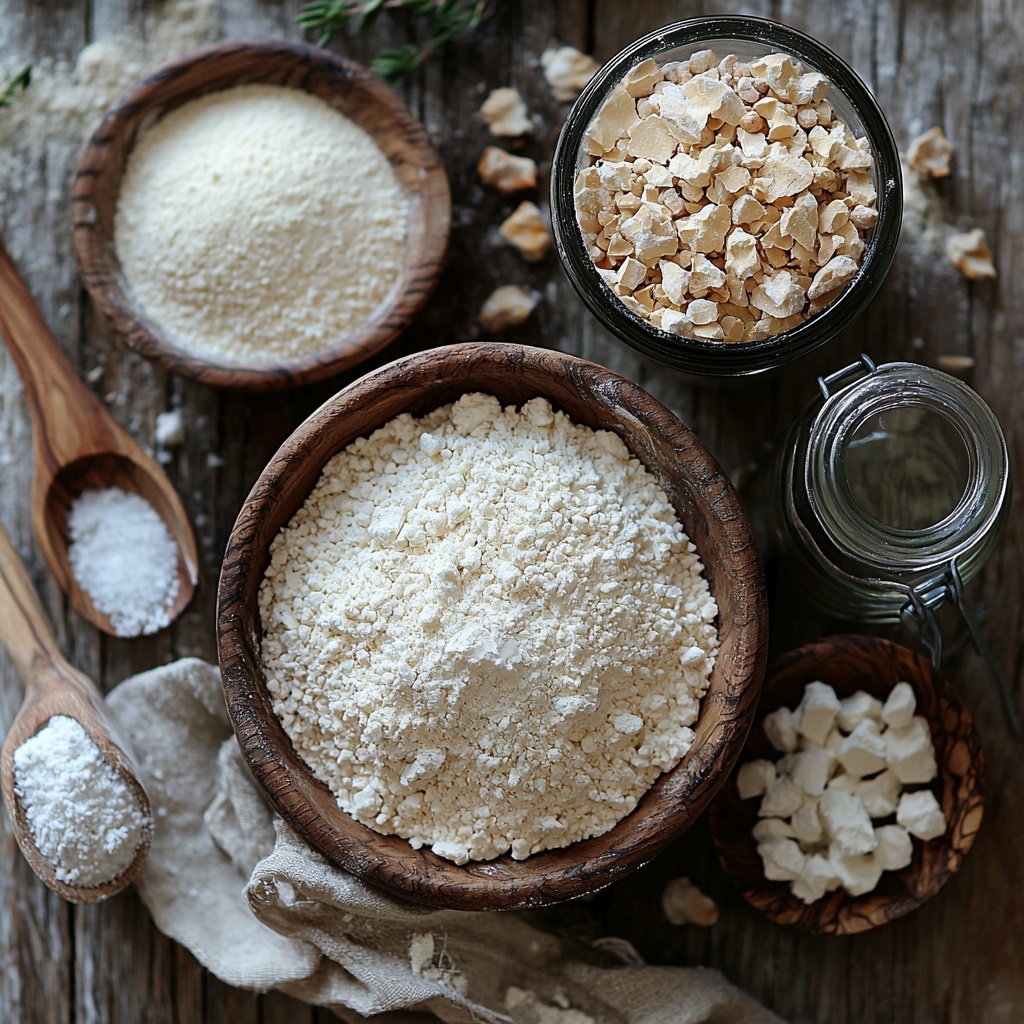
The beauty of this rye bread is in its simplicity—the ingredients are straightforward, yet each plays a crucial role in developing that rich flavor and irresistible texture. Every item is easy to find and works together perfectly to give you that authentic rye bread experience.
- 3 cups bread flour: Provides the necessary gluten structure keeping the bread chewy and light.
- 1 cup dark rye flour: Adds that distinctive earthy flavor and lovely deep color.
- 2 teaspoons fine sea salt: Enhances all the flavors and balances the tanginess of the rye.
- 1/2 teaspoon instant dried yeast: Responsible for that gentle rise and airy crumb.
- 1-1/2 cups water: Hydrates the dough and helps develop the rich texture you’re craving.
How to Make Easy Homemade Rye Bread Recipe
Step 1: Mix Your Dry Ingredients and Add Water
Begin by stirring together the bread flour, dark rye flour, fine sea salt, and instant yeast in a large bowl. The blend of bread and rye flours sets the perfect base for this bread’s chewy yet hearty nature. Pour in the water and mix everything until you no longer see any dry flour. The dough will be very sticky and feel a bit wetter than typical bread dough. Don’t worry—that’s exactly what you want for a rustic loaf.
Step 2: Let the Dough Rise Overnight
Cover your bowl with plastic wrap and let it sit at room temperature, undisturbed, for 12 to 18 hours. This long, slow rise allows the yeast to work its magic, developing the deep flavors and tender crumb that make rye bread so addictive. You’ll be amazed at how much the dough puffs up overnight.
Step 3: Shape the Dough Into a Ball
Once your dough has doubled in size and looks lively and bubbly, generously flour a clean surface. Tilt the bowl and carefully scrape out the dough using a rubber spatula or your fingertips, handling it gently so it doesn’t tear. Lightly flour your hands to prevent sticking and fold the dough into itself to create a smooth ball. This tender shaping helps create a beautiful crust while maintaining an open crumb inside.
Step 4: Second Rise on a Floured Towel
Sprinkle a clean tea towel heavily with flour and gently set your dough ball on it, seam side down. Loosely fold the towel over the dough to keep it cozy, then place it in a small mixing bowl for support. Let it rise again for 1 to 2 hours until just about doubled. This resting period adds volume and keeps your bread soft inside.
Step 5: Preheat Your Oven and Dutch Oven
Thirty minutes before the dough’s second rise finishes, preheat your oven to 475 degrees Fahrenheit. Place a rack in the lower third position and put a Dutch oven on it to preheat along with the oven. Preheating the pot is key to creating that superb crust you expect from great rye bread.
Step 6: Transfer Dough Into Hot Dutch Oven
Using oven mitts to avoid burns, carefully remove the Dutch oven lid. With the tea towel supporting the dough, gently flip it into the pot, seam side facing up. It’s a little nerve-wracking the first time, but the result is totally worth it. Cover the Dutch oven with the lid and place it back in the oven for 30 minutes. The enclosed pot traps steam, giving you that artisan touch.
Step 7: Finish Baking Uncovered
After 30 minutes, remove the lid and bake uncovered for another 15 to 20 minutes until the crust turns a deep, dark golden brown. This step crisps up the crust beautifully while allowing the loaf to develop its full flavor complexity and rustic appearance.
Step 8: Cool Before Slicing
Carefully lift your freshly baked rye bread out of the Dutch oven and place it on a cooling rack. Let it rest for at least 20 minutes before slicing—that pause lets the crumb set nicely and prevents the bread from turning gummy inside. This is when patience truly pays off!
How to Serve Easy Homemade Rye Bread Recipe
Garnishes
Easy Homemade Rye Bread Recipe’s bold flavor stands up beautifully to simple garnishes like a smear of good-quality butter or a drizzle of honey. For an extra nod to traditional rye, sprinkle some caraway seeds on top before baking next time, or slather on a layer of cream cheese with fresh herbs for a refreshing contrast.
Side Dishes
This bread is an excellent companion to robust soups and stews, especially classics like borscht or hearty vegetable soups. It also pairs wonderfully with sharp cheeses, cured meats, or a tangy mustard for a satisfying snack or meal. Its texture makes it ideal for dipping or building open-faced sandwiches packed with fresh, seasonal veggies.
Creative Ways to Present
Why not turn your Easy Homemade Rye Bread Recipe into a centerpiece? Create a rustic bread bowl by hollowing out the loaf to serve creamy dips or soups. Or cut thick slices, toast them, and top with smoked salmon, dill, and a squeeze of lemon for an elegant appetizer. The options are endless and delightful!
Make Ahead and Storage
Storing Leftovers
To keep your homemade rye bread fresh, store it at room temperature in a paper bag or wrapped loosely in a clean kitchen towel. This allows the crust to stay crisp while the interior remains soft. Avoid airtight plastic unless freezing, as that can trap moisture and soften the crust prematurely.
Freezing
If you want to save some for later, slice your loaf first and freeze the slices individually on a baking sheet. Then transfer them to a sealed freezer bag. This way, you can pull out just what you need without defrosting the entire loaf. Frozen rye bread keeps well for up to three months.
Reheating
To enjoy your rye bread freshly baked again, toast slices directly from frozen or warm a whole loaf by wrapping it loosely in foil and heating in a 350-degree oven for 10 to 15 minutes. This brings back that perfect crust-to-crumb contrast that makes this bread so crave-worthy.
FAQs
Can I use regular rye flour instead of dark rye flour?
Yes, you can substitute regular rye flour, but dark rye flour offers a deeper, more robust flavor and richer color that’s characteristic of traditional rye bread. It’s worth seeking out for this recipe if you can!
Do I need a Dutch oven to bake this bread?
While a Dutch oven helps create the ideal steamy environment to develop a crispy crust, you can use a heavy, oven-safe pot with a lid or bake on a preheated baking stone with a pan of water in the oven for steam if needed.
Why is the dough so sticky? Is that normal?
Absolutely normal! Rye flour has less gluten than wheat flour, so the dough feels wetter and stickier. Resist the urge to add too much flour—it should be sticky to ensure your bread stays moist and tender.
How long can I keep the bread after baking?
Fresh rye bread is best enjoyed within 2 to 3 days at room temperature. Beyond that, it may start to dry out or become stale, but freezing will keep it fresh for much longer.
Can I add seeds or nuts to this rye bread recipe?
Definitely! Adding caraway seeds, sunflower seeds, or chopped nuts can add wonderful texture and flavor. Just fold them into the dough after the first rise before shaping it into a ball.
Final Thoughts
Baking this Easy Homemade Rye Bread Recipe is truly a rewarding experience that fills your home with warmth and your taste buds with joy. With minimal ingredients and hands-on time, you’ll create a loaf that tastes like it was made by a professional baker. So grab your mixing bowl, set aside some time, and enjoy the simple pleasure of homemade rye bread. Trust me, once you try it, you’ll want to bake it again and again.
Print
Easy Homemade Rye Bread Recipe
- Prep Time: 14h 15m
- Cook Time: 50m
- Total Time: 15h 5m
- Yield: 12 servings
- Category: Bread
- Method: Baking
- Cuisine: European
Description
This easy homemade rye bread recipe yields a wonderfully dense and flavorful loaf with a dark golden crust and soft, moist interior. Using a combination of bread flour and dark rye flour, the dough requires a long, slow fermentation overnight to develop its characteristic tang and depth of flavor. Baked in a preheated Dutch oven, this rustic artisanal bread is perfect for sandwiches, toasting, or simply enjoying with butter.
Ingredients
Dry Ingredients
- 3 cups bread flour
- 1 cup dark rye flour
- 2 teaspoons fine sea salt
- 1/2 teaspoon instant dried yeast
Wet Ingredients
- 1–1/2 cups water
Instructions
- Mix Dry Ingredients. In a large mixing bowl, stir together the bread flour, dark rye flour, sea salt, and instant dried yeast until well combined.
- Add Water and Combine. Pour in the 1-1/2 cups of water and mix thoroughly until there are no dry patches of flour. Expect the dough to be very sticky and shaggy.
- First Rise. Cover the bowl tightly with plastic wrap and leave the dough to rise at room temperature for 12 to 18 hours, or until it has doubled in size. This long fermentation develops flavor and texture.
- Shape the Dough. Generously flour a clean work surface. Carefully tip the dough out of the bowl using a spatula or your fingers, trying not to tear it. Lightly flour your hands and gently fold the dough over itself to form a ball shape.
- Second Rise. Flour a clean tea towel liberally and place the dough seam side down on the towel. Loosely fold the towel over the dough and place it into a small bowl. Let it rise again for about 1 to 2 hours until nearly doubled.
- Preheat Oven and Dutch Oven. About 30 minutes before the second rise ends, place a rack in the lower third of your oven and set a Dutch oven on it. Preheat the oven to 475°F to ensure the pot is very hot for baking.
- Bake the Bread: First Stage. Using oven mitts, carefully remove the hot Dutch oven and take off the lid. Invert the dough from the towel into the pot, keeping the seam side up. Cover the pot and bake for 30 minutes. This traps steam and gives the bread a crusty exterior.
- Bake the Bread: Second Stage. Remove the lid from the Dutch oven and continue baking for an additional 15 to 20 minutes, until the crust is a deep golden brown.
- Cool the Bread. Take the bread out carefully and place it on a wire rack. Allow it to cool for at least 20 minutes before slicing to let the crumb set properly.
Notes
- For best flavor, use bread flour with higher protein content to develop gluten structure.
- The long fermentation time allows natural flavors to develop—do not rush this step.
- Use a well-floured surface and your hands to handle the sticky dough gently without tearing.
- Preheating the Dutch oven produces steam inside, which is critical for a crispy crust.
- Letting the bread cool completely before slicing prevents a gummy texture.
- You can store the bread wrapped in a cloth or bread bag at room temperature for up to 3 days.


