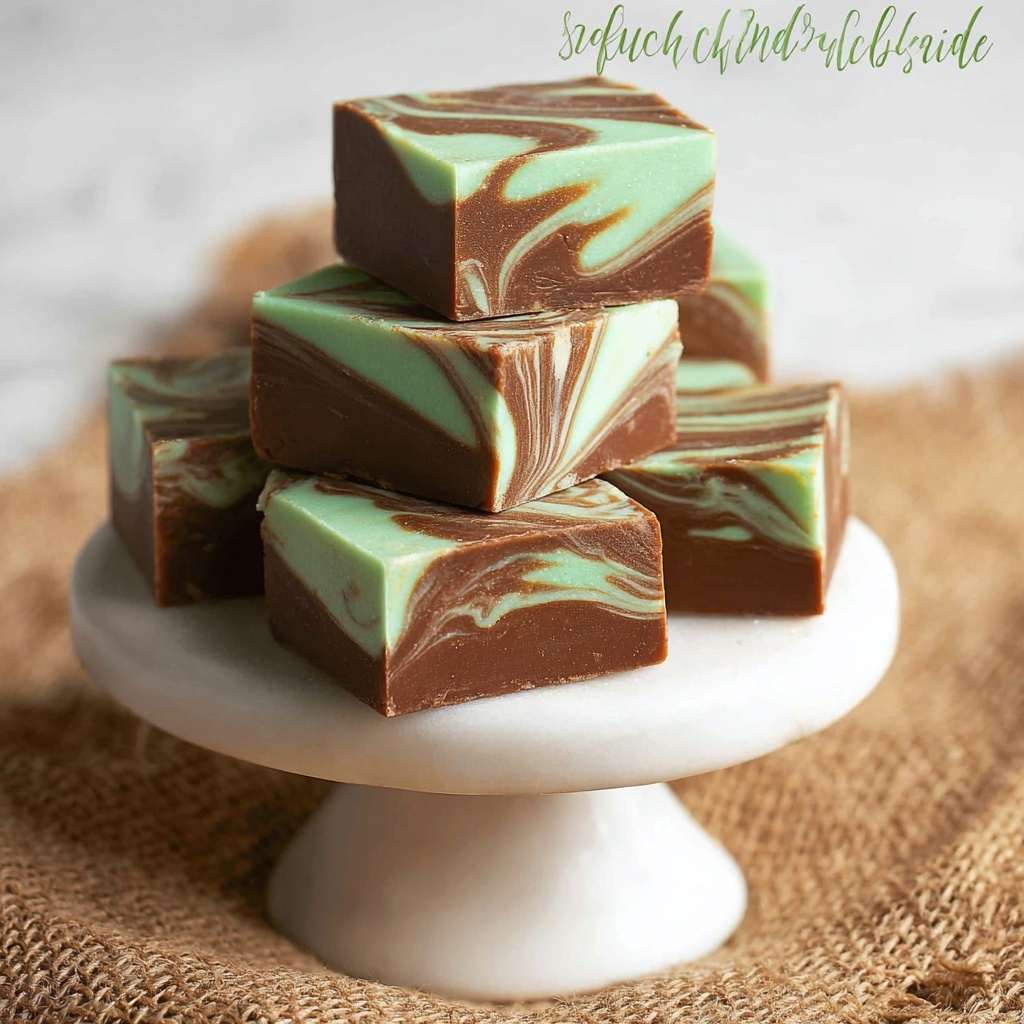
If you have a sweet tooth craving that burst of refreshing flavor with a rich, creamy texture, this Mint Chocolate Fudge Recipe is exactly what you need. It combines the classic decadence of milk and white chocolate with a lively hint of mint, creating a mesmerizing treat that’s perfect for sharing with friends or indulging all to yourself. Easy to make with simple ingredients, this fudge recipe brings a festive sparkle with its swirled green and chocolate layers that look as delightful as they taste.
Ingredients You’ll Need
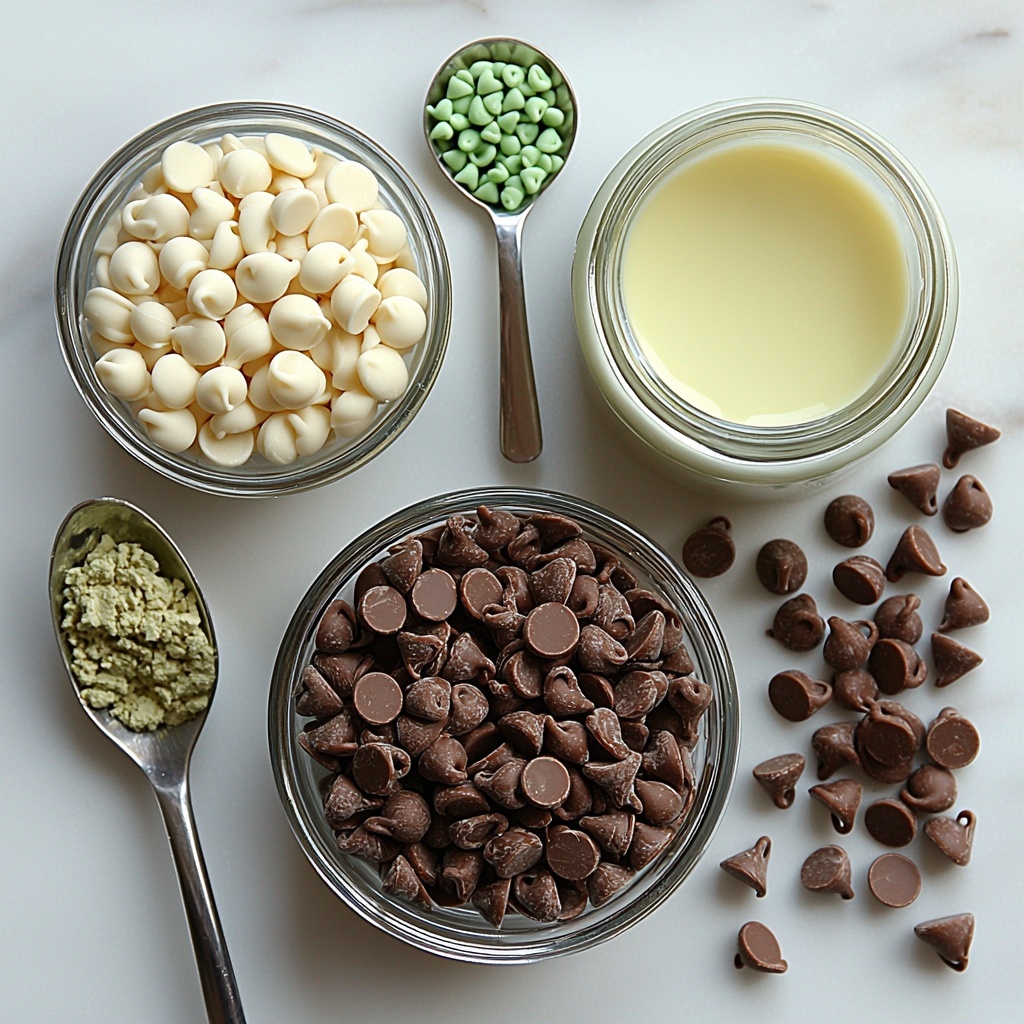
The beauty of this Mint Chocolate Fudge Recipe is in its simplicity. Each ingredient plays a key role in achieving that perfect balance of creamy texture, refreshing minty flavor, and eye-catching color that makes every bite pure joy.
- Milk chocolate chips: Provide a smooth, rich chocolate base that melts wonderfully and complements the mint perfectly.
- White chocolate chips: Give a sweet contrast and lighten the fudge visually, while soaking up the green color beautifully.
- Sweetened condensed milk: Creates that irresistible creamy, fudgy texture without any fuss—make sure it’s not evaporated milk!
- Mint extract: Infuses a fresh, invigorating mint flavor that lifts the chocolate’s richness delightfully.
- Green food coloring: Adds a fun and festive touch, turning the white chocolate into a pretty mint-green swirl.
How to Make Mint Chocolate Fudge Recipe
Step 1: Prepare Your Pan
Start by lining an 8×8 inch pan with foil, allowing the edges to hang over so you can easily lift the fudge out later. This simple prep makes cutting and serving a breeze and keeps your fudge looking neat.
Step 2: Melt the Chocolates
Next, melt the milk chocolate chips and white chocolate chips separately in the microwave following package instructions. Remember, stirring is key—chocolate melts mostly by stirring, so give it a good mix every 30 seconds to avoid overheating and seize up. You’ll have silky smooth pools of chocolate ready in under a minute.
Step 3: Combine with Sweetened Condensed Milk
Divide the sweetened condensed milk evenly into two bowls—one for the milk chocolate and one for the white chocolate. This step is crucial for getting that luscious fudgy texture that isn’t overly sweet but deeply satisfying.
Step 4: Add Mint Flavor and Color
Into the milk chocolate mixture, pour in the mint extract for that crisp, refreshing flavor hit. Into the white chocolate, drop in your green food coloring a little at a time until it’s a vibrant minty shade. Stir both mixtures thoroughly until combined and glossy.
Step 5: Create the Swirl and Set
Begin dropping spoonfuls of each chocolate mixture randomly into your prepared pan. Once all the fudge mixtures are in, shake the pan gently to level everything out evenly. For that signature Mint Chocolate Fudge Recipe look, run a butter knife softly through the mixture a couple of times to swirl the two colors together like a marble masterpiece.
Step 6: Chill and Cut
Finally, refrigerate overnight to let the fudge set perfectly firm. When you’re ready, lift the fudge out using the foil edges, trim off the rough bits around the sides, then carefully cut the fudge into four large squares. Slice each square into nine bite-sized pieces, giving you 36 perfect portions to savor.
How to Serve Mint Chocolate Fudge Recipe
Garnishes
Elevate the presentation of your mint chocolate fudge by sprinkling a few crushed peppermint candies or fresh mint leaves on top just before serving. This adds crunch and an extra pop of minty freshness that impresses both the eyes and the palate.
Side Dishes
Pair the fudge with a simple cup of hot cocoa or freshly brewed coffee to balance the sweetness while complementing the minty chocolate experience. A light fruit salad with berries can also provide a fresh, juicy contrast for a more balanced dessert spread.
Creative Ways to Present
For parties or gifts, arrange your fudge slices in small decorative boxes or stack them neatly on a pretty plate with parchment paper layers in between. You can even use colorful cupcake liners to portion out individual servings that feel extra special and mess-free.
Make Ahead and Storage
Storing Leftovers
Store your leftover Mint Chocolate Fudge Recipe pieces in an airtight container in the refrigerator. This keeps the fudge fresh and firm for up to two weeks, making it easy to enjoy a sweet treat whenever the mood strikes.
Freezing
If you want to enjoy your mint chocolate fudge later, freeze it in a freezer-safe container with parchment paper layers to prevent sticking. It will keep well for up to three months, and thawing it overnight in the fridge restores that perfect fudgy texture.
Reheating
This fudge is best enjoyed chilled, so reheating isn’t recommended as it can alter the texture. However, if you prefer it slightly soft, allow it to sit at room temperature for 10–15 minutes before serving to bring back some melt-in-your-mouth softness.
FAQs
Can I substitute the sweetened condensed milk?
Sweetened condensed milk is essential for that creamy fudge texture and sweetness. Substituting it might affect the consistency and flavor, so it’s best to stick to the original ingredient.
How strong is the mint flavor? Can I adjust it?
The mint extract adds a pleasant but not overpowering minty note. Feel free to adjust the quantity to your preference—start with 1 teaspoon and add a little more if you want a bolder mint punch.
Can I make this fudge without food coloring?
Absolutely! The fudge will still taste amazing without it, though the green swirl adds that festive, fun appearance that makes this Mint Chocolate Fudge Recipe extra special.
Is this recipe gluten-free?
Yes, all the ingredients used in this fudge recipe are naturally gluten-free, making it a safe and delicious treat for those avoiding gluten. Just double-check the labels for any cross-contamination.
Can I use other types of chocolate?
Milk and white chocolate are key to getting the classic mint chocolate combo here. Dark chocolate will work, but it will change the flavor and sweetness balance. If you try it, you might need to tweak the amounts to taste.
Final Thoughts
This Mint Chocolate Fudge Recipe is one of those delightful surprises that’s easy to make yet feels so special every time. It’s creamy, colorful, and perfectly minty, making it a crowd-pleaser any time of year. Give it a try—you’ll be handing out pieces of happiness in no time, and probably sneaking a few for yourself with a big smile on your face.
Print
Mint Chocolate Fudge Recipe
- Prep Time: 10 minutes
- Cook Time: 0 minutes
- Total Time: 10 minutes prep plus overnight chilling (about 8 hours)
- Yield: 36 pieces
- Category: Dessert
- Method: No-Cook
- Cuisine: American
Description
This Mint Chocolate Fudge recipe combines creamy milk and white chocolate with a refreshing hint of mint, resulting in a rich and smooth treat perfect for any chocolate lover. The fudge is easy to prepare with no cooking required, simply melt, mix, and chill overnight for a delightful dessert with a beautiful swirled effect.
Ingredients
Chocolate Mixtures
- 1 1/2 cups milk chocolate chips
- 1 1/2 cups white chocolate chips
Additional Ingredients
- 14 ounces sweetened condensed milk (not evaporated milk)
- 1 teaspoon mint extract
- Green food coloring (to tint white chocolate)
Instructions
- Prepare the pan: Line an 8×8-inch pan with foil leaving the foil extending over the edges to make removing the fudge easier later.
- Melt the chocolates: In separate bowls, melt the milk chocolate chips and white chocolate chips in the microwave according to package instructions. Stir well every 30 seconds to ensure smoothness and avoid overheating, usually melting in under a minute.
- Mix with condensed milk: Divide the sweetened condensed milk evenly and add half to the melted milk chocolate bowl and half to the melted white chocolate bowl, stirring each until fully combined.
- Add flavor and color: Stir the mint extract into the milk chocolate mixture. Add green food coloring to the white chocolate mixture until the desired minty shade is achieved, mixing thoroughly.
- Combine and swirl: Spoon the two chocolate mixtures alternately into the prepared pan. Gently shake the pan to level the fudge. Using a butter knife, swirl through the mixtures lightly to create a marbled effect.
- Chill and cut: Refrigerate the fudge overnight until firm. Lift the fudge from the pan using the foil edges, trim off the rough edges for a clean appearance, then cut the fudge into 36 pieces by first slicing it into four large sections and then cutting each large piece into nine smaller squares.
Notes
- Be careful not to overheat the chocolate during melting to prevent burning or seizing.
- Use sweetened condensed milk, not evaporated milk, for the correct texture and sweetness.
- Allow the fudge to chill fully overnight for the best firmness and sliceability.
- Stirring the chocolate frequently during melting ensures an even, smooth consistency.
- Green food coloring can be adjusted to achieve the desired mint color intensity.


