
If you’re craving something that delivers a punch of umami, a touch of creaminess, and the freshest flavors of the sea, this Miso Baked Oysters – A Quick and Easy West Coast Delight Recipe is your new go-to. It’s a stunningly simple dish that feels fancy but comes together in minutes, showcasing the oysters’ briny sweetness under a luscious miso-mayo topping that bubbles to golden perfection. Whether you’re hosting friends or treating yourself, these baked oysters bring that perfect balance of savory, tangy, and slightly spicy notes that will keep you coming back for more.
Ingredients You’ll Need
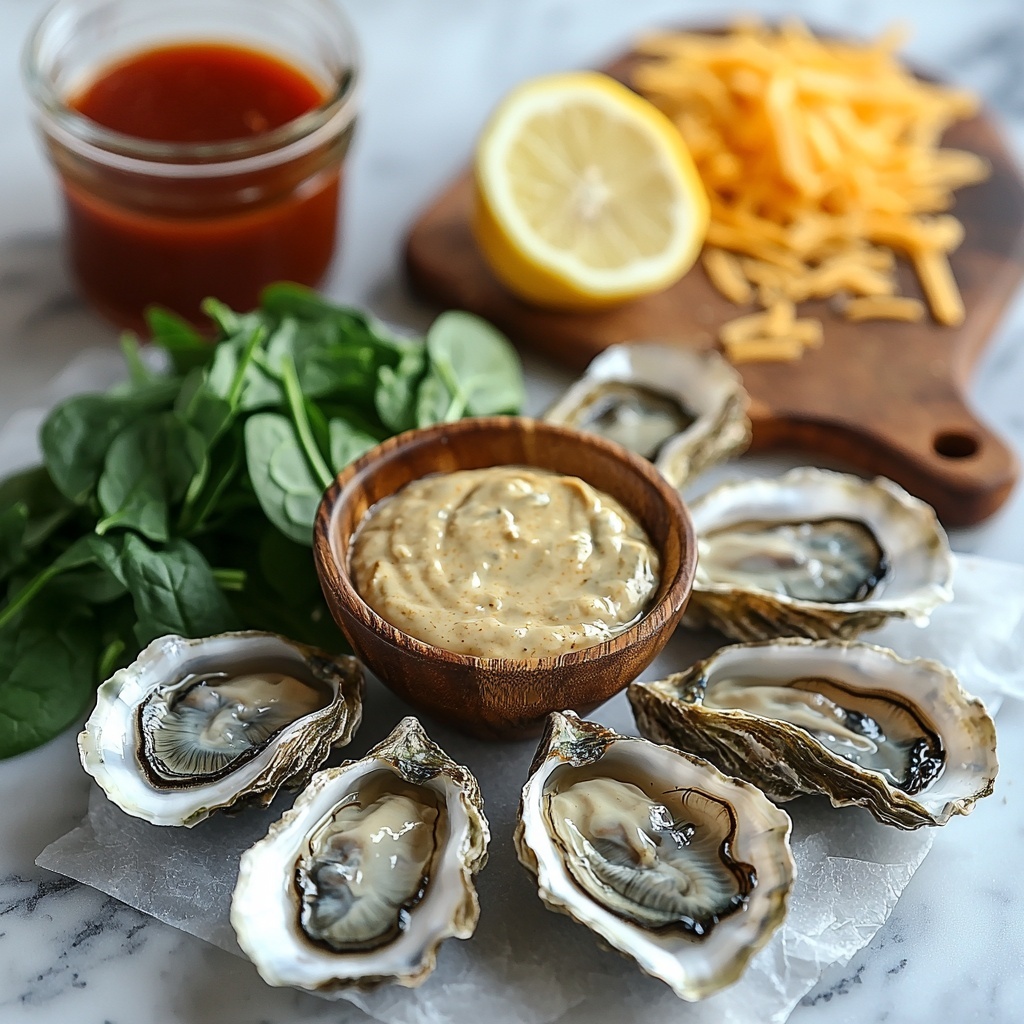
This recipe shines because it uses a handful of carefully chosen ingredients that each play a crucial role. From the delicate texture of fresh oysters to the creamy, tangy miso mayo mixture, every element contributes to the perfect harmony of taste and look.
- Fresh Oysters: The star of the dish, fresh oysters provide that natural brininess and tender bite that pair wonderfully with savory toppings.
- Japanese Mayonnaise: Creamy and subtly sweet, this mayo blends seamlessly with miso for richness and balance.
- Miso Paste: Adds depth with its fermented umami flavor—light miso is gentle, while darker ones add a richer note.
- Mirin: A touch of this sweet rice wine enhances the overall flavor, marrying the savory and sweet components beautifully.
- Hot Sauce: Just enough to give a little kick; adjust it to suit your spice tolerance for a personalized touch.
- Fresh Lemon Juice: Brightens the entire dish, cutting through the richness with its fresh acidity.
- Fresh Spinach: Offers a mild earthiness and keeps oysters stable while adding a pop of green color.
- Cheddar or Mozzarella Cheese: Melted on top for gooey, golden goodness; omit for a dairy-free version without compromising flavor.
How to Make Miso Baked Oysters – A Quick and Easy West Coast Delight Recipe
Step 1: Preheat Your Broiler
Start by setting your broiler or BBQ to high heat, ideally around 500 degrees Fahrenheit (260 degrees Celsius). Give it about 10 minutes to reach the perfect temperature—this high heat is what crisps up the cheese and melds the miso sauce into the oysters beautifully.
Step 2: Prepare Your Oyster Bed
Arrange oyster shells or small ramekins on a sturdy baking sheet. Using coarse salt to fill around the shells helps keep each oyster steady during baking, preventing any unwanted spills and ensuring even cooking.
Step 3: Make the Miso Mayo Sauce
In a bowl, whisk together the Japanese mayonnaise and miso paste until smooth and velvety. Then add mirin, hot sauce, and fresh lemon juice, blending all the ingredients into a luscious sauce that will elevate each oyster with its creamy, tangy, and spicy flavors.
Step 4: Layer the Spinach
Spoon fresh spinach evenly into each shell or ramekin. The spinach acts not only as a flavorful base but also as a cushion for the oysters, helping them stay perfectly positioned under the broiler’s heat.
Step 5: Add the Oysters
Place one fresh oyster on top of the spinach in each shell. Their natural juices blend with the spinach, creating a moist and flavorful base for the toppings.
Step 6: Top with Sauce and Cheese
Generously spoon about one tablespoon of your miso mayo sauce over each oyster, ensuring every bite is richly coated. Then sprinkle with shredded cheddar or mozzarella cheese for that irresistible golden crust.
Step 7: Broil to Perfection
Slide the baking sheet under the broiler and cook for 5 to 8 minutes. Watch closely as the cheese melts and bubbles to a golden brown, creating a beautifully inviting finish while the oysters remain tender and juicy underneath.
Step 8: Rest Before Serving
Remove the oysters from the oven and allow them to cool for about 5 minutes. This resting moment lets the flavors settle and makes them easier to enjoy without burning your fingers or palate.
How to Serve Miso Baked Oysters – A Quick and Easy West Coast Delight Recipe
Garnishes
A sprinkle of finely chopped green onions or chives adds a fresh, vibrant contrast that cuts through the richness. A dash of toasted sesame seeds can bring a subtle nuttiness and extra texture to the presentation.
Side Dishes
Pair with a simple crisp green salad dressed lightly in a citrus vinaigrette or a crusty artisan bread to soak up every drop of the miso mayo sauce and oyster juices. These sides keep things light and let the oysters truly shine on your plate.
Creative Ways to Present
Arrange the oysters on a bed of crushed ice for a stunning appetizer display that keeps them cold until served. You can also present each oyster on individual spoons for an elegant finger-food experience perfect for parties.
Make Ahead and Storage
Storing Leftovers
Keep leftover miso baked oysters in an airtight container in the refrigerator for up to 24 hours. Because oysters are best when fresh, try to enjoy any leftovers quickly to maintain their delicate texture and flavors.
Freezing
It’s not recommended to freeze these baked oysters, as the texture of both the oysters and the creamy miso topping will suffer. Fresh is definitely best for this recipe.
Reheating
If you must reheat, do so gently in a low oven at about 300 degrees Fahrenheit until warmed through, avoiding microwave reheating which can toughen the oysters and make the sauce separate.
FAQs
Can I use frozen oysters in this recipe?
Fresh oysters are highly recommended for the best flavor and texture in the Miso Baked Oysters – A Quick and Easy West Coast Delight Recipe. If you only have frozen oysters, thaw them carefully and pat dry, but the final dish might be less juicy and tender.
What can I substitute for Japanese mayonnaise?
If you can’t find Japanese mayo, use regular mayonnaise but increase the lemon juice slightly to add brightness that mimics the lighter Japanese version’s flavor profile.
Is it possible to make this recipe dairy-free?
Absolutely! Simply omit the cheese topping, and the miso mayo sauce will still provide plenty of creamy, umami goodness to keep the oysters delicious and satisfying.
How spicy is the dish? Can I adjust it?
The hot sauce adds a mild to moderate heat, and you can definitely adjust the amount based on your spice tolerance. For a milder taste, reduce or omit the hot sauce altogether.
Can I prepare the miso mayo sauce ahead of time?
Yes, you can mix the miso mayo sauce a few hours ahead and refrigerate it. Just give it a quick stir before spooning over the oysters so it’s perfectly smooth and ready to use.
Final Thoughts
There’s something truly special about the Miso Baked Oysters – A Quick and Easy West Coast Delight Recipe that makes it feel like a celebration every time you make it. With its rich layers of flavor, pleasing textures, and simple preparation, it’s a fantastic way to bring a little taste of the coast right into your kitchen. I can’t wait for you to try it and discover just how effortlessly delicious oysters can be!
Print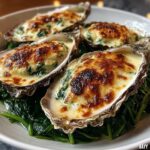
Delicious Recipe
- Prep Time: 10 minutes
- Cook Time: 8 minutes
- Total Time: 18 minutes
- Yield: 4 servings
- Category: Appetizer
- Method: Baking
- Cuisine: West Coast, Japanese-inspired
Description
Miso Baked Oysters is a quick and easy West Coast-inspired dish featuring fresh oysters topped with a savory miso mayonnaise sauce, fresh spinach, and melty cheese, broiled to perfection. This flavorful recipe combines Japanese ingredients with fresh seafood to create a delightful appetizer or light meal that is sure to impress.
Ingredients
Oysters
- 12 pieces Fresh Oysters (Substitute with any large oysters available)
Sauce
- 1/2 cup Japanese Mayonnaise (For regular mayo, increase lemon juice to balance flavor)
- 2 tablespoons Miso Paste (Light miso for milder taste; darker varieties for deeper flavor)
- 1 tablespoon Mirin (Do not substitute for an authentic flavor experience)
- 1 teaspoon Hot Sauce (Use any preferred brand, adjust to spice preference)
- 1 tablespoon Fresh Lemon Juice (Fresh juice recommended for best flavor)
Additional Ingredients
- 2 cups Fresh Spinach (Can substitute with kale or another leafy green)
- 1 cup Cheddar or Mozzarella Cheese (shredded) (Omit for dairy-free version)
Instructions
- Preheat the Broiler: Preheat your broiler or BBQ to high heat, around 500°F (260°C). Allow about 10 minutes for the broiler to fully heat up to ensure even cooking.
- Prepare Baking Surface: Arrange oyster shells or ramekins on a baking sheet. Fill them with coarse salt to stabilize the oysters during baking, preventing them from tipping over.
- Make Miso Mayo Sauce: In a mixing bowl, combine Japanese mayonnaise with miso paste, stirring until smooth. Blend in mirin, hot sauce, and fresh lemon juice until fully incorporated, creating a creamy, flavorful sauce.
- Arrange Spinach: Evenly distribute fresh spinach among the oyster shells or ramekins, providing a bed for the oysters and adding freshness and texture.
- Place Oysters: Carefully place the fresh oysters on top of the spinach in each shell or ramekin, preparing them for topping and broiling.
- Add Sauce and Cheese: Generously spoon about 1 tablespoon of the creamy miso mayo sauce over each oyster. Then, sprinkle shredded cheddar or mozzarella cheese evenly on top for a golden, bubbly finish.
- Broil: Place the baking sheet under the preheated broiler and cook for 5 to 8 minutes, or until the cheese is bubbling and golden brown, signaling that the oysters are cooked and the flavors melded.
- Cool Slightly: Remove from the oven and allow the oysters to cool for about 5 minutes. This resting time lets the flavors settle and ensures safe consumption temperature.
- Serve: Serve the miso baked oysters warm, ideally alongside a crisp salad or crusty bread to complement the rich flavors and provide textural contrast.
Notes
- Use fresh oysters for the best flavor and safety.
- Light miso paste provides a mild flavor, while darker miso delivers a deeper umami taste.
- If you prefer a dairy-free version, omit the cheese without compromising the overall taste.
- Adjust the amount of hot sauce based on your heat preference.
- Do not substitute mirin to maintain authentic flavor.
- Ensure the broiler is fully preheated for optimal cooking results.
- Serve immediately after cooling to best enjoy the texture and flavor.

