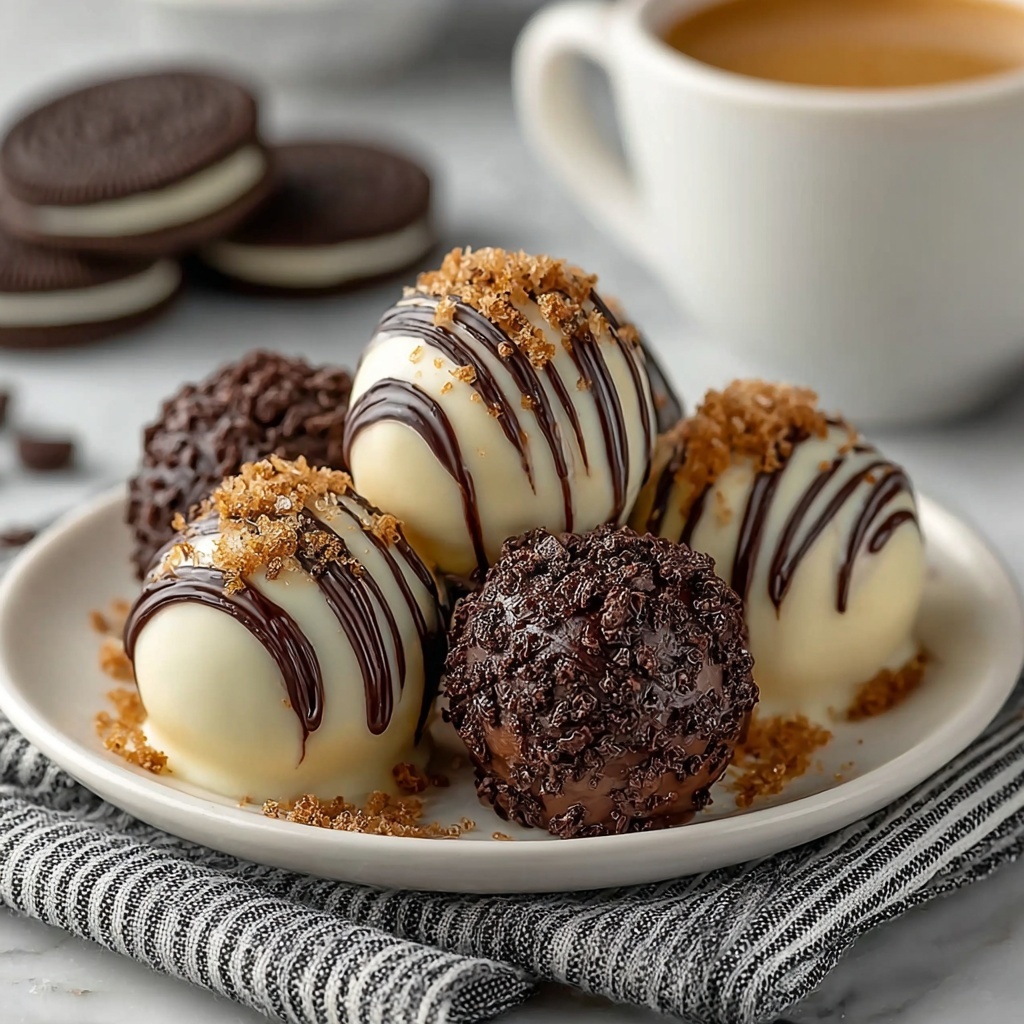
If you are looking for a dessert that is irresistibly rich, incredibly easy, and absolutely crowd-pleasing, the Oreo Truffles: A Decadent No-Bake Treat Recipe is a must-try in your kitchen. These little bites combine the classic flavor of Oreos with creamy cream cheese and a luscious chocolate coating to create a stunning, bite-sized indulgence. Best of all, they come together quickly without any baking, making them perfect for last-minute gatherings or a simple sweet treat whenever the craving hits!

Ingredients You’ll Need
These ingredients may be straightforward, but each one plays an essential role in creating the perfect texture and flavor balance for your Oreo truffles. From the slight crunch of crushed Oreos to the smooth tang of cream cheese and the glossy chocolate coating, every component adds something special.
- Oreo cookies, 1 package (15.35 oz): The base of the truffles, providing that beloved chocolate-and-cream taste and a wonderful crumbly texture.
- Cream cheese, 8 oz (softened): Adds creaminess and helps bind the Oreo crumbs into a moldable dough with a velvety mouthfeel.
- Semi-sweet chocolate chips, 16 oz: For coating, melting into a shiny, rich shell that perfectly complements the sweet center.
- Coconut oil, 1 tablespoon (optional): Helps the chocolate melt smoothly and creates a silky finish on the truffles.
- Crushed Oreos (optional garnish): To sprinkle on top, adding extra chocolate flavor and a delightful visual appeal.
- Melted chocolate drizzle (optional decoration): For a fancy touch that makes your truffles look professionally made.
How to Make Oreo Truffles: A Decadent No-Bake Treat Recipe
Step 1: Crush Cookies
Start by breaking down your Oreos into fine crumbs. Using a food processor is the easiest and quickest method—it turns the cookies into a sandy texture that will easily mix with the cream cheese. Don’t worry if you don’t have one; simply place the cookies in a zip-top bag and crush them with a rolling pin until finely ground. This step builds the foundation for those luscious truffles.
Step 2: Combine Ingredients
Next, mix your Oreo crumbs with softened cream cheese in a bowl. Use a spatula or your hands to blend everything until it forms a smooth, dough-like consistency. This creamy mixture is what makes the truffles melt in your mouth, balancing crumbly texture with softness perfectly.
Step 3: Shape into Balls
Scoop out about a tablespoon of the mixture and gently roll it into a ball shape with your hands. Place the formed balls on a parchment-lined baking sheet to keep them from sticking. This process is both therapeutic and fun, turning little bits of cookie and cream into bite-sized morsels of goodness.
Step 4: Chill
Pop the baking sheet into the refrigerator for around 30 minutes. This firmness step is crucial because it helps the truffles hold their shape during the chocolate-dipping process, ensuring a clean, smooth finish.
Step 5: Melt Chocolate
In a microwave-safe bowl, combine the semi-sweet chocolate chips with the optional tablespoon of coconut oil. Microwave in short 30-second bursts, stirring between each, until the chocolate is fully melted and silky smooth. This warm, glossy chocolate will be the decadent coat that transforms your truffles into elegant treats.
Step 6: Dip Truffles
Retrieve your chilled truffles and carefully dip each one into the melted chocolate. Use a fork or a dedicated dipping tool to lift and let excess chocolate drip off, creating a perfect, thin shell. This step is where things get truly addictive—you might be tempted to sneak a nibble already.
Step 7: Place on Baking Sheet
Once coated, gently place the dipped truffles back onto the parchment-lined baking sheet to avoid smudging or sticking. This makes cleanup easy and helps keep every truffle looking immaculate while they set.
Step 8: Add Toppings
While the chocolate is still soft, sprinkle crushed Oreos over the tops for an extra punch of texture and flavor. Alternatively, drizzle some additional melted chocolate artistically over the truffles for a sophisticated and mouthwatering presentation.
Step 9: Chill Again
Put the truffles back in the refrigerator for 15 to 20 minutes to allow the chocolate shell to harden fully. This chilling step ensures that every bite has that satisfying snap before revealing the lush creamy center.
Step 10: Serve
Your Oreo Truffles are now ready to be shared and enjoyed! Serve them chilled for the best texture and flavor, and watch how quickly these decadent no-bake treats disappear from the plate.
How to Serve Oreo Truffles: A Decadent No-Bake Treat Recipe
Garnishes
Adding garnishes can elevate your Oreo truffles from delicious to downright stunning. Sprinkle some crushed Oreos or even a pinch of sea salt on top to complement the sweetness. If you want a special touch, a drizzle of white or dark melted chocolate creates a beautiful contrast and makes your truffles look fancy enough for any occasion.
Side Dishes
While Oreo truffles are wonderful as a standalone indulgence, they also pair fabulously with rich coffee, creamy hot cocoa, or even a glass of cold milk. For a party, consider serving alongside a platter of fresh berries or whipped cream to lighten the richness of this decadent treat.
Creative Ways to Present
Presentation matters when you want to impress. Place your Oreo truffles in colorful mini cupcake liners or arrange them neatly on a decorative plate. You can also stack them in a tiered dessert tray or serve them in a pretty jar as a gift. The possibilities are endless, and having fun with presentation only makes these treats taste better.
Make Ahead and Storage
Storing Leftovers
Leftover Oreo truffles store beautifully in an airtight container in the refrigerator for up to one week. The cold helps maintain the chocolate coating’s snap and keeps the creamy interior fresh. Just be sure to keep them covered so they don’t absorb any fridge odors.
Freezing
If you want to keep these treats on hand longer, they freeze wonderfully. Place them in a single layer on a baking sheet, freeze until firm, then transfer to a freezer-safe bag or container. When ready to enjoy, thaw them overnight in the fridge for the creamiest texture.
Reheating
Since Oreo truffles are best served chilled, reheating is not recommended. Instead, if they warm up and lose firmness, simply place them back in the fridge for 15-20 minutes to restore their ideal texture and chocolate shell snap.
FAQs
Can I use a different type of cookie instead of Oreos?
Absolutely! While classic Oreos provide a distinct flavor everyone loves, you can experiment with other sandwich cookies or even crushed chocolate chip cookies for a unique twist. Just keep in mind the flavor and texture may vary slightly.
Is it necessary to use full-fat cream cheese?
Full-fat cream cheese gives the best creamy texture and flavor balance in Oreo truffles. Low-fat or whipped versions may result in a softer dough that’s harder to shape, so for best results, stick with full-fat regular cream cheese.
Can I use white chocolate instead of semi-sweet for coating?
Yes! White chocolate gives a beautifully sweet and smooth coating that contrasts nicely with the dark Oreo center. Just be sure to melt it gently to avoid burning or clumping.
How do I prevent the chocolate coating from cracking?
Allow your truffles to chill fully before coating, and avoid dipping warm truffles, as sudden temperature changes can cause cracking. Also, add a little coconut oil to the chocolate to create a flexible shell that hardens smoothly without breaking.
Are Oreo truffles safe to leave out at room temperature?
Since they contain cream cheese, it’s best to keep Oreo truffles refrigerated. Leaving them out at room temperature for extended periods can cause spoilage. Serve them chilled for the best taste and safety.
Final Thoughts
This recipe for Oreo Truffles: A Decadent No-Bake Treat Recipe is quite simply a game changer for dessert lovers everywhere. Its simplicity and luscious flavors make it a go-to for parties, gifts, or even a special sweet moment just for yourself. I encourage you to dive in, gather your ingredients, and whip up these incredible truffles—your taste buds will thank you!
Print
Oreo Truffles: A Decadent No-Bake Treat Recipe
- Prep Time: 20 minutes
- Cook Time: 0 minutes
- Total Time: 50 minutes
- Yield: About 36 truffles
- Category: Dessert
- Method: No-Cook
- Cuisine: American
- Diet: Vegetarian
Description
These Oreo Truffles are a decadent, no-bake treat combining crushed Oreo cookies with creamy cream cheese, dipped in smooth melted chocolate. Perfect for parties, holidays, or whenever you crave an easy yet indulgent dessert.
Ingredients
For the Truffles:
- 1 package (15.35 oz) Oreo cookies (about 36 cookies)
- 8 oz cream cheese, softened (full-fat for best results)
For the Coating:
- 16 oz semi-sweet chocolate chips (or white chocolate for coating)
- 1 tablespoon coconut oil (optional, for smoother melting)
For Garnish (Optional):
- Crushed Oreos for sprinkling on top
- Drizzle of melted chocolate for decoration
Instructions
- Crush Cookies: In a food processor, add the entire package of Oreo cookies and pulse until finely crushed into crumbs. Alternatively, place cookies in a zip-top bag and crush with a rolling pin until fine.
- Combine Ingredients: In a mixing bowl, combine the crushed Oreos with softened cream cheese. Mix thoroughly until a dough-like consistency forms, using a spatula or your hands.
- Shape into Balls: Scoop about 1 tablespoon of the mixture and roll it into a ball with your hands. Place the balls on a parchment-lined baking sheet. Repeat until all mixture is used.
- Chill: Refrigerate the shaped truffles for about 30 minutes to allow them to firm up.
- Melt Chocolate: In a microwave-safe bowl, combine chocolate chips and coconut oil (if using). Microwave in 30-second intervals, stirring between, until smooth and fully melted.
- Dip Truffles: Remove chilled truffles from refrigerator. Using a fork or dipping tool, dip each truffle into the melted chocolate and let excess drip off.
- Place on Baking Sheet: Return coated truffles to the parchment-lined baking sheet.
- Add Toppings: While chocolate is still wet, sprinkle crushed Oreos on top or drizzle with extra melted chocolate for decoration.
- Chill Again: Refrigerate truffles for 15-20 minutes more to set the chocolate coating.
- Serve: Once set, serve chilled and enjoy your indulgent Oreo truffles.
Notes
- Use full-fat cream cheese for best flavor and texture.
- If you don’t have a food processor, crushing the Oreos in a sealed bag with a rolling pin works well.
- Coconut oil helps create a smoother chocolate coating but is optional.
- Store finished truffles in an airtight container in the refrigerator for up to 1 week.
- These truffles can be customized with different chocolate types or garnishes like sprinkles or nuts.


