
If you’re on the hunt for a cookie that perfectly blends nutty richness with a tender, buttery bite, the Pistachio Thumbprint Cookies Recipe has got you covered. These charming little cookies are not only a feast for the eyes with their golden bases and vibrant green fillings, but each bite delivers a deliciously smooth pistachio cream center that complements the crumbly cookie dough beautifully. Whether you’re baking for a special occasion or just craving a delightful treat to savor with your afternoon tea, this recipe is a definite keeper in your baking repertoire.
Ingredients You’ll Need
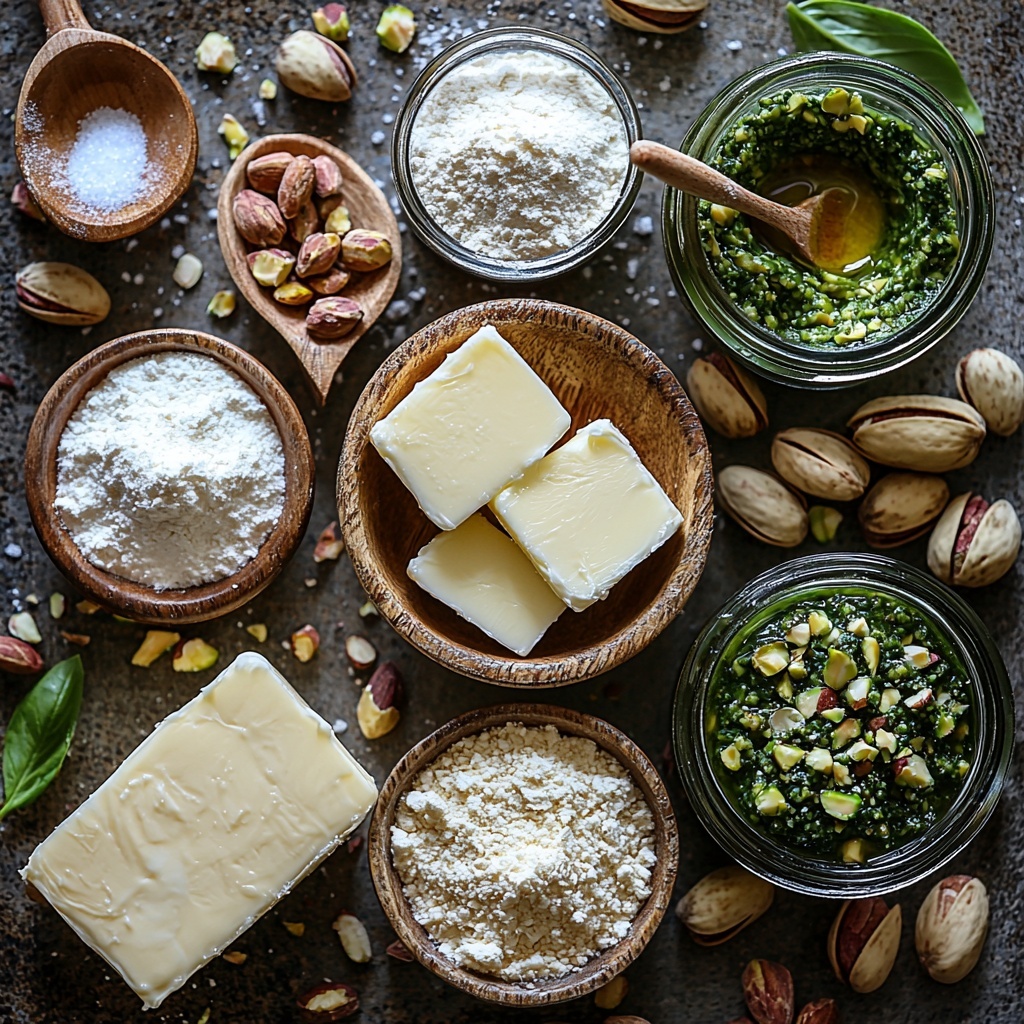
The beauty of this Pistachio Thumbprint Cookies Recipe lies in its simplicity. Each ingredient plays a starring role in ensuring the cookies have just the right balance of softness, flavor, and texture – making the entire baking process both straightforward and rewarding.
- 1 ½ cups all-purpose flour: The base of the cookie dough, providing structure and that perfect tender crumb.
- ½ cup unsalted butter (softened): Adds richness and helps create a melt-in-your-mouth texture.
- ⅓ cup granulated sugar: Sweetens the dough just enough without overpowering the nutty flavors.
- 1 teaspoon vanilla extract: Enhances the overall flavor profile with a warm, inviting aroma.
- ½ cup almond flour: Brings a subtle nuttiness and a soft crumb to the cookies.
- ¼ teaspoon salt: Balances the sweetness and heightens all the other tastes.
- ⅓ cup pistachio cream or paste: The luscious filling that makes these cookies stand out from the crowd.
- 2 tablespoons chopped pistachios: Adds a delightful crunch on top, providing texture and a pop of color.
How to Make Pistachio Thumbprint Cookies Recipe
Step 1: Creaming the Butter and Sugar
Start by beating the softened butter and granulated sugar together in a mixing bowl until the mixture is light and fluffy. This step is crucial because incorporating air at this stage ensures the cookies bake up soft and tender, preventing them from becoming dense. Once creamed, stir in the vanilla extract to infuse the dough with a delicate, aromatic sweetness.
Step 2: Mixing in the Flours and Salt
Next, it’s time to bring in the dry ingredients. Add the almond flour and salt to the wet mixture and stir until evenly distributed. Gradually sprinkle in the all-purpose flour, mixing gently to combine everything just until a dough forms. This careful approach helps keep the cookies tender by avoiding too much gluten development.
Step 3: Shaping the Cookies and Forming the Thumbprint
Roll the dough into small balls, about one tablespoon each, and place them spaced apart on a lined baking sheet. Press your thumb or the back of a spoon into the center of each ball to create an indent — this little nest is where the irresistible pistachio cream will go later on.
Step 4: Baking to Golden Perfection
Pop the baking sheet into the oven preheated to the right temperature and bake for 12 to 14 minutes. You’ll want to keep an eye on them so the edges turn a lovely light golden color but don’t overbake. Allow the cookies to cool completely on the baking sheet to preserve their delicate shape before the next step.
Step 5: Filling and Garnishing
Once cooled, fill each thumbprint carefully with pistachio cream. For a neat appearance, use a piping bag to deposit the cream precisely. Finally, sprinkle chopped pistachios over the top to add texture and a visually stunning contrast, turning these cookies into mini works of edible art.
How to Serve Pistachio Thumbprint Cookies Recipe
Garnishes
Enhance the presentation by dusting a light sprinkle of powdered sugar over the pistachio cookies for a snowy finish. Fresh mint leaves on the side can offer a refreshing contrast and bring a hint of vibrant green to your cookie platter.
Side Dishes
These cookies pair wonderfully with a steaming cup of your favorite tea or freshly brewed coffee, perfectly balancing the nutty richness. For an elegant touch, enjoy them alongside a small bowl of mixed berries or a scoop of vanilla ice cream, adding fresh and creamy elements to your dessert experience.
Creative Ways to Present
Arrange these Pistachio Thumbprint Cookies Recipe beauties on a tiered serving tray for a stunning display at parties or celebrations. You can also wrap a few in cellophane tied with a ribbon for thoughtful homemade gifts that friends and family will adore.
Make Ahead and Storage
Storing Leftovers
Store your baked and filled pistachio cookies in an airtight container at room temperature, where they will stay fresh and moist for up to 3 days. Keeping them sealed properly prevents the delicate pistachio cream from drying out and maintains that delightful texture in every bite.
Freezing
If you want to bake ahead, you can freeze the unbaked dough balls on a baking sheet before stamping the thumbprints. Once frozen solid, transfer them to a freezer bag and bake fresh anytime, adding an extra minute or two to the baking time. Alternatively, frozen baked cookies (without the filling) can be stored and filled after thawing.
Reheating
For warmed-up cookies, pop them in a preheated oven at low heat for a few minutes; avoid the microwave as it can make the cookie soggy. The gentle warmth will revive the buttery softness without compromising the signature pistachio cream filling.
FAQs
Can I substitute almond flour with another nut flour?
Yes, you can swap almond flour for other nut flours like hazelnut or cashew flour, but keep in mind each nut flour has a different moisture content and flavor, which might slightly alter the texture and taste of the cookies.
Is pistachio cream easy to find or can I make it at home?
Pistachio cream is often available in specialty grocery stores or online, but you can also make your own by blending roasted pistachios with a touch of oil and sweetener until creamy. Homemade pistachio paste allows for control over sweetness and freshness.
Can I make these cookies gluten-free?
Absolutely! Using a gluten-free all-purpose flour blend will work well in this Pistachio Thumbprint Cookies Recipe. Just be sure your blend contains xanthan gum or another binding agent for the best texture.
Why should I avoid overmixing the dough?
Overmixing develops gluten in the flour, which can make your cookies tough rather than tender and crumbly. Mixing just until combined keeps these cookies delightfully soft.
What’s the best way to press the thumbprint without cracking the dough?
Chill the dough balls for about 15 minutes before pressing them. This firms up the dough and minimizes cracking when you make the indent for the filling.
Final Thoughts
There’s something incredibly satisfying about making a batch of Pistachio Thumbprint Cookies Recipe from start to finish. They strike the perfect balance between elegant and approachable, nutty and sweet, soft and crunchy. I hope you’ll give these a try soon and enjoy sharing these little gems with the people you love. Happy baking!
Print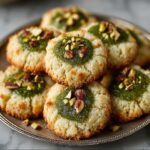
Pistachio Thumbprint Cookies Recipe
- Prep Time: 20 minutes
- Cook Time: 14 minutes
- Total Time: 34 minutes
- Yield: 12 cookies
- Category: Dessert
- Method: Baking
- Cuisine: American
- Diet: Vegetarian
Description
These Pistachio Thumbprint Cookies are buttery, tender, and perfectly sweetened with a delightful pistachio cream filling. With a subtle crunch from the chopped pistachios on top, they make an elegant and delicious treat for any occasion, combining the rich flavors of almond and pistachio in every bite.
Ingredients
Dry Ingredients
- 1 ½ cups all-purpose flour
- ½ cup almond flour
- ¼ teaspoon salt
Wet Ingredients
- ½ cup unsalted butter (softened)
- ⅓ cup granulated sugar
- 1 teaspoon vanilla extract
Filling & Toppings
- ⅓ cup pistachio cream or paste
- 2 tablespoons chopped pistachios
Instructions
- Cream Butter and Sugar: In a mixing bowl, cream the softened butter and granulated sugar together until the mixture is light and fluffy. This step incorporates air into the dough, ensuring a tender texture. Then, add the vanilla extract and mix until fully combined.
- Mix Dry Ingredients: Add the almond flour and salt to the wet mixture, stirring them in to combine evenly. Gradually add the all-purpose flour in increments, folding it into the dough gently. Mix just until the dough comes together to avoid tough cookies.
- Shape the Cookies: Roll the dough into small balls, about one tablespoon each. Place them spaced on a lined baking sheet as the cookies will spread slightly. Make an indent in the center of each ball with your thumb or the back of a spoon to create the thumbprint for the filling.
- Bake: Place the baking sheet in a preheated oven (temperature not specified but commonly 350°F/175°C) and bake for 12-14 minutes or until the edges are lightly golden. Once done, remove from oven and allow cookies to cool completely on the sheet to preserve their shape.
- Fill and Garnish: Once cooled, fill each thumbprint with pistachio cream using a piping bag for precision or a small spoon. Sprinkle chopped pistachios over the filled centers for a delightful crunch and garnish.
Notes
- Make sure the butter is softened to room temperature for easier creaming with sugar.
- Do not overmix the dough to keep the cookies tender.
- Spacing the dough balls properly is important as the cookies will spread while baking.
- Use a piping bag for neater filling application, but a spoon also works well.
- Store cookies in an airtight container to maintain freshness.
