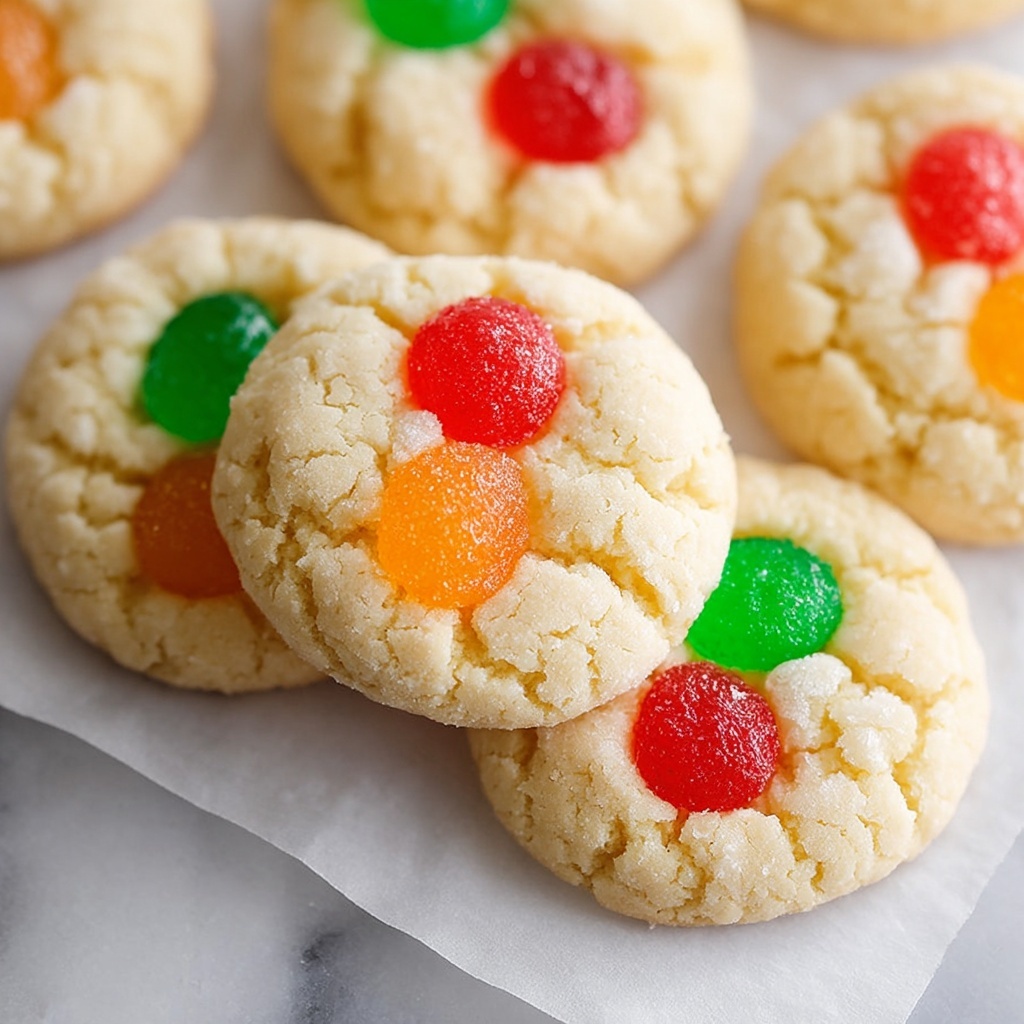
If you are looking to bring a splash of colorful nostalgia to your holiday baking, the Retro Christmas Gumdrop Cookies Recipe is an absolute must-try. These charming cookies blend the buttery richness of a classic sugar cookie with the chewy bursts of fruity gumdrops, creating a delightful treat that instantly evokes warm memories and festive joy. Each bite offers a satisfying texture contrast and a playful pop of sweet, fruity flavor that’s perfect for sharing with family and friends over the holidays.
Ingredients You’ll Need
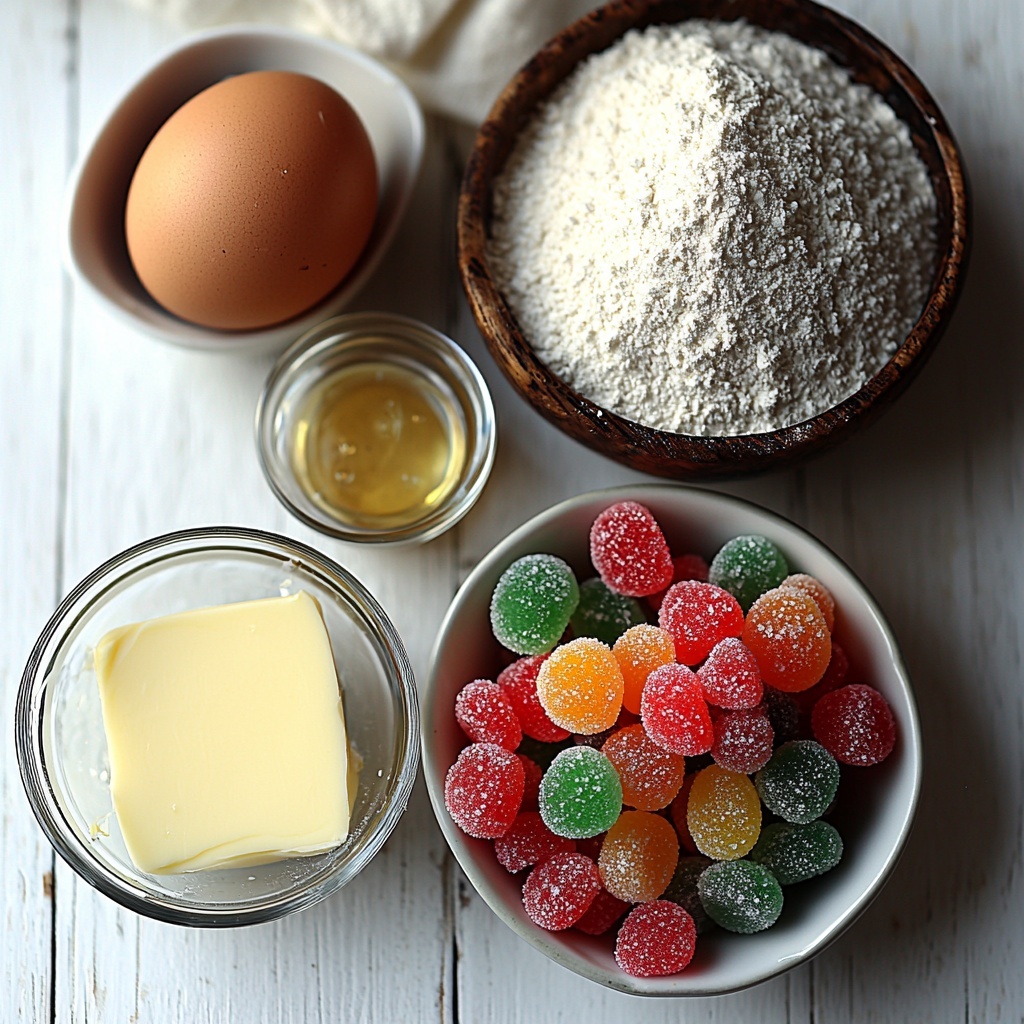
These ingredients are surprisingly simple yet essential for capturing the perfect balance of flavor, texture, and color in this Retro Christmas Gumdrop Cookies Recipe. Each component works in harmony to ensure your cookies are tender, aromatic, and full of festive sparkle.
- 1 cup unsalted butter, softened: Provides a rich, creamy base and tender crumb for the cookies.
- 1 cup granulated sugar: Sweetens the dough and helps create that characteristic cookie crunch.
- 1 large egg: Binds the ingredients together and adds moisture for a soft texture.
- 1 teaspoon vanilla extract: Enhances the flavor with a warm, sweet aroma.
- 2 1/4 cups all-purpose flour: The foundation of the dough, providing structure and thickness.
- 1/2 teaspoon baking soda: Helps the cookies rise just enough for a soft, chewy bite.
- 1/4 teaspoon salt: Balances the sweetness and intensifies the other flavors.
- 1 cup fruit-flavored gumdrops, chopped and floured: Adds colorful fruity bursts and delightful chewiness throughout each cookie.
How to Make Retro Christmas Gumdrop Cookies Recipe
Step 1: Prepare the Gumdrops
Start by chopping your fruit-flavored gumdrops into small, bite-sized pieces that will evenly disperse in the dough. Toss them lightly with a little bit of flour to prevent sticking or sinking to the bottom of the cookie during baking, ensuring each cookie has those wonderful fruity pops.
Step 2: Cream Butter and Sugar
Next, cream together the softened butter and granulated sugar until the mixture is light, fluffy, and pale in color. This step is crucial for creating that tender cookie texture and helps your cookies spread and bake just right.
Step 3: Add Egg and Vanilla
Beat in the large egg and vanilla extract until everything is smooth and fully combined. The egg adds moisture and richness, while vanilla deepens the overall flavor profile with a sweet warmth.
Step 4: Combine Dry Ingredients
In a separate bowl, whisk together the all-purpose flour, baking soda, and salt. This ensures even distribution of the leavening agent and seasoning throughout the dough.
Step 5: Mix Wet and Dry Ingredients
Gradually add your dry ingredient mix into the wet mixture, stirring gently until a soft dough forms. Be careful not to overmix, or your cookies might turn out too tough instead of tender and chewy.
Step 6: Fold in Gumdrops
Gently fold in the floured gumdrop pieces until they are evenly dispersed throughout the dough, guaranteeing every cookie will have just the right amount of colorful chewiness.
Step 7: Chill the Dough (Optional)
If you have the time, chilling the dough in the refrigerator for about 30 minutes can help your cookies hold their shape better during baking, resulting in perfectly round, evenly baked treats.
Step 8: Preheat Oven and Prepare Baking Sheets
Preheat your oven to 350 degrees Fahrenheit (175 degrees Celsius) and line your baking sheets with parchment paper to prevent sticking and make cleanup a breeze.
Step 9: Shape the Cookies
Scoop out the dough in tablespoon-sized balls and place them at least 2 inches apart on the prepared baking sheets. This spacing allows the cookies to spread without merging, keeping their individual shapes intact.
Step 10: Bake Until Golden
Bake the cookies for 9 to 11 minutes, just until the edges turn a lovely golden color and the centers are set but still soft. This timing ensures that chewy center texture while giving a slight crisp to the outer edges.
Step 11: Cool Before Serving
Once baked, let your cookies cool on the baking sheet for five minutes before transferring them to a wire rack to cool completely. This step helps them firm up just right for handling and serving.
How to Serve Retro Christmas Gumdrop Cookies Recipe
Garnishes
For an extra touch of holiday magic, consider sprinkling some colored sugar or adding a light dusting of powdered sugar over the cookies before serving. This will give your Retro Christmas Gumdrop Cookies Recipe an even more festive, sparkling appearance that’s sure to catch everyone’s eye.
Side Dishes
These cookies pair beautifully with classic holiday beverages like hot cocoa, eggnog, or a warm cup of spiced cider. The warmth and spice of these drinks complement the fruity sweetness and buttery richness of the gumdrop cookies perfectly.
Creative Ways to Present
Try stacking the cookies in a clear jar tied with a red or green ribbon to create an inviting holiday gift. Alternatively, arrange them on festive platters alongside other Christmas favorites to make a colorful and scrumptious cookie platter that will brighten any party table.
Make Ahead and Storage
Storing Leftovers
Store any leftover gumdrop cookies in an airtight container at room temperature to keep them fresh and chewy for up to one week. Make sure to separate layers with parchment paper to avoid sticking.
Freezing
You can freeze these cookies for longer storage by placing them in a sealed freezer-safe container or bag. They will keep well for up to three months, making them a convenient make-ahead treat for the busy holiday season.
Reheating
If you prefer your gumdrop cookies warm, simply reheat them in a low oven (around 300 degrees Fahrenheit) for 5 minutes or microwave for 10-15 seconds. This will bring back that fresh-baked softness and flavor.
FAQs
Can I use different types of gumdrops?
Absolutely! While fruit-flavored gumdrops are traditional for this Retro Christmas Gumdrop Cookies Recipe, feel free to experiment with other varieties, like sour or spice-flavored, depending on your taste preference.
Is it necessary to flour the gumdrops before adding them to the dough?
Flouring the gumdrops helps prevent them from sinking to the bottom of the cookies during baking and stops them from sticking together. It’s a simple but important step to keep the distribution even.
Can I substitute butter with margarine or shortening?
For best flavor and texture, unsalted butter is recommended. However, if you need to substitute, margarine or shortening can be used but may alter the taste and tenderness of the cookies slightly.
How can I make these cookies more festive?
In addition to using colorful gumdrops, adding red and green sprinkles, or a drizzle of icing can enhance the festive appearance of the cookies to match your holiday décor.
Can I double this Retro Christmas Gumdrop Cookies Recipe?
Yes! Doubling the recipe works well if you need to make a larger batch. Just be sure to mix the dough thoroughly and bake the cookies in batches to avoid overcrowding your oven.
Final Thoughts
There is truly something special about the Retro Christmas Gumdrop Cookies Recipe that captures the spirit of the holidays in every bite. The playful colors and joyful flavors make these cookies a beloved classic that everyone will ask you to bake year after year. I hope you enjoy making and sharing this festive treat as much as I do!
Print
Retro Christmas Gumdrop Cookies Recipe
- Prep Time: 10 minutes
- Cook Time: 11 minutes
- Total Time: 31 minutes
- Yield: 24 servings
- Category: Dessert
- Method: Baking
- Cuisine: American
Description
These Retro Christmas Gumdrop Cookies are a festive and colorful treat perfect for the holiday season. Soft, buttery cookies studded with fruity gumdrops offer a delightful chew and a sweet burst of flavor in every bite. This recipe is simple to prepare and yields a classic holiday cookie everyone will enjoy.
Ingredients
Cookie Dough
- 1 cup unsalted butter, softened
- 1 cup granulated sugar
- 1 large egg
- 1 teaspoon vanilla extract
- 2 1/4 cups all-purpose flour
- 1/2 teaspoon baking soda
- 1/4 teaspoon salt
Gumdrops
- 1 cup fruit-flavored gumdrops, chopped and floured
Instructions
- Prepare Gumdrops: Chop the fruit-flavored gumdrops into small pieces and toss them with a small amount of flour to prevent them from sticking together or sinking during baking.
- Cream Butter and Sugar: In a large bowl, cream together the softened unsalted butter and granulated sugar until the mixture is light and fluffy, usually about 3-5 minutes.
- Add Egg and Vanilla: Beat in the large egg and vanilla extract until fully incorporated and smooth.
- Mix Dry Ingredients: In a separate bowl, whisk together the all-purpose flour, baking soda, and salt to ensure they are evenly combined.
- Combine Wet and Dry Ingredients: Gradually add the dry ingredients to the wet ingredients while mixing, until a soft dough forms.
- Fold in Gumdrops: Gently fold the floured gumdrop pieces into the dough making sure they are evenly distributed without overmixing.
- Chill Dough (Optional): For better cookie shape and texture, chill the dough in the refrigerator for 30 minutes before baking.
- Preheat Oven and Prepare Baking Sheets: Preheat your oven to 350°F (175°C) and line baking sheets with parchment paper to prevent sticking.
- Scoop Dough: Using a tablespoon or cookie scoop, form balls of dough and place them 2 inches apart on the prepared baking sheets to allow room for spreading.
- Bake Cookies: Bake the cookies in the preheated oven for 9 to 11 minutes, or until the edges are golden brown and the centers are just set.
- Cool: Remove the baking sheet from the oven and allow the cookies to cool on the sheet for 5 minutes before transferring them to a wire rack to cool completely.
Notes
- Chilling the dough helps maintain the cookie shape and prevents excessive spreading during baking.
- Flouring the gumdrops prevents them from sinking to the bottom of the cookies during baking.
- Store cookies in an airtight container at room temperature for up to one week for best freshness.
- Feel free to use your favorite gumdrop flavors or add colored sugar sprinkles on top before baking for extra festivity.


