
If you’re craving a crowd-pleaser that bursts with flavor and is effortlessly easy to make, then you’re going to absolutely love this Turkey Club Sliders with Garlic Butter Recipe. These bite-sized sandwiches combine tender turkey, crispy bacon, melty cheese, and fresh veggies, all lovingly tucked between soft slider buns and finished with a luscious garlic butter glaze. Perfect for game day, casual get-togethers, or a weeknight treat, this recipe transforms simple ingredients into an unforgettable, savory feast that everyone will keep asking for.
Ingredients You’ll Need
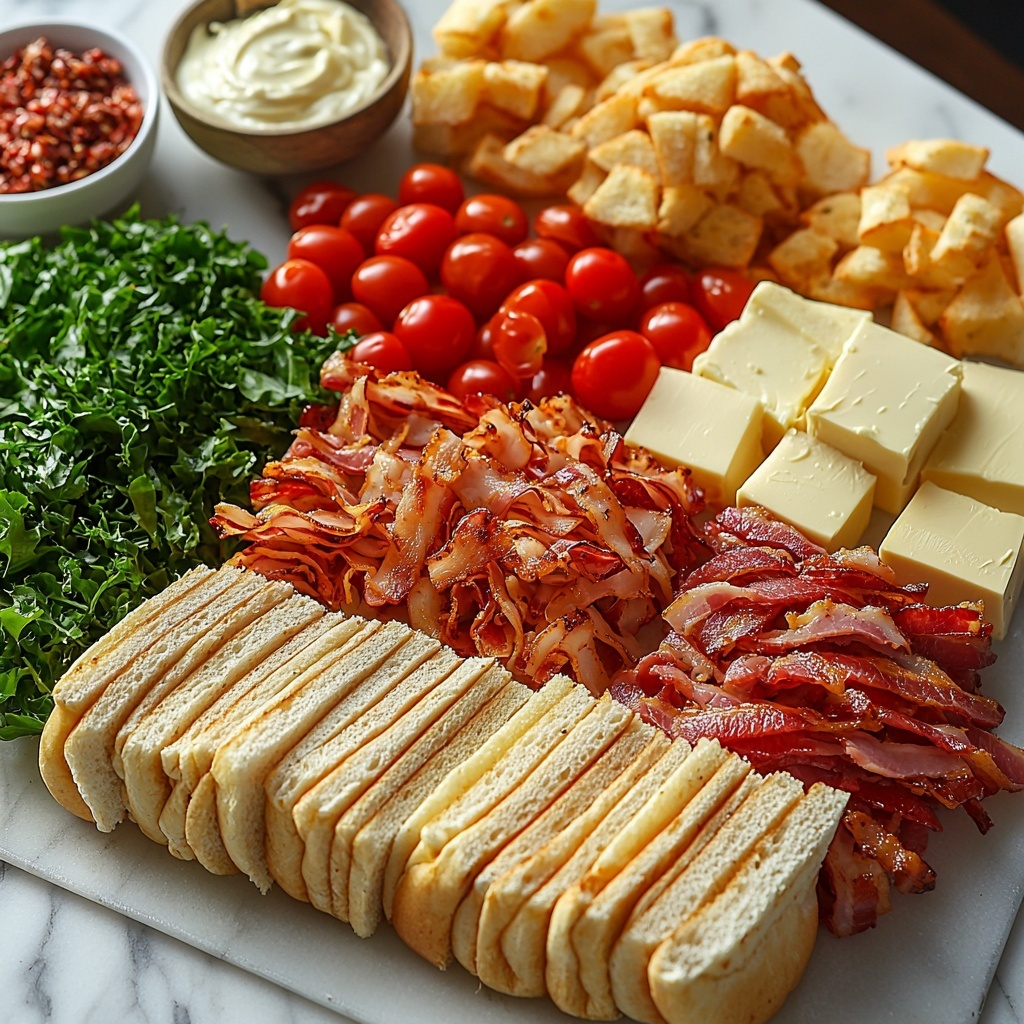
Gathering your ingredients is where the magic begins. Each component plays a vital role in building the perfect balance of textures and flavors—creamy, crisp, smoky, and buttery all in one delightful bite.
- 12 slider buns: Soft and slightly sweet, these are the foundation that holds all the delicious fillings together.
- 1 pound deli turkey breast, thinly sliced: Lean and tender, it keeps the sliders hearty without overpowering the other flavors.
- 8 slices cooked bacon, halved: Adds that irresistible crunch and a smoky punch that elevates the whole sandwich.
- 6 slices provolone or Swiss cheese, halved: Melts beautifully to create gooey, savory pockets of goodness.
- 2 medium tomatoes, thinly sliced: Brings a juicy freshness that brightens every mouthful.
- 1 cup shredded lettuce: Crisp and light, adds a welcome crunch and balance.
- 4 tablespoons unsalted butter, melted: The star of the garlic butter topping, adding richness and golden color.
- 1 teaspoon garlic powder: Infuses the butter with robust, aromatic flavor without being overpowering.
- 1/2 teaspoon dried parsley: Offers a subtle herbaceous note and a pop of green for visual appeal.
- 1 tablespoon Dijon mustard: Sharp and tangy, it cuts through the richness for a more layered taste.
- 2 tablespoons mayonnaise: Creamy and smooth, it binds everything together and adds moisture.
How to Make Turkey Club Sliders with Garlic Butter Recipe
Step 1: Prepare Your Baking Dish and Buns
Start by preheating your oven to 350°F and lightly greasing a 9×13-inch baking dish. Slice the slider buns horizontally and arrange the bottoms snugly in the dish—it’s the perfect base to build your layers.
Step 2: Spread the Mustard and Mayonnaise
Evenly spread the Dijon mustard and mayonnaise over the bottom halves of the buns. These condiments bring a creamy tang and moisture that keeps every bite balanced and flavorful.
Step 3: Layer the Turkey, Bacon, Cheese, Tomato, and Lettuce
Now it’s time to pile on the good stuff! Layer the thinly sliced turkey, halved bacon slices, cheese pieces, juicy tomato slices, and shredded lettuce evenly over the prepared buns. Each layer adds texture and taste that will make your sliders unforgettable.
Step 4: Top and Brush with Garlic Butter
Place the tops of the buns over your savory fillings to form complete sliders. In a small bowl, whisk together the melted butter, garlic powder, and dried parsley to create your flavorful garlic butter. Brush this liberally over the slider tops, ensuring a golden, aromatic finish.
Step 5: Bake to Perfection
Cover the baking dish with foil and bake for 15 minutes to soften and meld all the flavors. Then, remove the foil and bake for an additional 5 to 7 minutes until the slider tops are beautifully golden and the cheese has melted to ooey-gooey perfection.
Step 6: Slice and Serve Warm
Once out of the oven, slice the sliders apart carefully and serve warm. These irresistible Turkey Club Sliders with Garlic Butter Recipe beauties are ready to bring smiles all around your table.
How to Serve Turkey Club Sliders with Garlic Butter Recipe
Garnishes
A sprinkle of freshly chopped parsley or a few thin slices of ripe avocado add a fresh, vibrant touch that complements the rich layers inside the sliders beautifully. If you like a little heat, some red pepper flakes or a dash of hot sauce can be amazing too.
Side Dishes
Pair your sliders with crispy sweet potato fries, a tangy coleslaw, or a simple mixed green salad to round out the meal with color and extra flavors. Pickles or a bowl of crunchy veggie sticks with ranch dip also make fantastic companions for that classic deli vibe.
Creative Ways to Present
Arrange your sliders on a wooden serving board lined with parchment paper for a casual, rustic look that invites sharing. For parties, consider serving mini skewers to keep everything together and add a festive flair. You can even serve alongside an array of gourmet dipping sauces to let your guests customize their bites.
Make Ahead and Storage
Storing Leftovers
Place any leftover sliders in an airtight container and refrigerate. They will keep well for up to 3 days, making for a quick and delicious lunch or dinner the next day.
Freezing
If you want to save sliders for another time, wrap each one tightly in plastic wrap and place them in a freezer-safe bag or container. They freeze beautifully for up to 2 months, perfect for meal prep or unexpected guests.
Reheating
To reheat, unwrap the sliders and place them on a baking sheet. Warm in a 350°F oven for about 10 minutes until heated through and the cheese is melty again. Avoid microwaving, as it can turn the buns soggy and the texture less appealing.
FAQs
Can I use a different type of cheese for the Turkey Club Sliders with Garlic Butter Recipe?
Absolutely! Cheddar, mozzarella, or even pepper jack work wonderfully if you want a different cheese flavor or a bit more spice. Just choose one that melts well for that perfect gooey texture.
Is it possible to make this recipe vegetarian?
While the traditional version centers on turkey and bacon, you can easily swap these for plant-based deli slices and vegetarian bacon alternatives. Just be sure to adjust cooking times and watch the sliders so they don’t dry out.
How spicy is the garlic butter topping?
The garlic butter mix is flavorful but mild, focusing on aromatic garlic and parsley without heat. If you prefer a spicy kick, add a pinch of cayenne pepper or chili powder to the butter before brushing it on.
Can I prepare the sliders ahead of time before baking?
Yes, you can assemble the sliders in the baking dish, cover tightly, and refrigerate for a few hours before baking. This is a great way to save time on serving day. Just bake them a little longer if cold from the fridge.
What is the best way to keep slider buns from getting soggy?
Spreading the mustard and mayo on the bottom buns creates a moisture barrier, and baking with foil helps steam while keeping the tops crisp. Serving sliders warm and not overly packed with wet ingredients also preserves the bun’s texture.
Final Thoughts
I can’t recommend this Turkey Club Sliders with Garlic Butter Recipe enough—it’s a delightful mix of flavors and textures packed into one perfect little sandwich. Whether you’re making it for a party or just because, it effortlessly impresses and comforts all at once. Go ahead and treat yourself to these sliders soon; I promise they’ll be a new favorite in your kitchen and at your table!
Print
Delicious Recipe
- Prep Time: 15 minutes
- Cook Time: 22 minutes
- Total Time: 37 minutes
- Yield: 12 sliders
- Category: Main Course
- Method: Baking
- Cuisine: American
Description
These Turkey Club Sliders with Garlic Butter offer a delicious twist on a classic sandwich, combining tender turkey, crispy bacon, melty cheese, and fresh veggies layered on soft slider buns. Brushed with a flavorful garlic butter and baked to golden perfection, these sliders are perfect for parties, game days, or a quick and satisfying family dinner.
Ingredients
Sliders
- 12 slider buns
- 1 pound deli turkey breast, thinly sliced
- 8 slices cooked bacon, halved
- 6 slices provolone or Swiss cheese, halved
- 2 medium tomatoes, thinly sliced
- 1 cup shredded lettuce
Garlic Butter
- 4 tablespoons unsalted butter, melted
- 1 teaspoon garlic powder
- 1/2 teaspoon dried parsley
Condiments
- 1 tablespoon Dijon mustard
- 2 tablespoons mayonnaise
Instructions
- Prepare the Oven and Baking Dish. Preheat the oven to 350°F (175°C) and lightly grease a 9×13-inch baking dish to prevent the sliders from sticking during baking.
- Assemble the Slider Bases. Slice each slider bun in half horizontally. Arrange the bottom halves evenly in the prepared baking dish to form the base layer for your sliders.
- Add Condiments. Spread Dijon mustard and mayonnaise evenly over each bottom bun half to add moisture and flavor to the sandwiches.
- Layer the Fillings. Place slices of turkey breast over the condiments on each bun. Top with halved bacon slices, followed by halved cheese slices, tomato slices, and shredded lettuce to build layers of flavor and texture.
- Top the Sliders. Place the top halves of the slider buns over the layered fillings to complete the sandwiches.
- Prepare the Garlic Butter. In a small bowl, combine melted butter, garlic powder, and dried parsley. Stir well to blend the flavors evenly.
- Brush Garlic Butter on Buns. Generously brush the garlic butter mixture over the tops of the slider buns to ensure a savory, golden crust after baking.
- Bake Covered. Cover the baking dish tightly with foil and place it in the preheated oven. Bake for 15 minutes to allow the cheese to melt and flavors to meld.
- Uncover and Brown. Remove the foil and bake for an additional 5 to 7 minutes until the tops are golden brown and slightly crisp.
- Serve. Remove the sliders from the oven, slice into individual portions with a sharp knife, and serve warm for the best taste experience.
Notes
- For extra flavor, add a slice of avocado to each slider right after baking.
- You can substitute cheddar cheese if you prefer a sharper taste.
- These sliders are perfect for parties, game days, or an easy family dinner.

