“`html
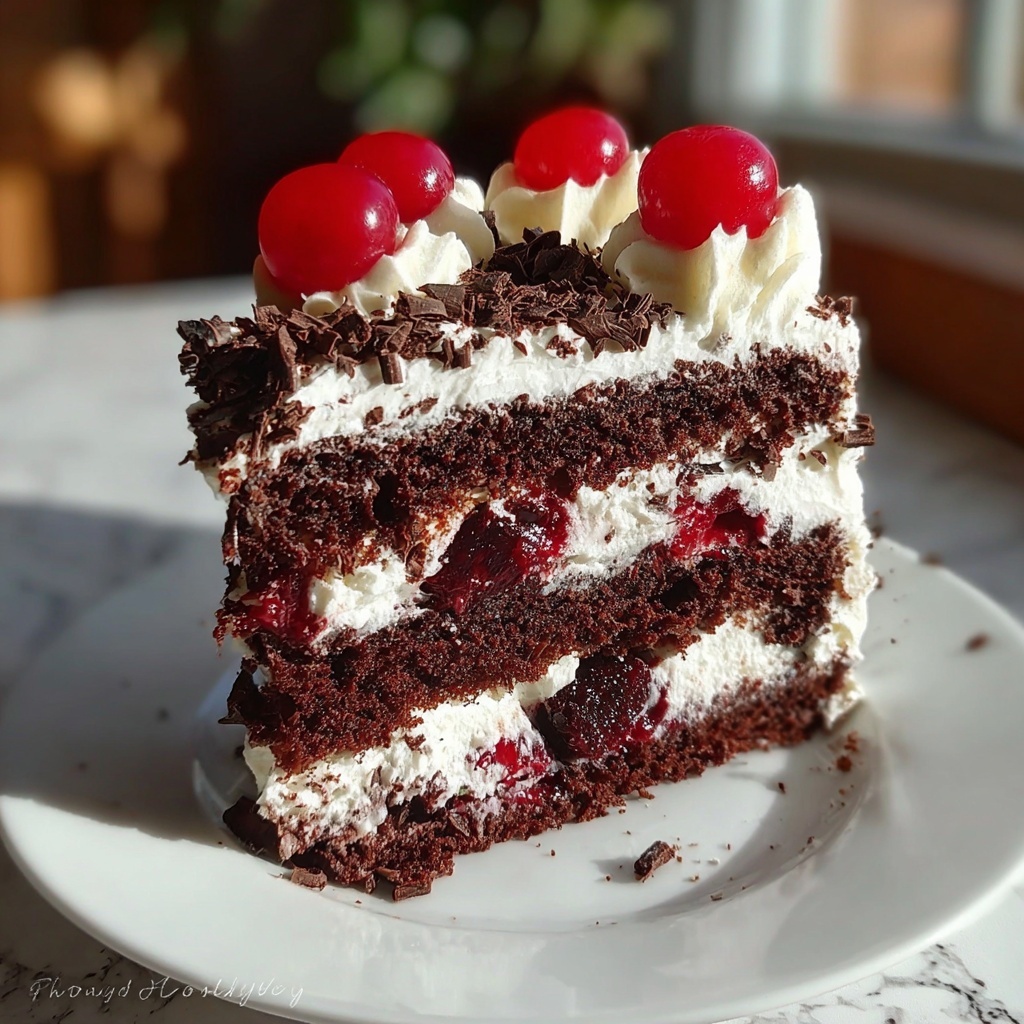
If you are looking for a show-stopping dessert that will instantly become the star of your holiday celebrations, the Christmas Black Forest Cake: A Decadent Festive Dessert Recipe is your perfect go-to. This cake brings together rich, moist chocolate layers with the bright tartness of sour cherries and the cloud-like luxury of whipped cream. Each bite bursts with holiday cheer and indulgence, making it a beloved classic that creates lasting memories around the table. Whether you’re baking for a crowd or treating yourself to a special festive moment, this recipe is guaranteed to exhilarate your taste buds and warm your heart.
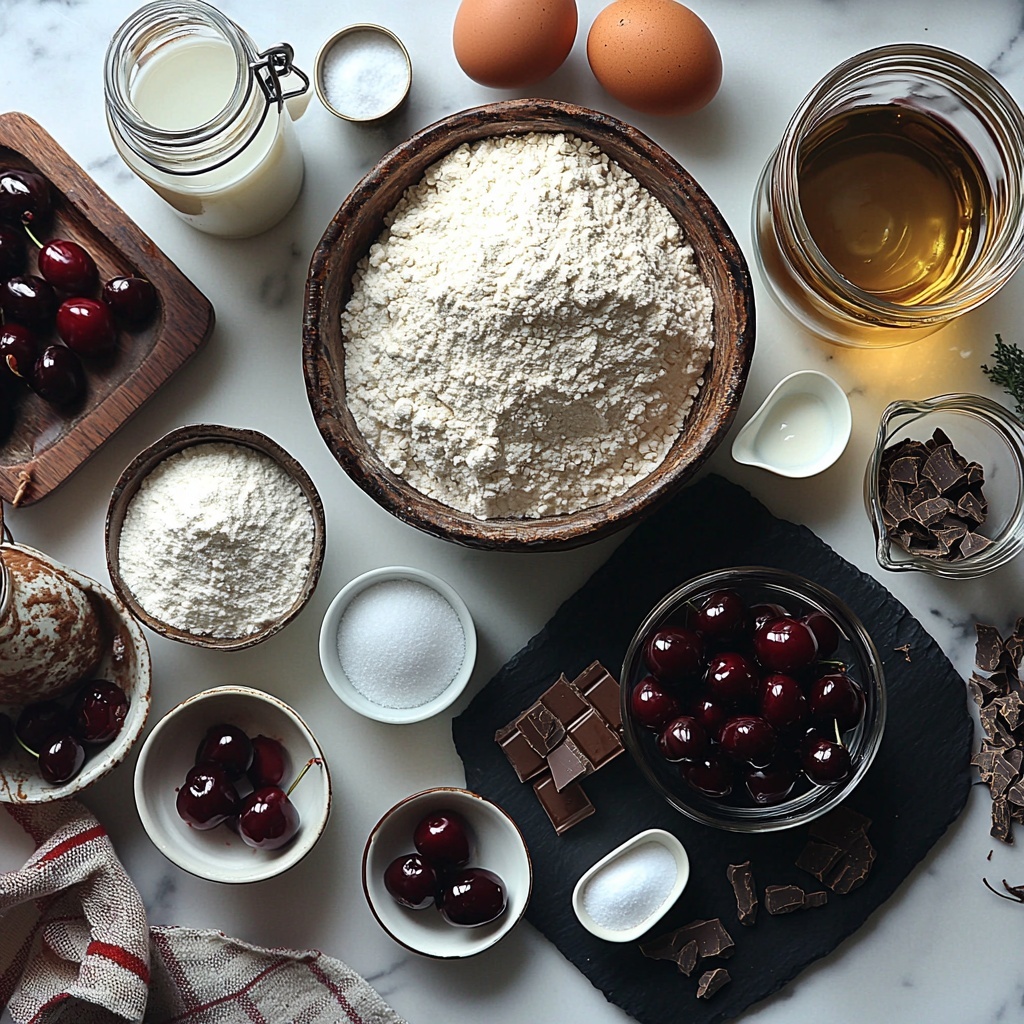
Ingredients You’ll Need
Simple, timeless ingredients create the magic in this Christmas Black Forest Cake. Each one plays a vital role, from the deep cocoa powder that provides that unmistakable chocolate intensity to the fresh sour cherries that add a festive pop of color and flavor. These essentials combine to build layers of texture and taste that are truly unforgettable.
- 2 cups all-purpose flour: The foundation that gives your cake its tender crumb and structure.
- 1 3/4 cups granulated sugar: Provides sweetness and helps keep the cake moist.
- 3/4 cup unsweetened cocoa powder: Delivers rich, deep chocolate flavor with a beautiful dark color.
- 1 1/2 teaspoons baking powder: Ensures your cake layers rise perfectly fluffy.
- 1 1/2 teaspoons baking soda: Works alongside baking powder for the perfect lift and crumb.
- 1 teaspoon salt: Balances sweetness and enhances the overall flavor profile.
- 2 large eggs: Adds moisture, richness, and helps bind everything together.
- 1 cup milk: Keeps the batter smooth and tender for the perfect texture.
- 1/2 cup vegetable oil: Adds moistness without overpowering the chocolate.
- 2 teaspoons vanilla extract: Infuses warmth and depth, elevating every bite.
- 1 cup boiling water: Intensifies the cocoa flavor and creates a silky batter.
- 1 jar (24 oz) sour cherries, drained: Tart and juicy cherries bring a festive and refreshing contrast.
- 2 cups heavy whipping cream: Whipped to soft peaks, it adds luscious creaminess and lightness.
- 1/4 cup powdered sugar: Sweetens the whipped cream perfectly without grit.
- Chocolate shavings for garnish: Add a final touch of elegance and extra chocolate bliss.
How to Make Christmas Black Forest Cake: A Decadent Festive Dessert Recipe
Step 1: Prepare Your Oven and Pans
Start by preheating your oven to 350°F (175°C). Greasing and flouring two 9-inch round cake pans ensures your cake layers come out cleanly, ready for frosting and assembly. This prep step might seem simple but is crucial for flawless layers.
Step 2: Mix the Dry Ingredients
In a large bowl, whisk together the flour, granulated sugar, cocoa powder, baking powder, baking soda, and salt. Combining these ingredients first spreads the leavening agents evenly, which guarantees your cake rises uniformly and has that tender crumb we all love.
Step 3: Add the Wet Ingredients
Incorporate the eggs, milk, vegetable oil, and vanilla extract into the dry mix. Beat on medium speed for 2 minutes to create a smooth batter filled with air bubbles that will translate into a light texture. This step brings life and moisture into the batter, preparing it beautifully for the final flourish.
Step 4: Stir in Boiling Water
Slowly mix in the boiling water until the batter is well combined. This might seem unusual, but the hot water helps intensify the cocoa flavor while making the batter silky smooth and easy to pour. Don’t worry—the batter will be thin, but that’s perfect for this indulgent cake.
Step 5: Bake the Cake Layers
Divide the batter evenly between your prepared pans and bake for 30-35 minutes. You’ll know it’s ready when a toothpick inserted in the center comes out clean. Let the cakes cool in the pans for 10 minutes before turning them out onto wire racks to cool completely — patience here means beautiful, stable layers later!
Step 6: Whip the Cream
While your cakes are cooling, whip the heavy cream with powdered sugar until soft peaks form. The cream should be fluffy but still hold shape, creating the perfect texture to complement the rich chocolate and tangy cherries.
Step 7: Assemble the Cake
Place one chocolate cake layer on your serving plate. Spread a generous layer of whipped cream over it, then scatter the drained sour cherries on top. These juicy bursts bring a festive brightness and a slight tartness that balance the richness. Carefully place the second cake layer on top.
Step 8: Frost and Garnish
Frost the top and sides of the cake with the remaining whipped cream for a smooth, snowy finish. Finally, adorn your cake with chocolate shavings and a few extra cherries. This classic decoration not only adds to the festive feel but also delivers extra chocolate and fruity bites with each slice.
How to Serve Christmas Black Forest Cake: A Decadent Festive Dessert Recipe
Garnishes
For an extra festive touch, add a few fresh mint leaves along with the chocolate shavings to bring a splash of green and a refreshing aroma. You can also dust a light sprinkle of cocoa powder or powdered sugar over the top for that snowy Christmas look.
Side Dishes
This cake pairs beautifully with a simple cup of hot coffee, black tea, or even a glass of chilled dessert wine. To keep up with the Christmas spirit, serve it alongside roasted chestnuts or a light fruit salad featuring seasonal berries to balance the indulgence.
Creative Ways to Present
Transform your cake into a mini holiday centerpiece by adding edible gold leaf or tiny festive sprinkles shaped like stars and holly berries. You can also serve individual slices topped with a dollop of whipped cream and a cherry on top, making every piece feel like a little gift.
Make Ahead and Storage
Storing Leftovers
The Christmas Black Forest Cake: A Decadent Festive Dessert Recipe stays fresh and delightful when refrigerated, covered tightly with plastic wrap or stored in an airtight container. It will happily keep for 3-4 days, allowing you to savor every slice without worry.
Freezing
If you want to prepare ahead or save some for later, this cake freezes wonderfully. Wrap it tightly in plastic wrap and then in aluminum foil or place it in a freezer-safe container. It can be frozen for up to 1 month without losing its moistness or flavor. Thaw in the refrigerator overnight before serving.
Reheating
This cake is best enjoyed chilled or at room temperature to maintain its texture and creaminess. If you prefer, allow it to sit out for about 30 minutes before slicing. Avoid heating it in the microwave as this can compromise the whipped cream and cherries.
FAQs
Can I use fresh cherries instead of jarred sour cherries?
Absolutely! Fresh sour cherries work beautifully if they are in season. Make sure to pit and drain any excess juice to avoid soggy layers. Fresh cherries will add a lovely bright flavor and a bit more texture to your cake.
What can I substitute for heavy whipping cream?
If you can’t find heavy cream, chilled coconut cream is a great dairy-free alternative that whips up nicely and adds a subtle tropical twist. Just remember it will slightly alter the taste but still keep the cake rich and creamy.
Is this recipe suitable for beginners?
Yes! The Christmas Black Forest Cake: A Decadent Festive Dessert Recipe is straightforward with clear steps. Even if you’re new to baking, you’ll find it approachable and rewarding with spectacular results that look and taste impressive.
How do I prevent the whipped cream from becoming runny?
Use chilled heavy cream and a cold bowl while whipping, and stop as soon as soft peaks form. Adding powdered sugar helps stabilize it. Also, keep the cake refrigerated until serving to maintain that perfect fluffy texture.
Can I make this cake gluten-free?
To make it gluten-free, substitute the all-purpose flour with a 1-to-1 gluten-free baking flour blend. Ensure your blend contains xanthan gum for structure. The texture might be slightly different but still delicious and festive!
Final Thoughts
There is just something so special about the Christmas Black Forest Cake: A Decadent Festive Dessert Recipe that speaks directly to the soul of holiday indulgence. Its combination of moist chocolate, tangy cherries, and fluffy cream is pure joy in every bite. I wholeheartedly encourage you to try making this cake for your next festive gathering — it’s sure to become a fast favorite and a treasured tradition forever.
“`
Print
Christmas Black Forest Cake: A Decadent Festive Dessert Recipe
- Prep Time: 20 minutes
- Cook Time: 35 minutes
- Total Time: 1 hour 5 minutes
- Yield: 12 servings
- Category: Dessert
- Method: Baking
- Cuisine: German
Description
This classic Christmas Black Forest Cake combines moist chocolate layers with a luscious cherry filling and whipped cream frosting. Perfectly festive and indulgent, it’s a show-stopping holiday dessert that’s simple to make yet impressive to serve.
Ingredients
Dry Ingredients
- 2 cups all-purpose flour
- 1 3/4 cups granulated sugar
- 3/4 cup unsweetened cocoa powder
- 1 1/2 teaspoons baking powder
- 1 1/2 teaspoons baking soda
- 1 teaspoon salt
Wet Ingredients
- 2 large eggs
- 1 cup milk
- 1/2 cup vegetable oil
- 2 teaspoons vanilla extract
- 1 cup boiling water
Filling and Frosting
- 1 jar (24 oz) sour cherries, drained
- 2 cups heavy whipping cream
- 1/4 cup powdered sugar
- Chocolate shavings for garnish
Instructions
- Preheat Oven and Prepare Pans: Preheat your oven to 350°F (175°C). Grease and flour two 9-inch round cake pans to prevent sticking.
- Mix Dry Ingredients: In a large bowl, thoroughly mix the all-purpose flour, granulated sugar, unsweetened cocoa powder, baking powder, baking soda, and salt.
- Add Wet Ingredients: Add the eggs, milk, vegetable oil, and vanilla extract to the dry mixture. Beat on medium speed for 2 minutes to combine well and create a smooth batter.
- Incorporate Boiling Water: Carefully stir in 1 cup of boiling water until the batter is well combined; the batter will be thin.
- Pour Batter into Pans: Divide the batter evenly between the two prepared cake pans.
- Bake the Cake: Bake in the preheated oven for 30-35 minutes, or until a toothpick inserted into the center comes out clean.
- Cool the Cakes: Let the cakes cool in the pans for 10 minutes, then transfer them onto wire racks to cool completely.
- Whip the Cream: In a chilled bowl, whip the heavy cream with powdered sugar until soft peaks form for a fluffy frosting.
- Assemble the Cake: Place one cake layer on a serving plate, spread the drained sour cherries over it, then top with a layer of whipped cream.
- Add Second Layer: Place the second cake layer on top of the cream and cherries.
- Frost the Cake: Frost the top and sides of the cake with the remaining whipped cream.
- Garnish: Decorate the cake with chocolate shavings and additional cherries for a festive finish.
Notes
- Ensure the cakes are completely cooled before frosting to prevent the cream from melting.
- Use chilled heavy cream and a chilled bowl for best whipping results.
- The boiling water helps to bloom the cocoa for a richer chocolate flavor.
- Sour cherries can be substituted with fresh or canned cherries if preferred.
- Chocolate shavings can be made by using a vegetable peeler on a chocolate bar.
- Store the cake refrigerated and consume within 3 days for optimal freshness.


