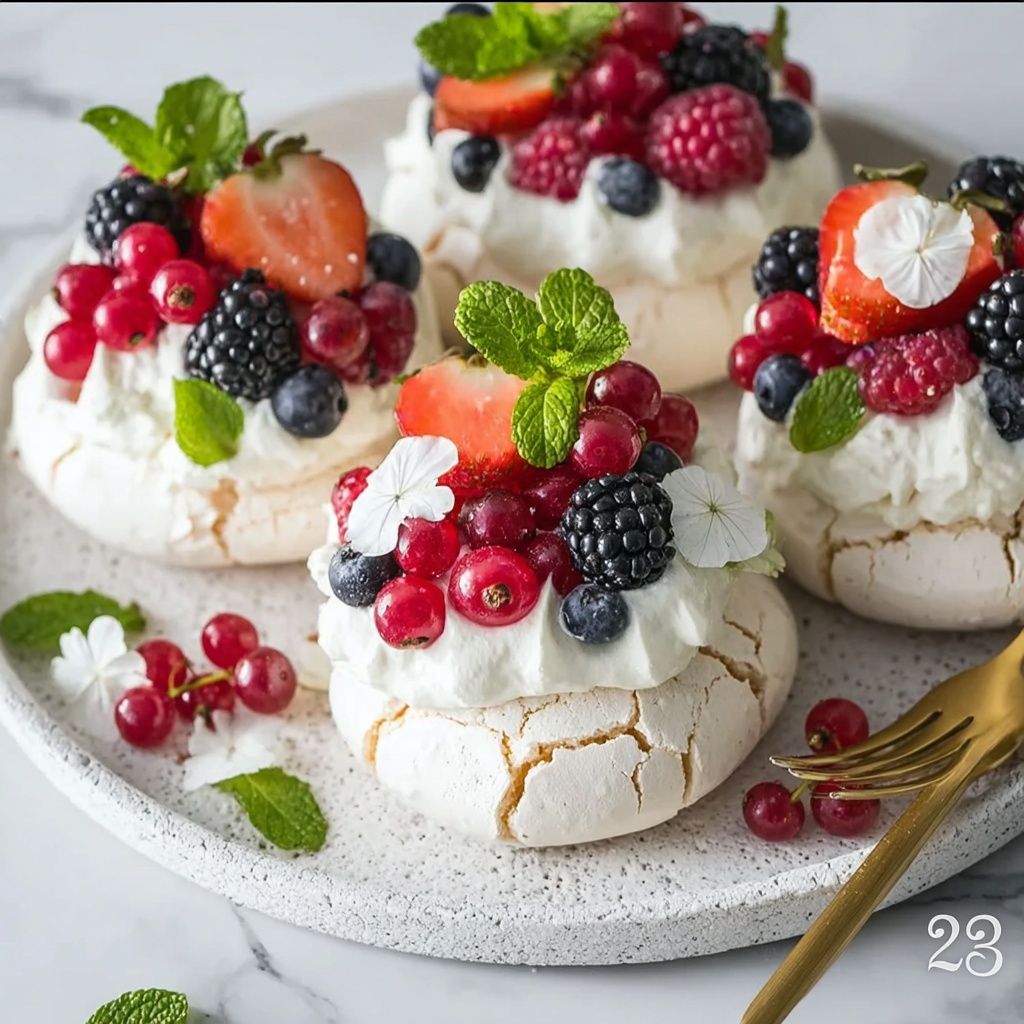
If you have a sweet tooth but crave something light, fluffy, and absolutely delightful, you are going to adore this Vegan Magic Mini Pavlovas That Are Light and Irresistible Recipe. These little clouds of joy are crisp on the outside yet tender inside, all without a single egg. The magic lies in the humble chickpea brine, transforming simple pantry staples into a dessert that feels utterly special and indulgent. Ready to make your dessert dreams come true? Let’s dive in.
Ingredients You’ll Need
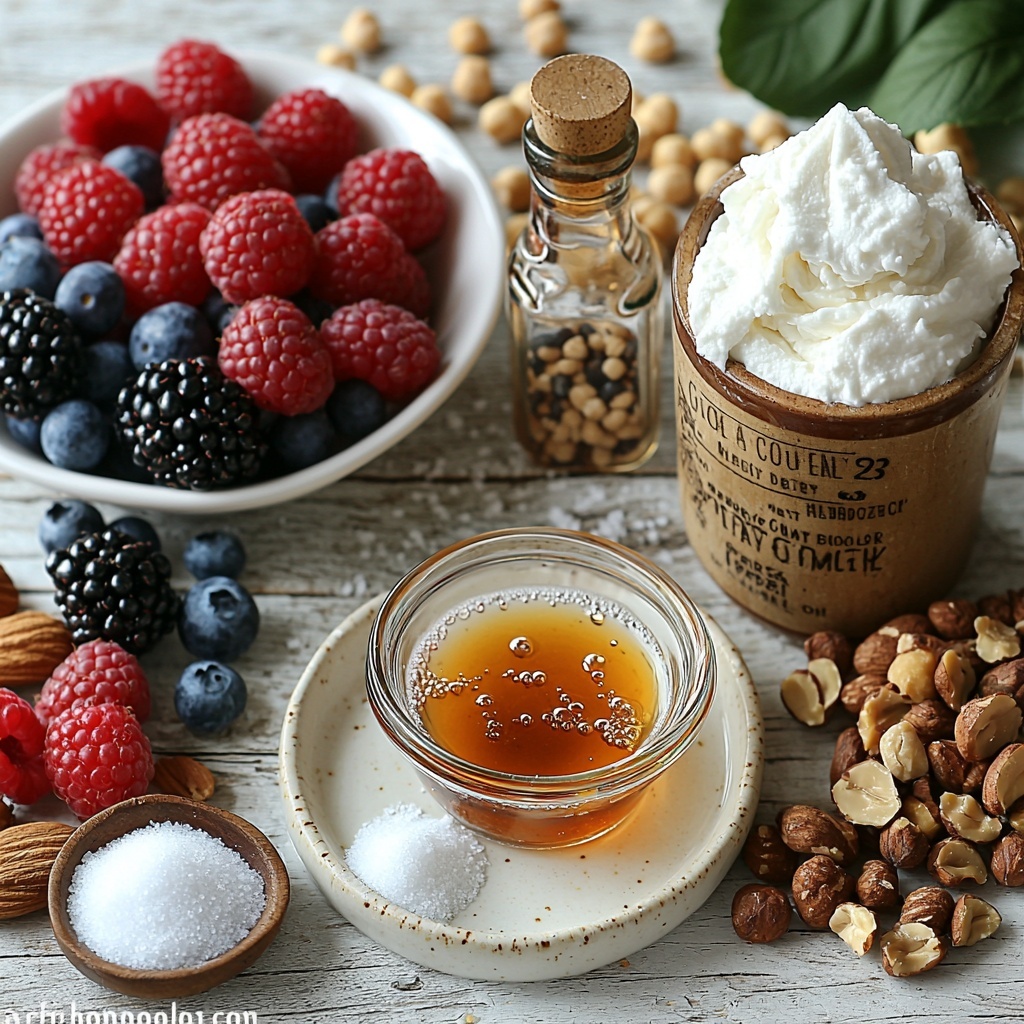
This Vegan Magic Mini Pavlovas That Are Light and Irresistible Recipe relies on straightforward ingredients, each playing a crucial role from structure to flavor. From the chickpea brine that whips into meringue-like perfection to the fresh berries that add vibrant color and tang, every component is essential.
- 1/2 cup Chickpea Brine: The secret egg white substitute that whips into a fluffy meringue texture.
- 1/4 teaspoon Cream of Tartar: Helps stabilize the meringue for a perfectly crisp finish.
- 1 cup Sugar: Sweetens and stabilizes the meringue, creating a glossy, stiff mixture.
- 1 teaspoon Vanilla Extract: Adds a beautiful warm depth of flavor to the pavlovas.
- 1 cup Jam or Whipped Coconut Cream: Your choice for luscious fillings or toppings that complement the pavlova.
- 1 cup Berries or Chopped Nuts: Fresh garnishes that bring texture, color, and brightness.
- 1 can Full-Fat Coconut Milk: Chilled and whipped for a rich, dairy-free cream topping option.
How to Make Vegan Magic Mini Pavlovas That Are Light and Irresistible Recipe
Step 1: Preheat Your Oven
Start by setting your oven to a low 210°F (100°C). This gentle heat is essential because pavlovas need slow, even baking to achieve that signature crisp outside with a soft inside. Patience is key here—it’s almost like giving your mini pavlovas a spa day, letting them dry out perfectly for 90 minutes.
Step 2: Whip the Chickpea Brine Mixture
Pour the chickpea brine and cream of tartar into a clean mixing bowl. Using a hand mixer, whip these together until soft peaks form, about 2 to 3 minutes. The mixture will start to resemble the texture of whipped egg whites, which is just a glimpse of the magic ahead.
Step 3: Sweeten and Stabilize with Sugar
Gradually add the sugar while continuing to beat the mixture for 3 to 4 minutes until stiff peaks appear. This means when you lift the beaters, the mixture holds sharp peaks without collapsing. Then, stir in the vanilla extract, which will infuse your pavlovas with an irresistible aroma.
Step 4: Shape Your Mini Pavlovas
Using a spoon or piping bag, dollop or pipe your meringue onto a baking sheet lined with parchment paper. Each mini pavlova should be evenly sized to bake consistently and look incredibly inviting when finished.
Step 5: Bake Low and Slow
Place the tray in the preheated oven and bake for about 1 hour and 30 minutes. They should become dry to the touch and have a slight crispness on the outside. When you gently tap them, they should sound hollow—this means the magic transformation is complete.
Step 6: Cool and Add Toppings
Allow your mini pavlovas to cool completely on the baking sheet to keep their shape intact. Once cooled, fill or top them with your choice of jam or whipped coconut cream, finishing with a scattering of berries or chopped nuts for that perfect pop of flavor and texture.
How to Serve Vegan Magic Mini Pavlovas That Are Light and Irresistible Recipe
Garnishes
Think fresh and vibrant: ripe berries, toasted coconut flakes, or crunchy nuts add color and contrasting texture to your vegan pavlovas. These simple touches elevate the look and taste, making each bite even more enjoyable.
Side Dishes
Pair these mini pavlovas with a cup of herb-infused tea or a chilled glass of sparkling fruit juice. The light, airy texture of the pavlovas complements refreshing beverages perfectly, creating a balanced and elegant treat.
Creative Ways to Present
Try layering your Vegan Magic Mini Pavlovas That Are Light and Irresistible Recipe in small glass parfait cups with alternating layers of whipped coconut cream and fresh fruit for a fun twist. Or arrange a platter with a variety of jams and toppings for a DIY pavlova bar—everyone can craft their dream dessert!
Make Ahead and Storage
Storing Leftovers
Store your leftover mini pavlovas in an airtight container at room temperature for up to 3-4 days. This keeps their crisp shells intact and the inside moist but not soggy. Just add fresh toppings right before serving to maintain their signature texture.
Freezing
Feel free to freeze any extra pavlova shells before adding toppings. Place them in a single layer in a freezer-safe container with parchment between layers to prevent sticking. They freeze beautifully for up to 1 month. Thaw at room temperature when ready to serve.
Reheating
Reheating is generally not recommended for pavlovas, as the crisp texture can be lost. Instead, enjoy them fresh or at room temperature for the lightest, most irresistible experience.
FAQs
Can I use something other than chickpea brine for the meringue?
Chickpea brine is unique for its ability to mimic egg whites’ whipping capabilities, so it’s highly recommended. Aquafaba from other beans is sometimes used, but chickpea brine tends to produce the most reliable results for this recipe.
Do I have to chill the coconut milk before whipping?
Yes, chilling full-fat coconut milk helps the cream solidify and separate from the liquid, making it perfect for whipping into a creamy, fluffy topping that complements your pavlovas beautifully.
Why is cream of tartar needed?
Cream of tartar stabilizes the whipped chickpea brine, helping it hold peaks and increasing the pavlova’s durability during baking. Without it, the mixture may deflate or not crisp properly.
Can I make these pavlovas gluten-free?
Absolutely! This entire Vegan Magic Mini Pavlovas That Are Light and Irresistible Recipe is naturally gluten-free as it contains no flour or gluten-containing ingredients.
What’s the best way to serve these at a party?
Serve them on a pretty platter or as individual desserts with a variety of toppings on the side, like fresh fruit, nut butters, and different jams, so guests can customize their pavlovas to their taste preferences.
Final Thoughts
Making these Vegan Magic Mini Pavlovas That Are Light and Irresistible Recipe is like unlocking a little dessert secret—simple ingredients transformed into something extraordinary. Once you try them, they’ll no doubt become a beloved addition to your dessert repertoire, perfect for sharing with friends or savoring anytime you want a light, sweet treat. Go ahead, whip up a batch and watch the smiles appear!
Print
Vegan Magic Mini Pavlovas That Are Light and Irresistible Recipe
- Prep Time: 15 minutes
- Cook Time: 1 hour 30 minutes
- Total Time: 2 hours 15 minutes
- Yield: 12 servings
- Category: Dessert
- Method: Baking
- Cuisine: Vegan
- Diet: Vegan
Description
This recipe for Vegan Magic Mini Pavlovas uses chickpea brine as an egg white substitute to create light, airy meringues that are naturally vegan and gluten-free. These mini pavlovas are baked low and slow to achieve a crisp exterior with a soft center, then topped with optional jam, whipped coconut cream, and fresh berries or nuts for a delightful, plant-based dessert that’s both beautiful and delicious.
Ingredients
Meringue:
- 1/2 cup Chickpea Brine (Aquafaba, egg white substitute)
- 1/4 teaspoon Cream of Tartar (to stabilize the meringue)
- 1 cup Sugar (granulated, sweetener for the meringue)
- 1 teaspoon Vanilla Extract (for flavor enhancement)
Optional Toppings:
- 1 cup Jam (any flavor, for filling)
- 1 can Full-Fat Coconut Milk (chilled, for whipping the cream)
- 1 cup Berries or Chopped Nuts (for garnish)
Instructions
- Preheat Oven: Set your oven to 210°F (100°C) to prepare for low-temperature baking, which is crucial for drying out the meringues without browning.
- Prepare Meringue Base: In a clean mixing bowl, combine 1/2 cup of chickpea brine with 1/4 teaspoon of cream of tartar. Use a hand mixer to beat the mixture on medium speed until soft peaks form, about 2 to 3 minutes. This creates the initial foam structure.
- Add Sugar Gradually: While continuing to beat, slowly incorporate 1 cup of sugar over 3 to 4 minutes until the meringue reaches stiff, glossy peaks. Then, mix in 1 teaspoon of vanilla extract for added flavor.
- Shape Meringues: Spoon or pipe the meringue mixture onto a baking sheet lined with parchment paper, shaping into small rounds to form the mini pavlovas.
- Bake: Place the baking sheet in the oven and bake for approximately 1 hour and 30 minutes. This low and slow baking dries out the meringues, giving them a crisp exterior and a slightly soft center.
- Cool: Allow the pavlovas to cool completely on the baking sheet; this prevents cracking and helps them set properly.
- Prepare Toppings: If using whipped coconut cream, chill a can of full-fat coconut milk overnight, scoop the solidified cream part, and whip it until fluffy.
- Assemble: Fill the cooled pavlovas with your choice of jam or whipped coconut cream, then garnish with fresh berries or chopped nuts for texture and flavor contrast.
Notes
- Ensure the mixing bowl and beaters are completely clean and dry to achieve maximum volume when whipping the chickpea brine.
- Using cream of tartar stabilizes the meringue, helping it hold its shape during baking.
- Low oven temperature is key to drying the meringues without browning them.
- Chilling coconut milk overnight makes it easier to separate and whip the cream.
- Store the assembled pavlovas in the refrigerator and consume within 24 hours for best texture.
- Variations can include different fruit jams or nut types depending on preference.
